Configure SSO with Azure
In Deepser you can set up SSO using Azure as the default provider. This article explains how to configure Deepser and Azure to allow SSO login and user provisioning via an Azure account. The process includes three steps: creating an OAuth client in Deepser, configuring Azure, and completing the OAuth client configuration in Deepser. SSO login requires HTTPS.
Deepser OAuth Client Creation
To configure a new SSO integration, follow these steps:
-
Go to System > Tools > OAuth > Client.
-
Click on the Add Client button:

- Assign a name to the client and set the following fields:
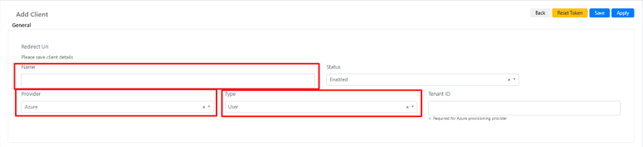
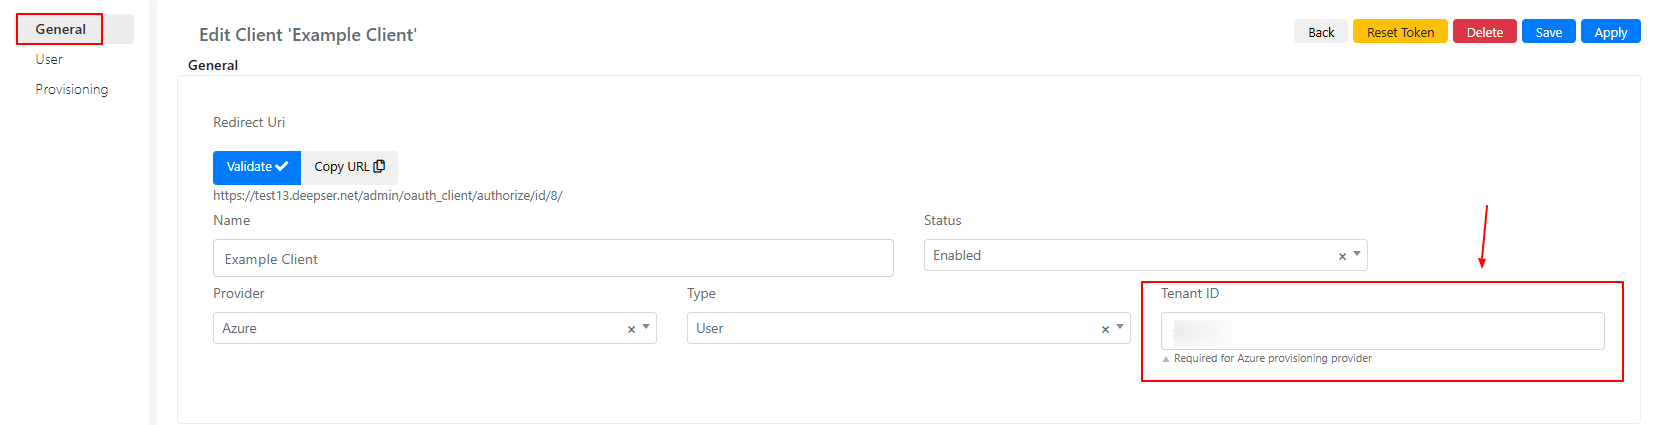
Name is the name of the OAuth client. Provider should be set to Azure and Type as User. The Tenant ID will be populated after you finish.
-
Click Apply or Save.
-
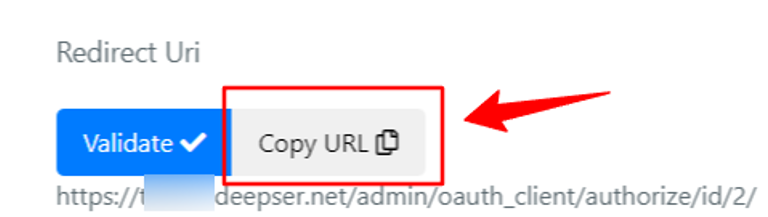
After saving, copy the Redirect URI from the following field:
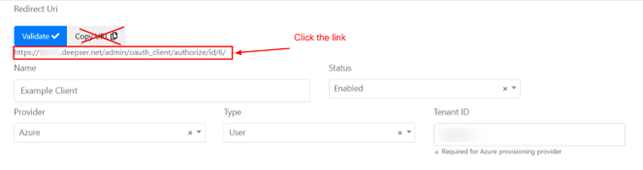
The "Redirect URI" is needed to configure the provider-side SSO (Azure in this case). The next steps are Azure configuration followed by completing the configuration in Deepser.
Azure Configuration
In this step you manage the configuration on the provider side (Azure).
Log in as an administrator to the Azure portal: https://portal.azure.com/.
Perform all configurations in incognito mode or in a browser without any active logins to Azure/Outlook 365 to avoid user conflicts during the configuration.
App Registration
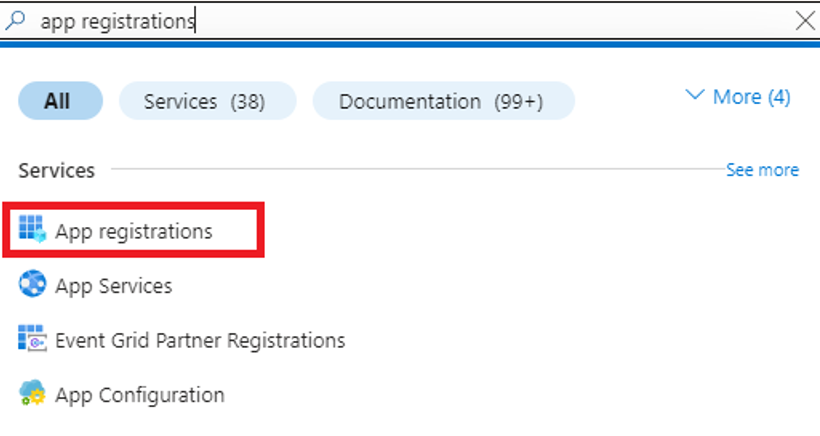
- Search for "App registrations" and open it:
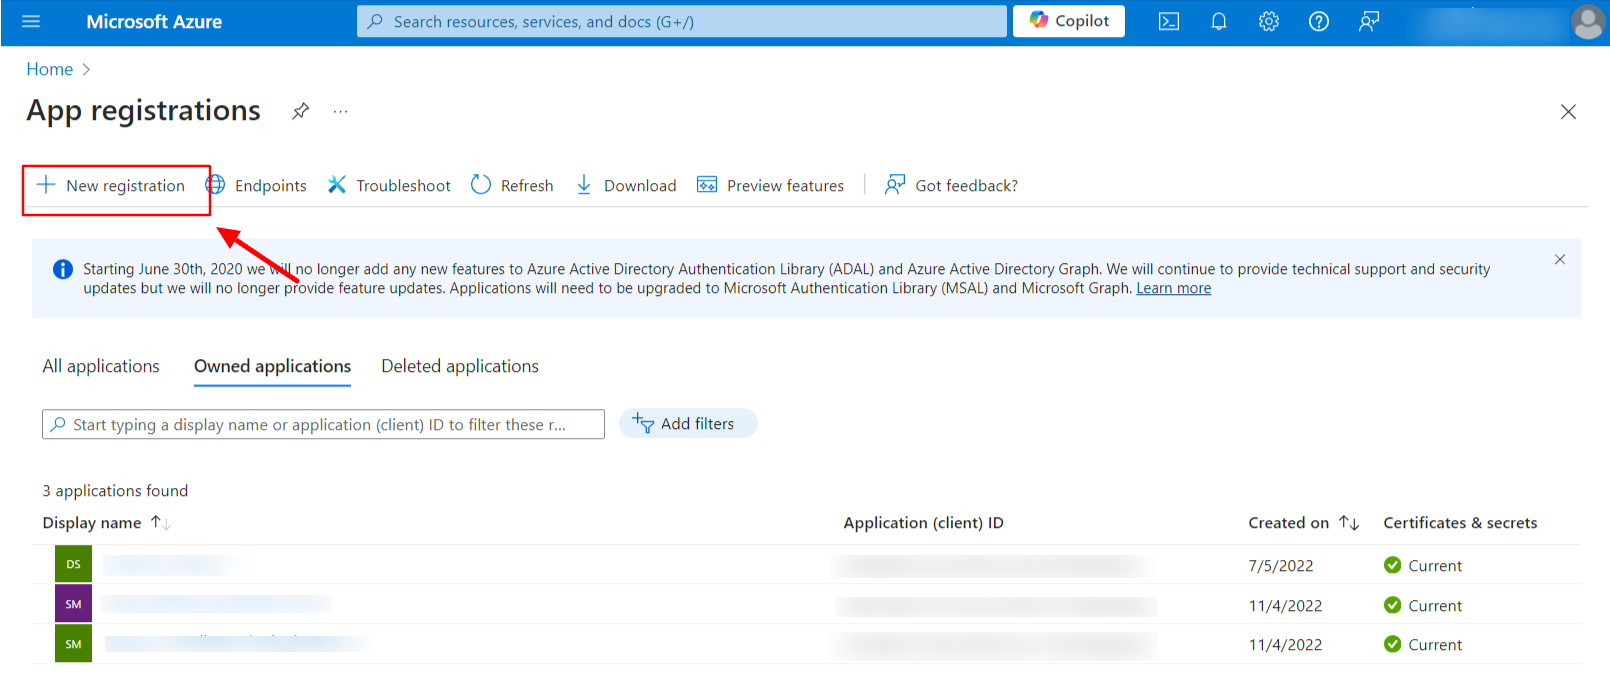
- Click on the New registration button:
- On the App Registration page, enter the following information:
- Name for the new app
- Supported Account as "Accounts in any organizational directory (Any Microsoft Entra ID tenant -- Multitenant) and personal Microsoft accounts (e.g. Skype, Xbox)"
- Redirect URI as "Web" type (previously generated and copied from the Deepser OAuth client, as described in the Deepser OAuth Client Creation section above)
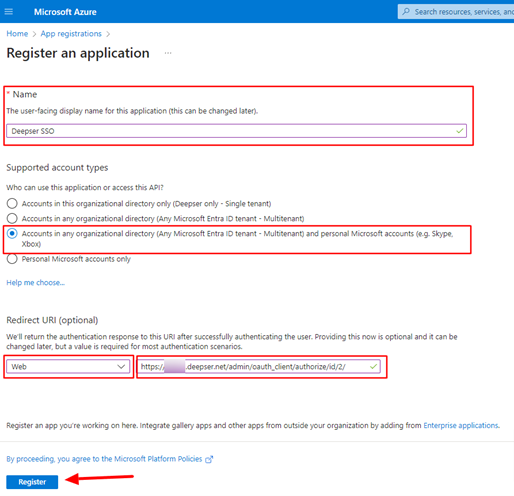
- Click Register to finish.
App Authentication
-
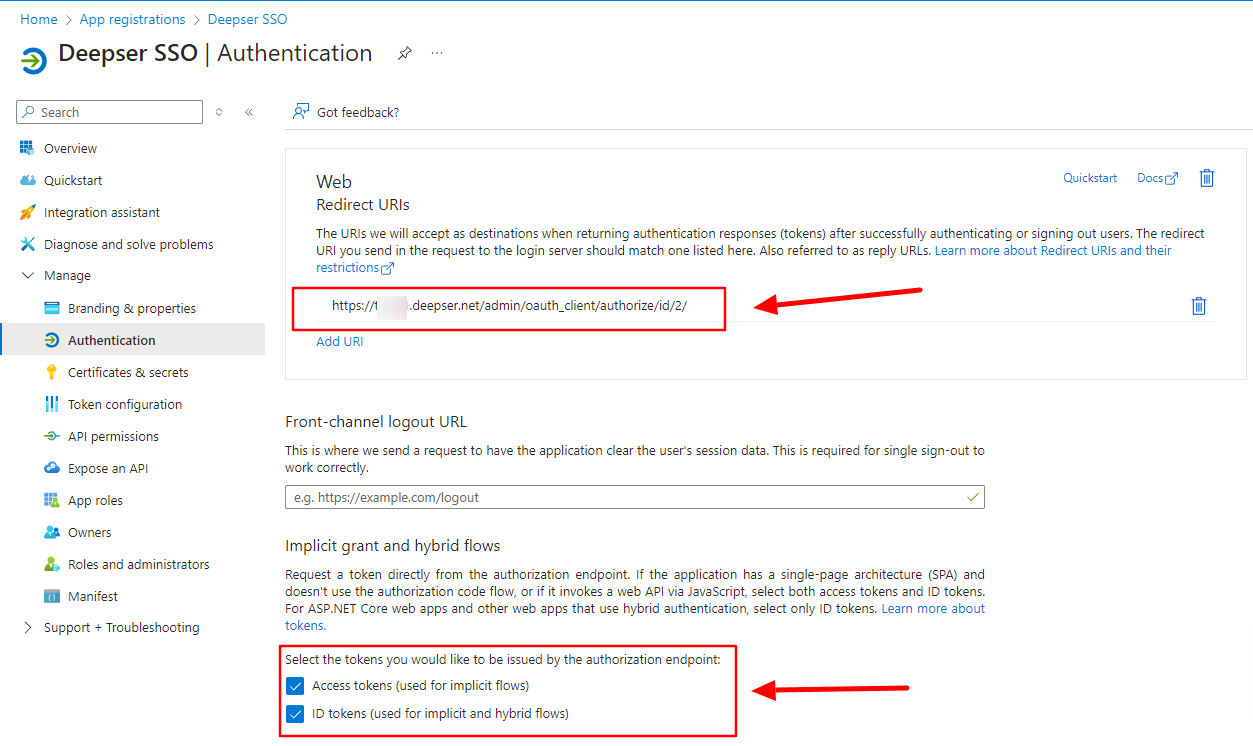
Access your newly registered application and navigate to Manage > Authentication from the menu.
-
Confirm that the correct Redirect URI is set under the "Web" section, and enable the following tokens:
- Access tokens (used for implicit flows)
- ID tokens (used for implicit and hybrid flows)
App Certificate and Secret
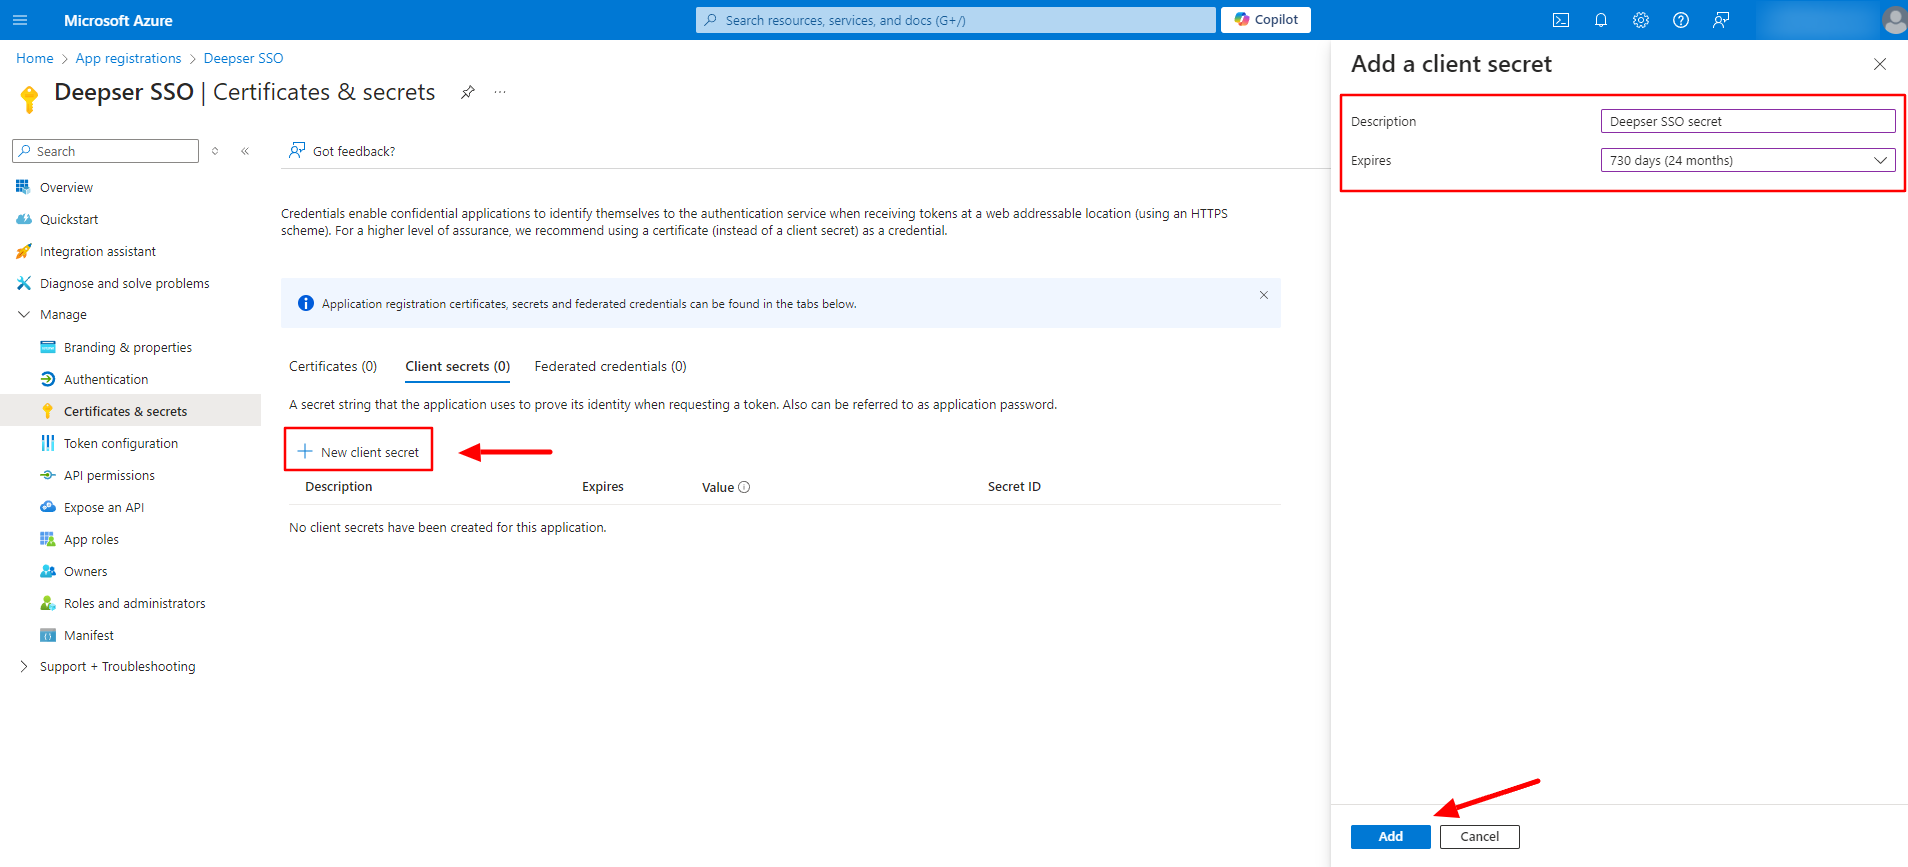
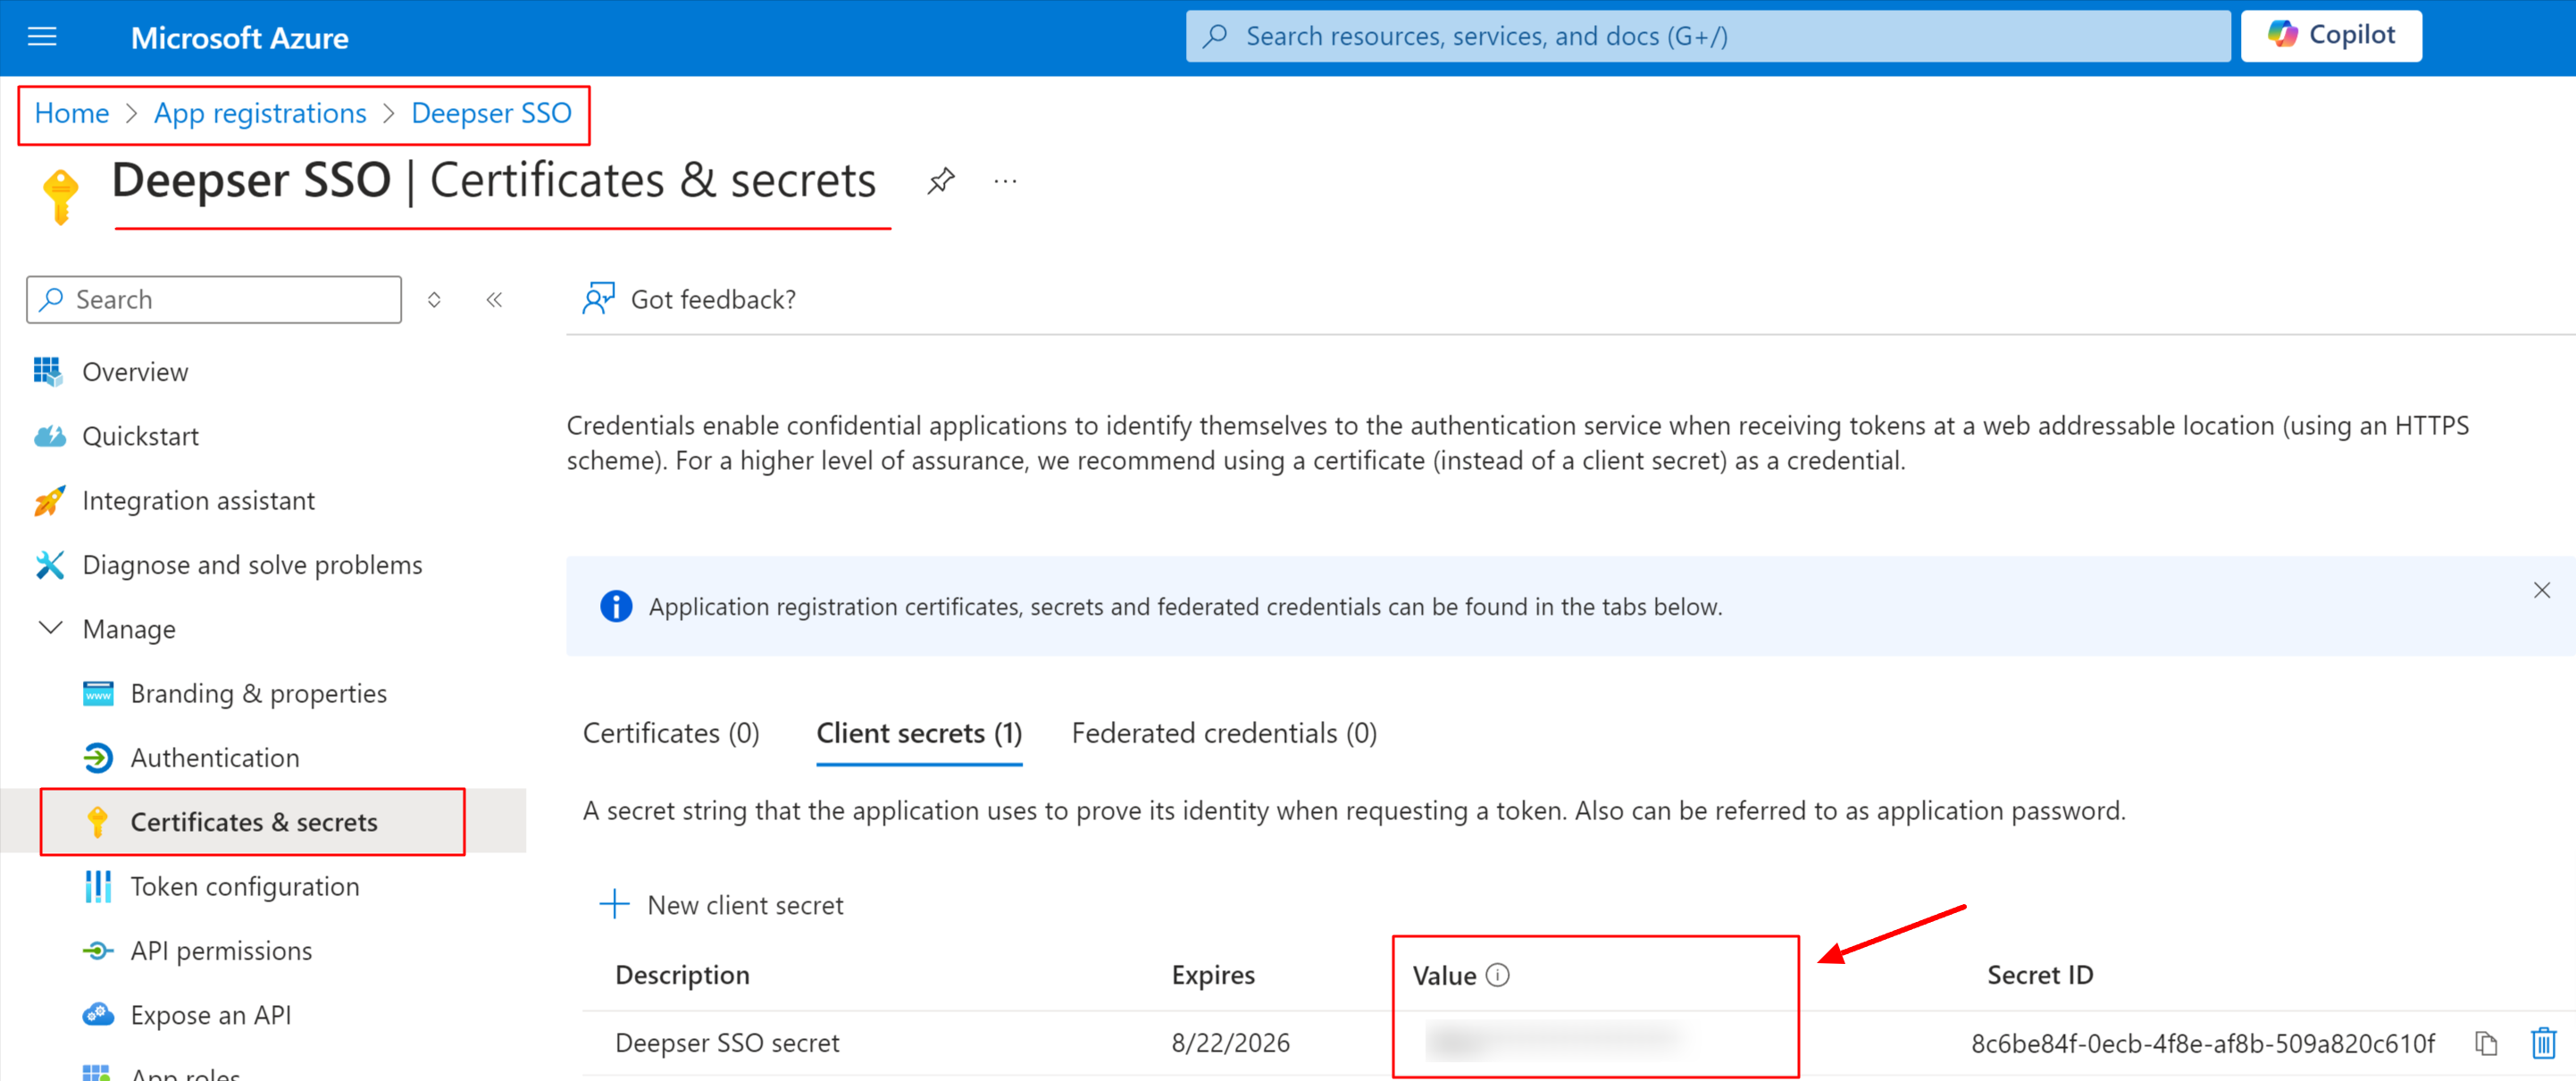
- Under Manage > Certificates & secrets, create a secret. Set its expiration time and copy its value for later use in Deepser.
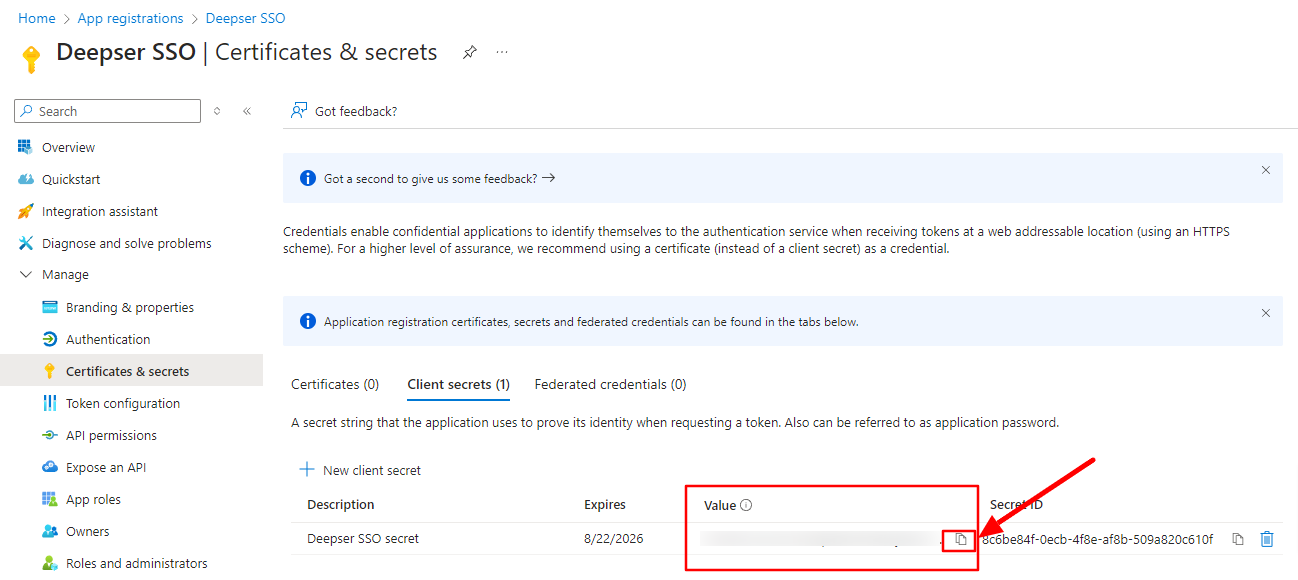
- Enter the copied secret value into the Client Secret field on the OAuth client record in Deepser:
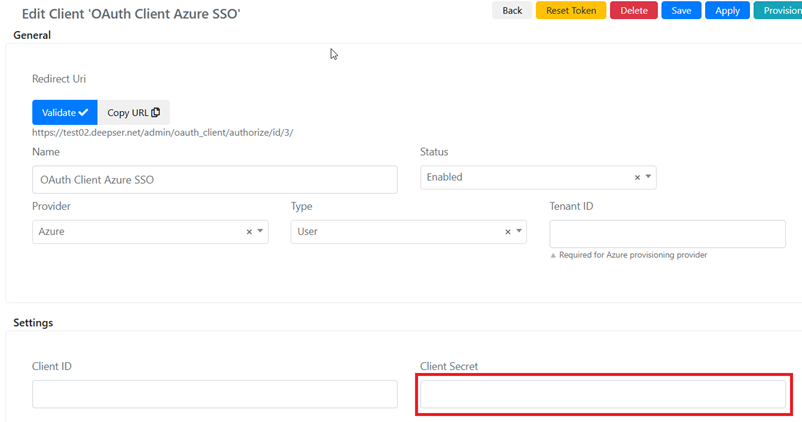
- Be sure to copy the value of the secret, not the Secret ID.
- You must copy the secret value during the creation phase, as you cannot access it later (you would need to recreate it).
- If you set an expiration for the secret, remember to renew it before the expiration date.
App Token Configuration
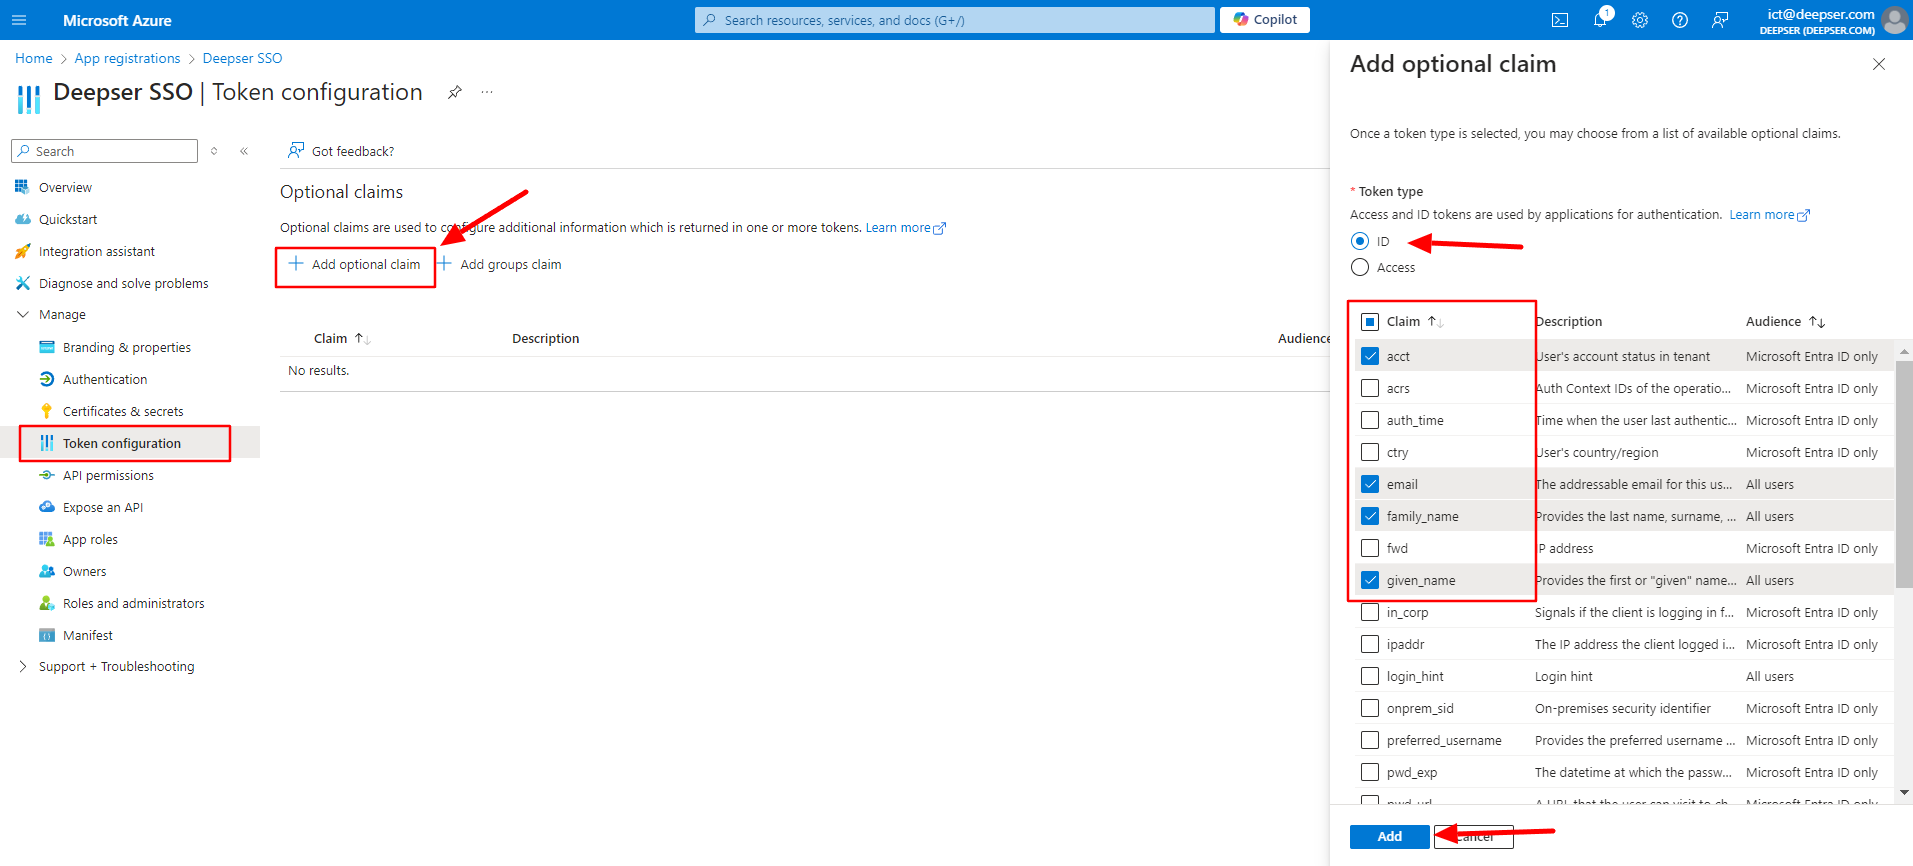
- Under Manage > Token configuration, set the following optional claim IDs by clicking on "Add optional claim":
- acct
- family_name
- given_name
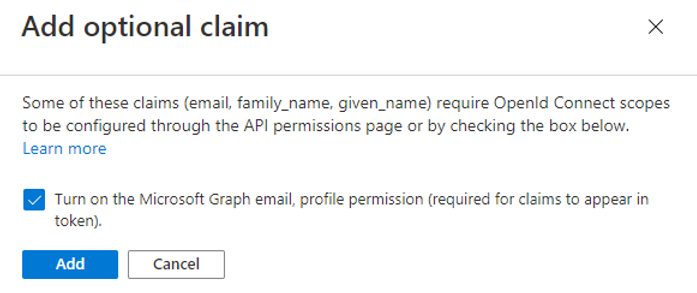
- When adding the claims, check the box for "Turn on the Microsoft Graph email, profile permission (required for claims to appear in the token)":
App API Permissions
- Under Manage > API permissions, add the following permissions for Microsoft Graph and then run the Grant admin consent action:
- email as Delegated permission
- offline_access as Delegated permission
- openid as Delegated permission
- profile as Delegated permission
- User.Read as Delegated permission
- If you need to provision users and groups in Deepser, also add:
- User.Read.All as Application permission
- Group.Read.All as Application permission
- Click Add a permission to open the permission selection prompt:
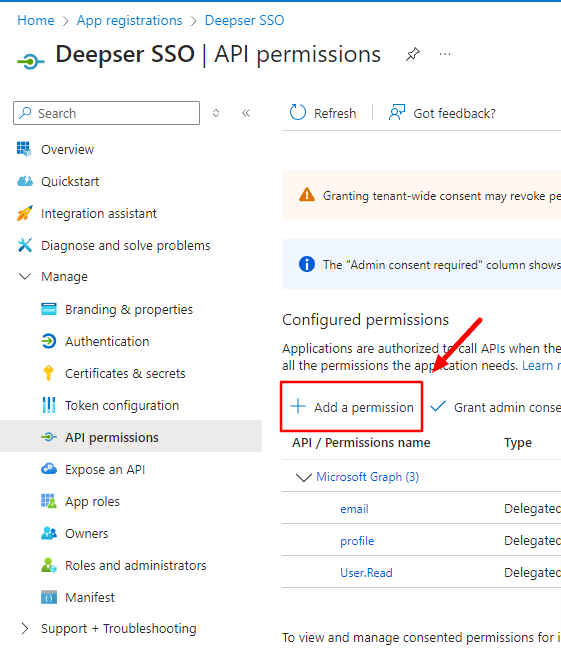
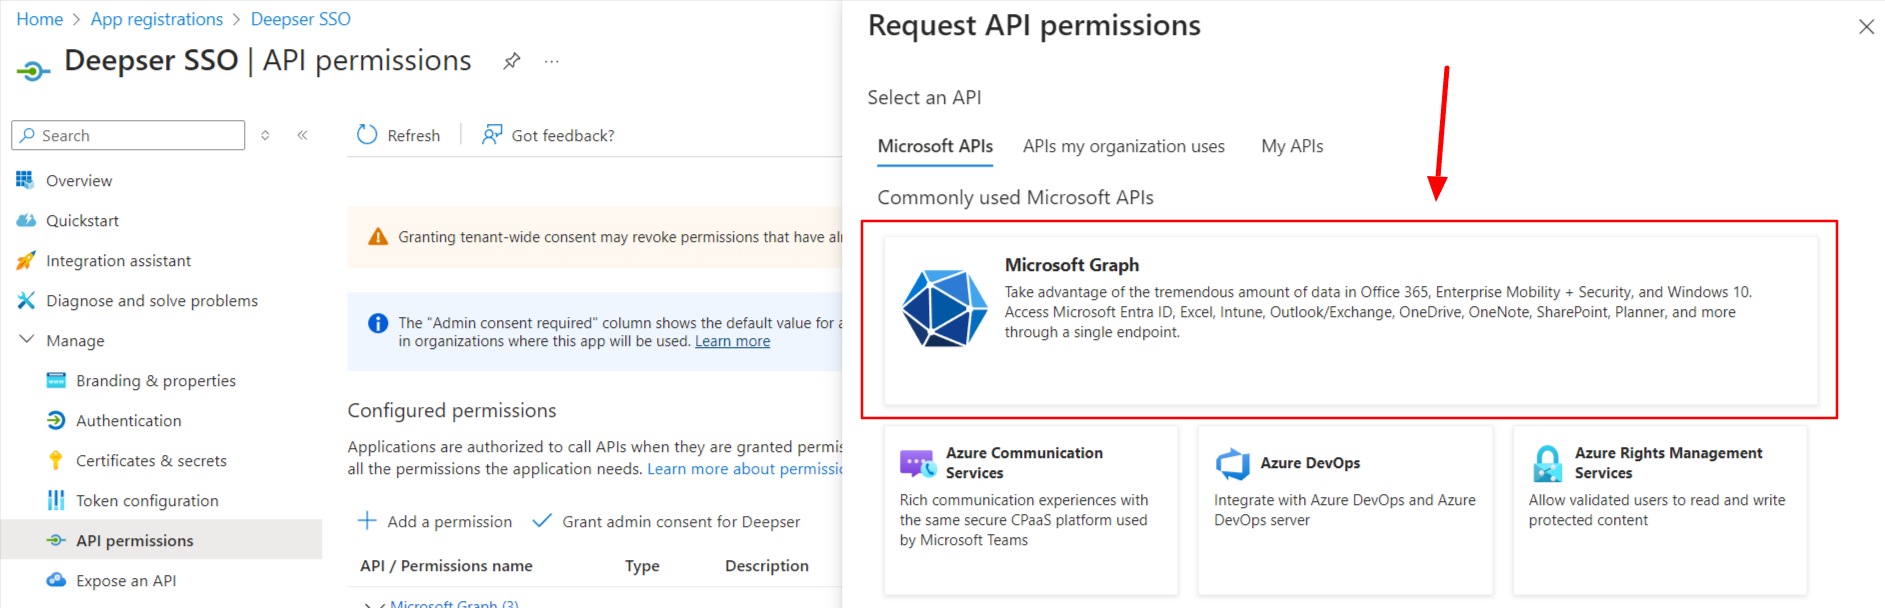
- Select Microsoft Graph as the API permission to use:
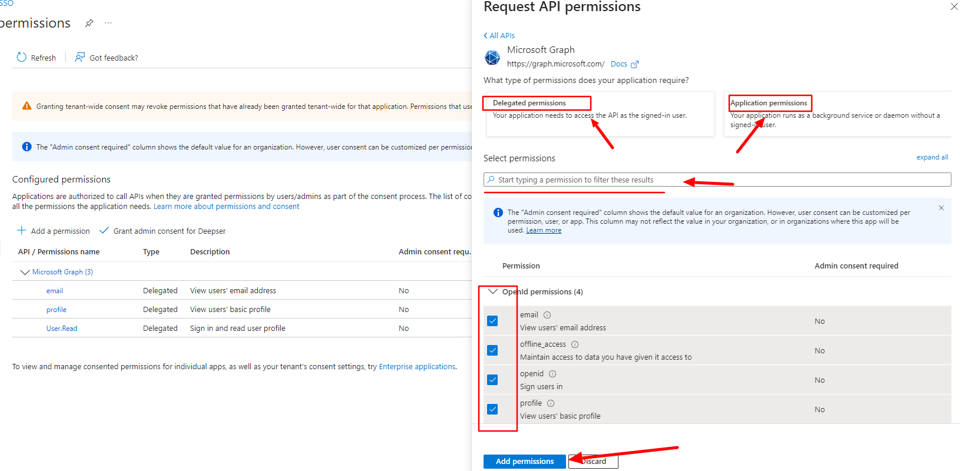
- From that screen, choose Delegated or Application permissions and use the search field to find the desired permission:
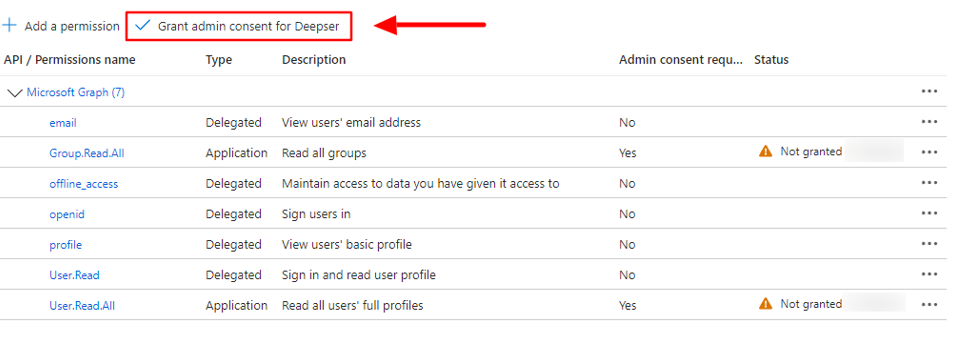
- After adding all desired permissions, run the Grant admin consent command:
Enterprise Application
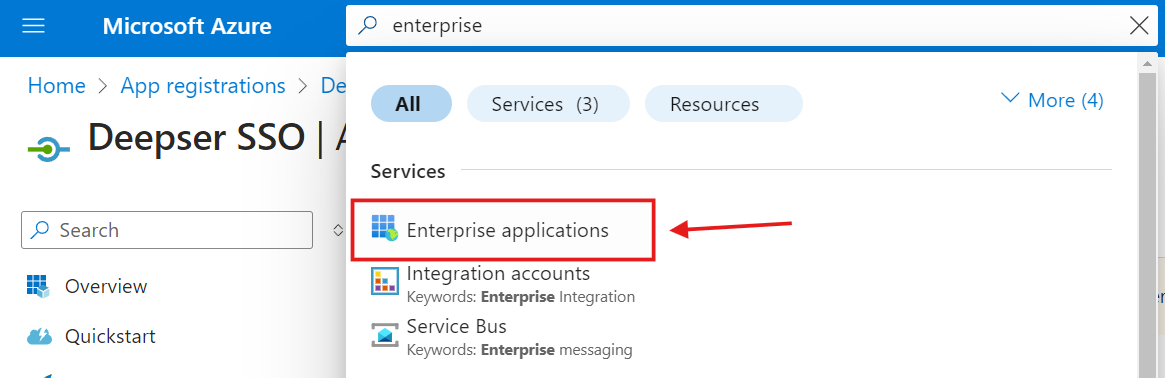
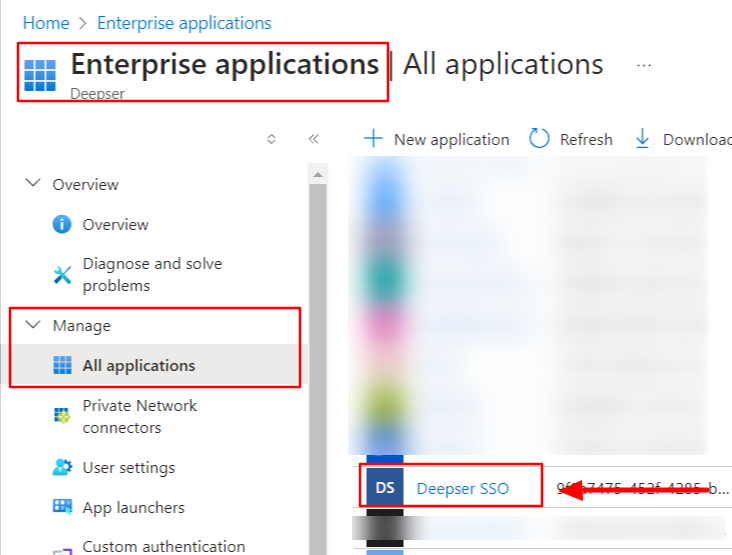
- Search for Enterprise Applications in the global search:
- Search for and access your newly registered application:
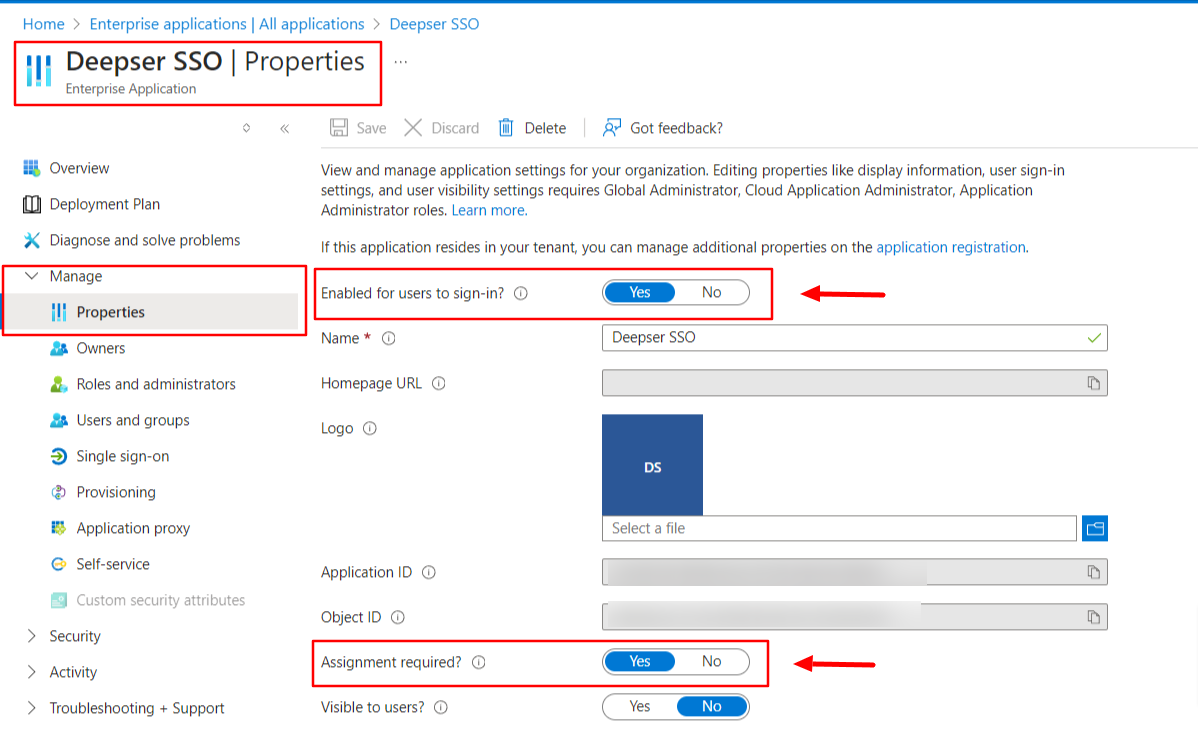
- Go to its properties and change the following configurations:
- Enable for users to sign-in to YES
- Assignment required to YES
Users and Groups
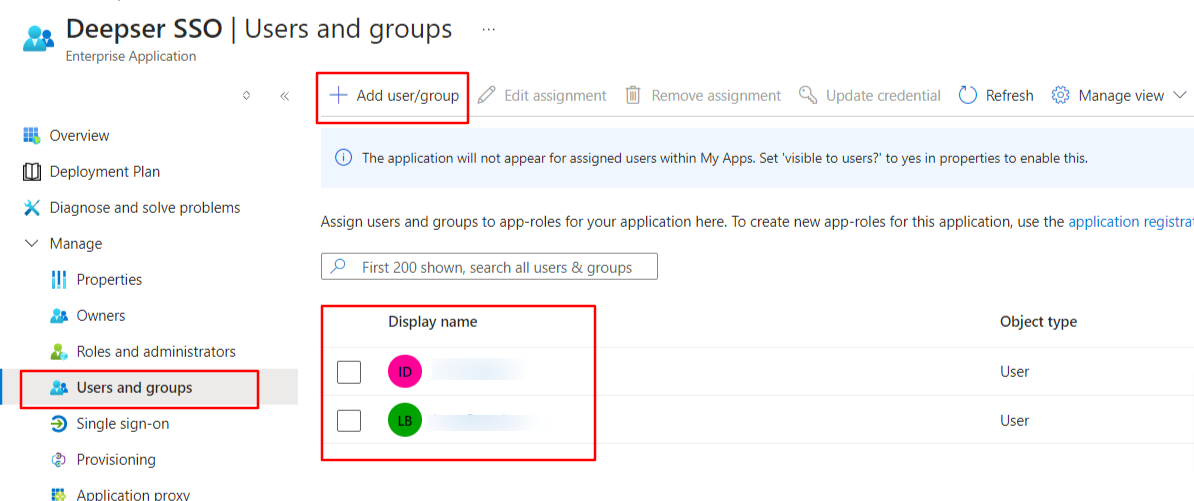
To enable provisioning for users and groups in Enterprise Application, add your desired users and groups:
Azure to Deepser Configuration
Before going back to the OAuth client in Deepser, note down all the Azure information to be used in the Deepser OAuth client configuration.
Secret Value
The Secret value will be entered in the Client Secret field in Deepser ("General" tab):
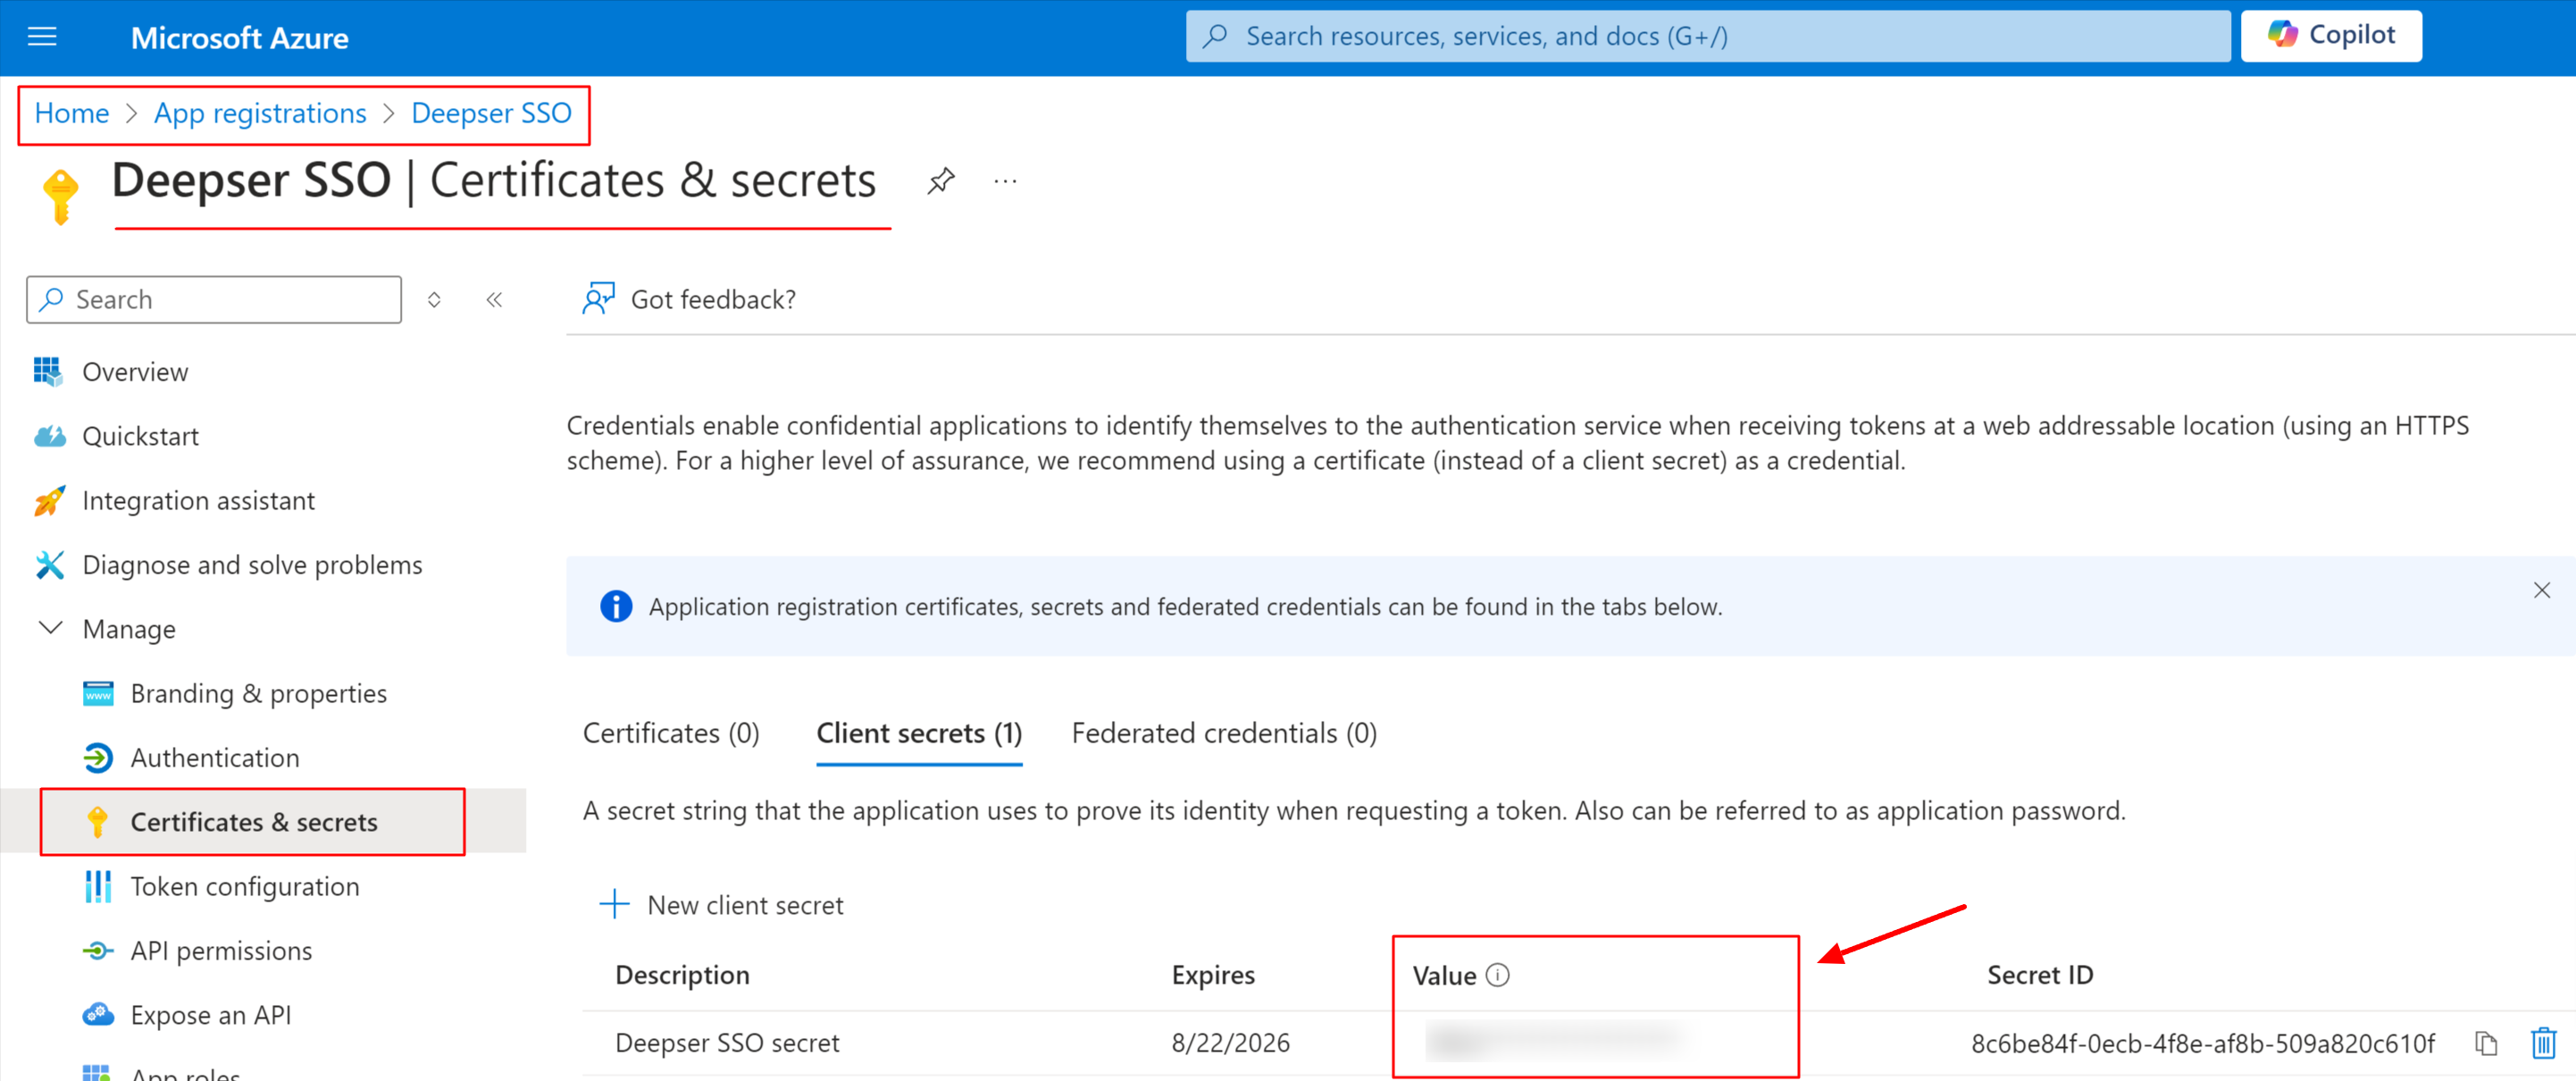
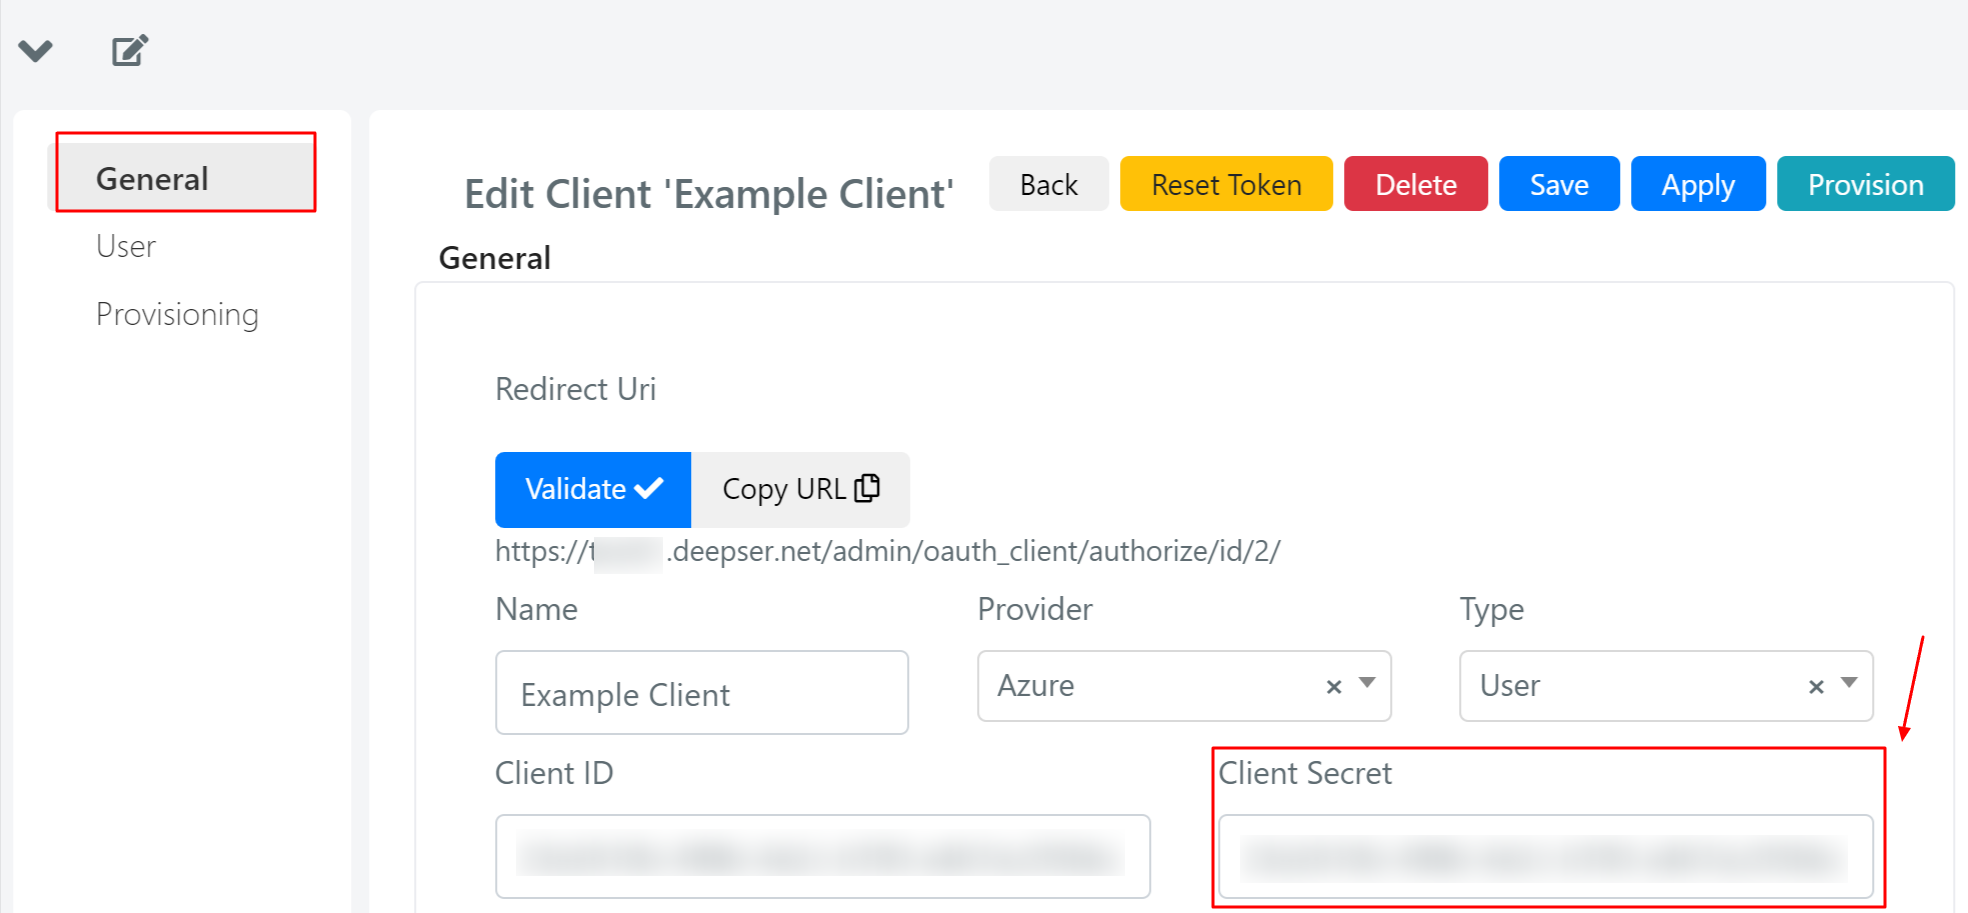
Remember to copy the value of the secret (not the Secret ID) during its creation phase, as you cannot access it later. See the warning in the App Certificate and Secret section above for details.
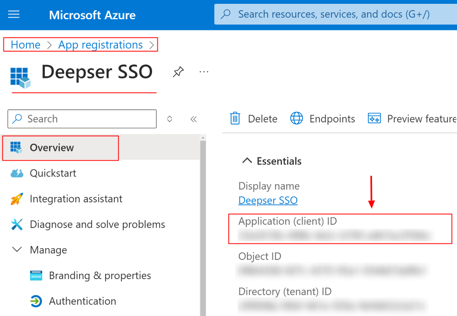
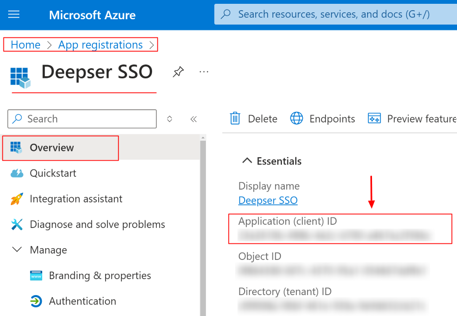
Application (Client) ID
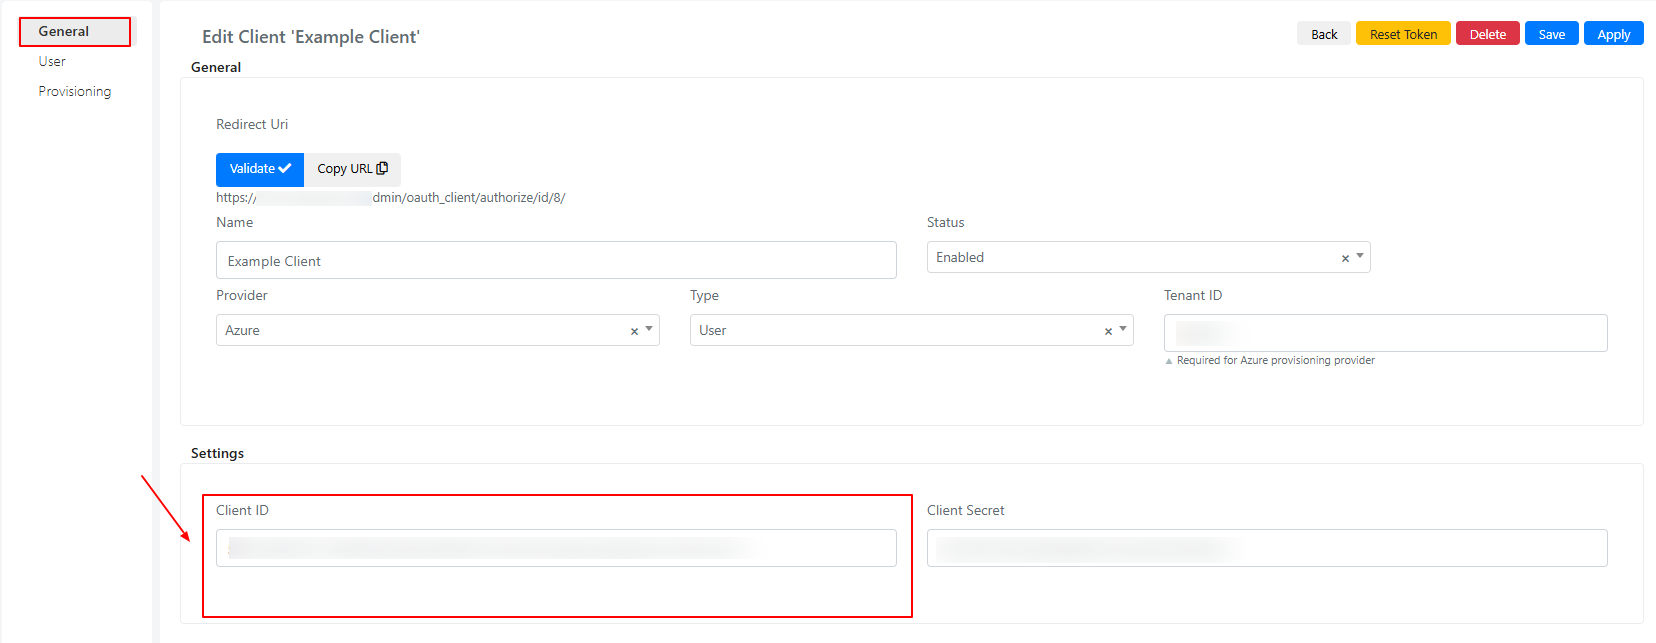
The Application (client) ID will be entered in the Client ID field in Deepser ("General" tab):
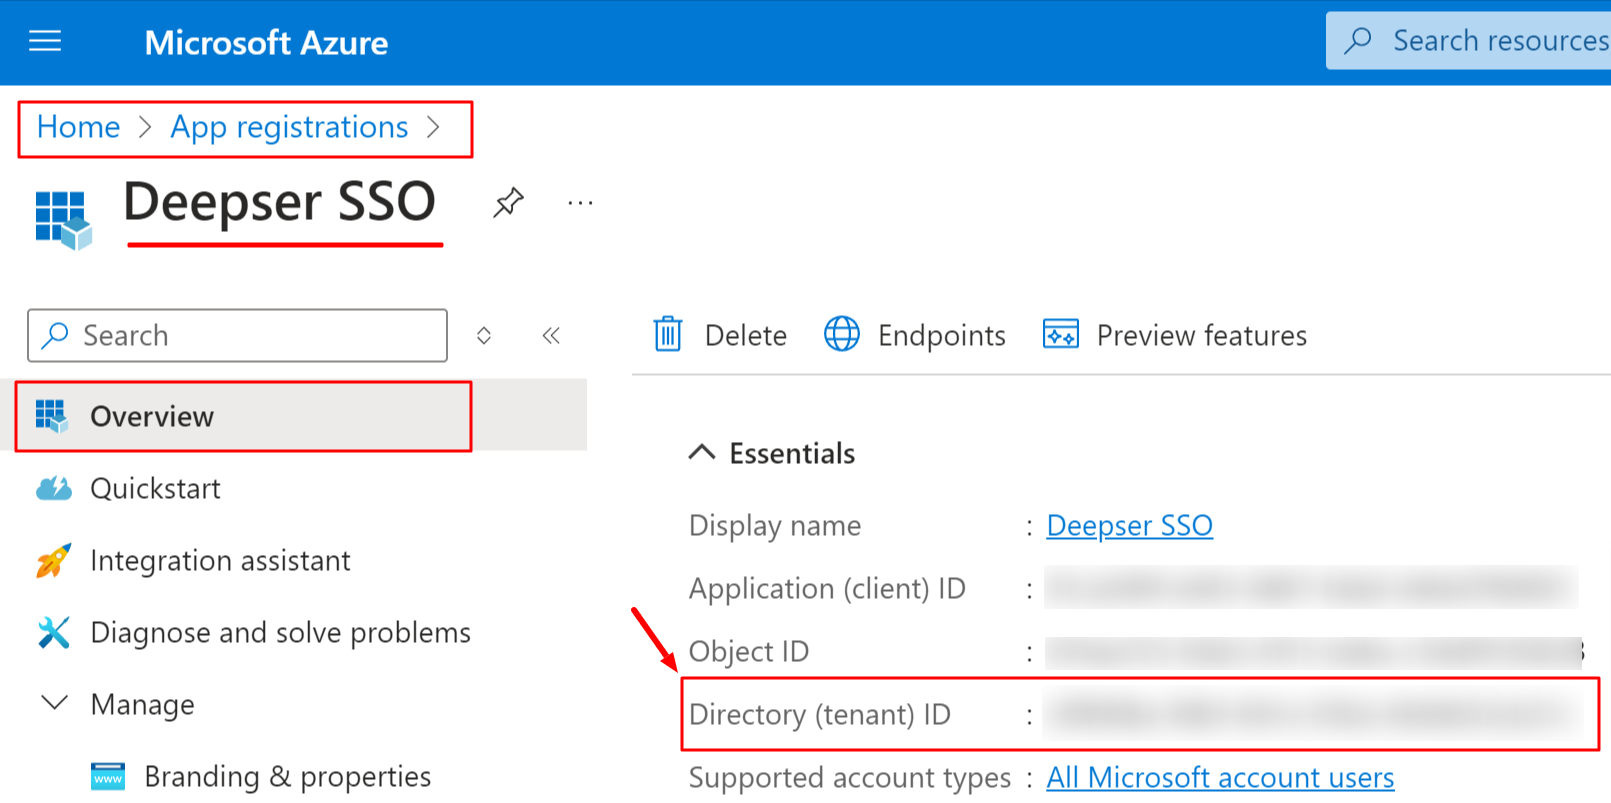
Directory (Tenant) ID
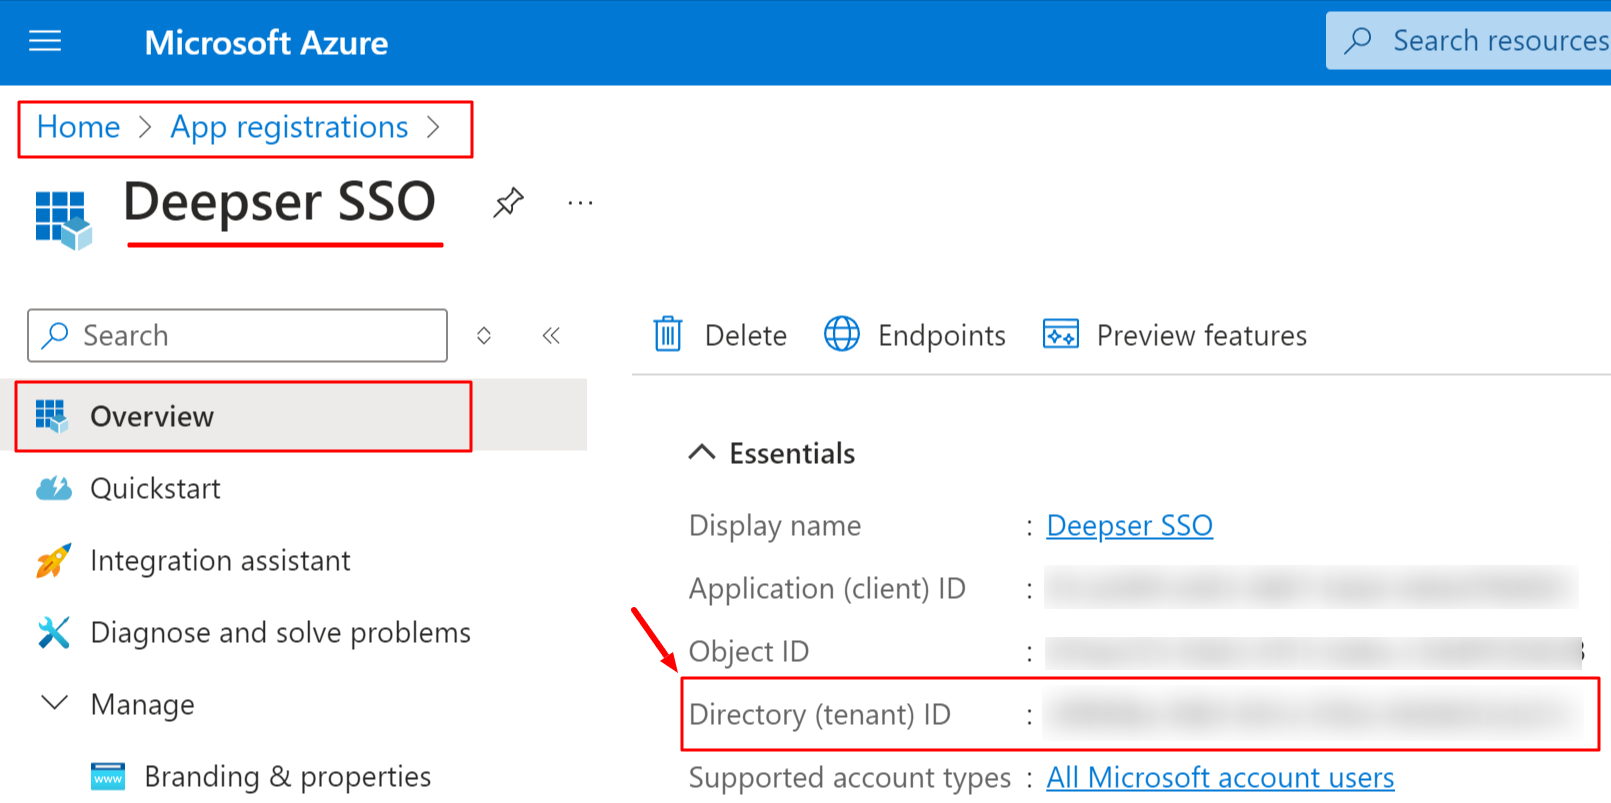
The Directory (tenant) ID will be entered in the Tenant ID field in Deepser ("Provisioning" tab):
Deepser OAuth Client Configuration Completion
You can now return to the Deepser OAuth client record to complete the configuration.
General Tab
If not already done, configure the "Provider" and "Type" fields as "Azure" and "User" respectively. Then set the Client ID and Client Secret:
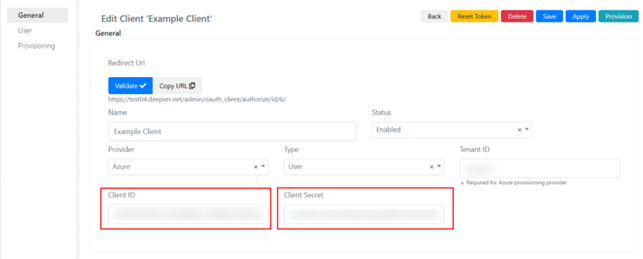
In the Client ID field, enter your Azure application ID, which you can find in the overview section of the app registration:
In the Client Secret field, enter the value you copied earlier when creating the secret:
Users Tab
In the "Users" tab, fill in the highlighted fields:
- Username Attribute: userPrincipalName
- Endpoint Users Data: https://graph.microsoft.com/v1.0/me
- Users Field: set as shown in the image below.
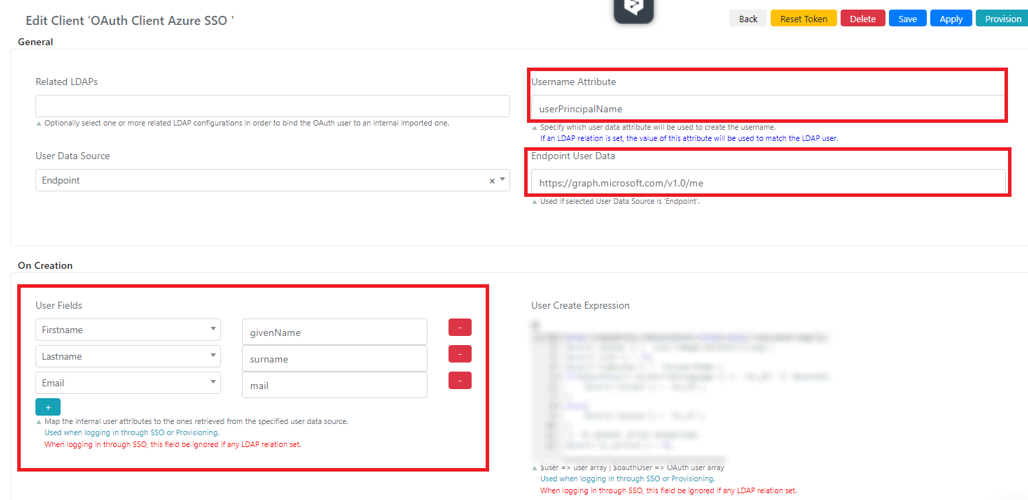
In this tab you can specify field mapping between Deepser and Azure. You can also populate other fields and perform processing in Deepser upon creating or updating a user via the User Create Expression and User Update Expression fields.
Provisioning Tab
If you want to enable user and group provisioning, go to the "Provisioning" tab. Fill in the fields highlighted in the figure:
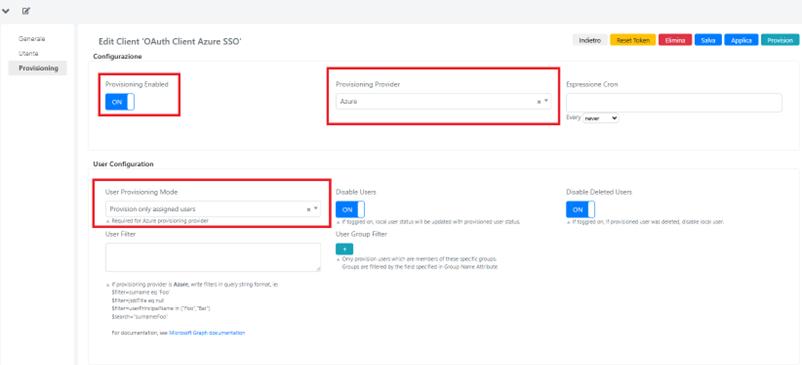
In the Tenant ID field, enter your Azure Directory (tenant) ID, which you can find in the overview section of the app registration:
Validate and Test
-
Return to the General tab and click the Validate button to check if the connection between Deepser and Azure works correctly. As noted earlier, perform validation in incognito mode or in a browser without active Azure/Outlook 365 logins.
-
You can copy the validation URL directly from the Redirect URI field:
- Click the Provision button to verify the configuration. The users and groups selected in the Azure app should now be correctly imported into Deepser.
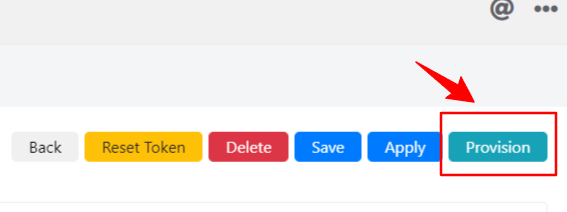
You can also configure a Cron Expression to automatically run provisioning at scheduled times.
Also refer to the SSO Deepser Configuration article for a better understanding of the fields in this form.