Configure a Chatbot
The Deepser chatbot lets you automate chat interactions using flow-based triggers and actions. This guide covers how to enable the chatbot, create a bot, configure available bot actions, and walks through a complete example flow.
Prerequisites
To trigger a chatbot flow, the User Portal must be enabled. You can enable it under System > Configuration.
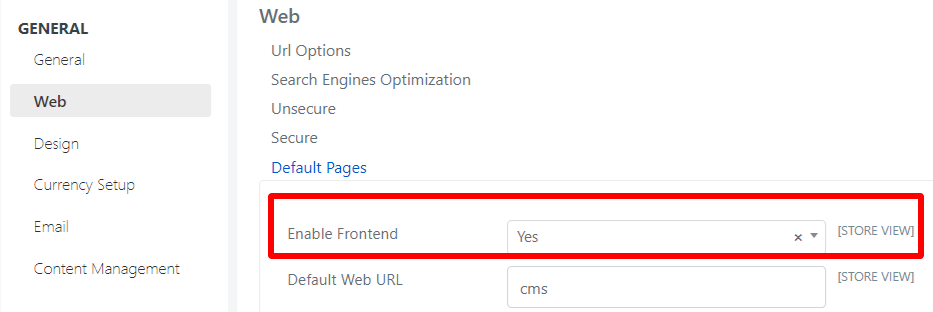
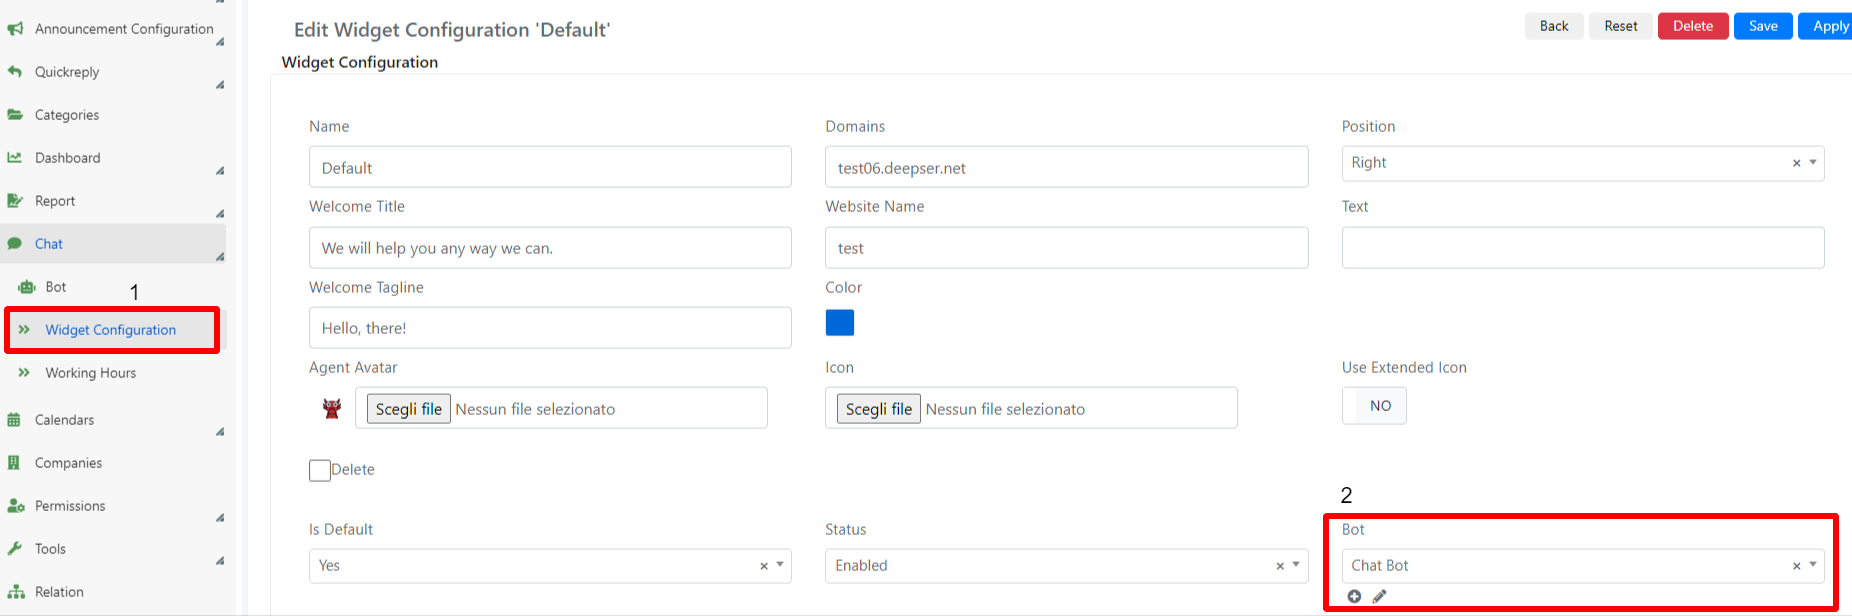
Next, enable the chat on the User Portal by navigating to System > Configuration > Chat > Configurations.
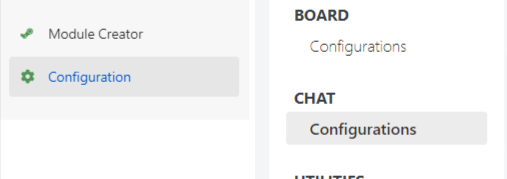
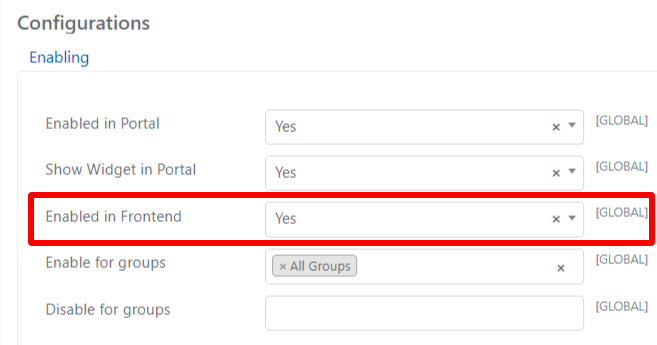
Under Configurations > Enabling, set "Enabled in Frontend" to Yes.
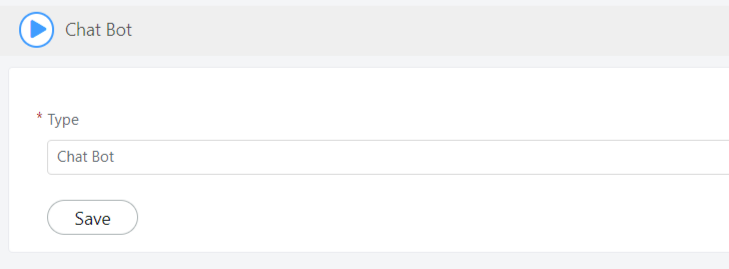
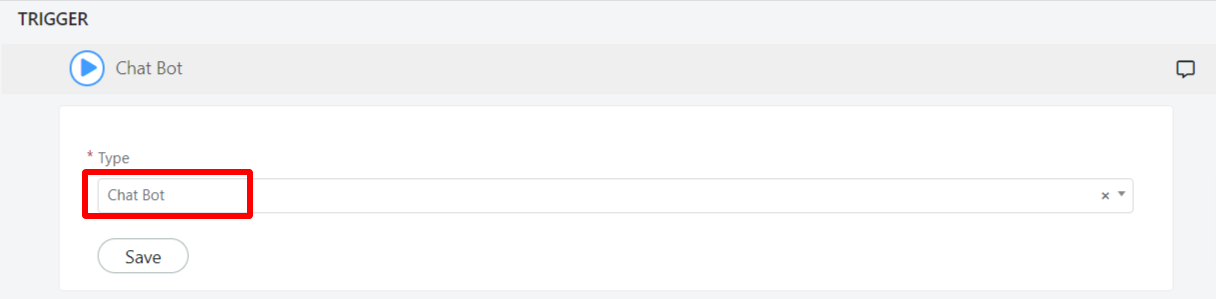
The chatbot in Deepser is powered by a flow with a trigger of type "Chatbot." This trigger executes every time a new chat is created in the User Portal.
Create a Bot
- Open System > Chat > Bot and click Add Bot.

- Configure your bot using the fields described below.

| Field | Description |
|---|---|
| Name | The name of the bot. |
| Flow Header | The flow to which the bot is connected. |
| Status | Enabled or Disabled. |
| Avatar | The image of the bot. |
- After creating the bot, open the chat template and add the "Bot" field to the form.
Chatbot Actions
Send Message
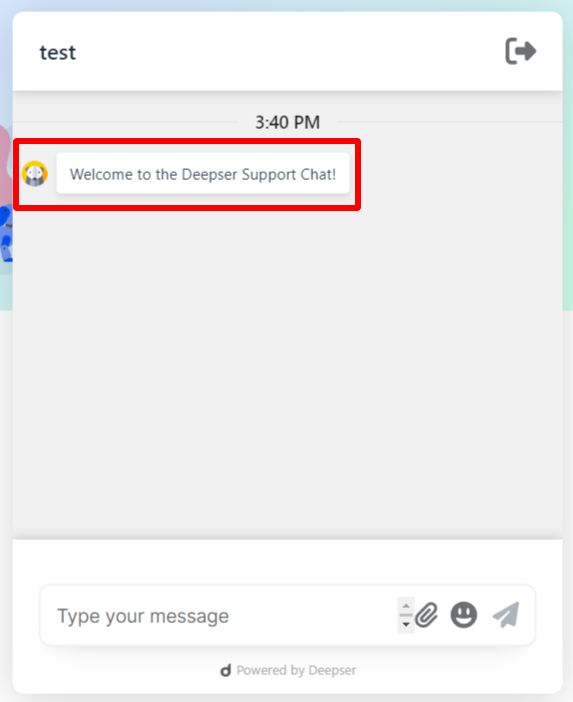
This action sends a text message directly on the created chat.
To configure this action:
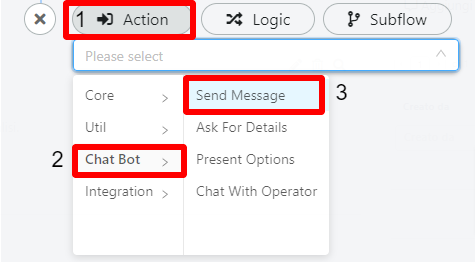
- Open Action > Chat Bot > Send Message by clicking "+".
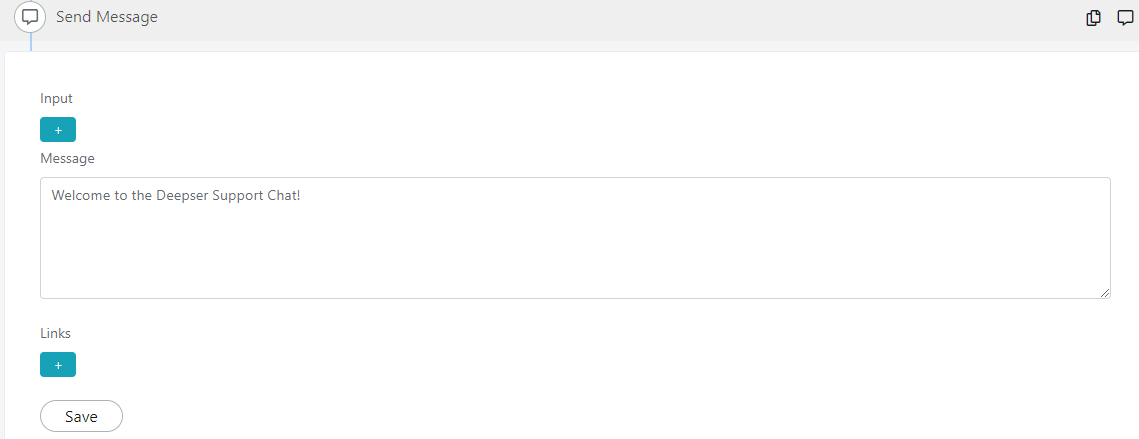
- Write your message in the "Message" field and click Save.
Ask for Details
This action sends a question that waits for a response from the user. The response can be of type String or Attachment and can be used as a variable later in the flow.
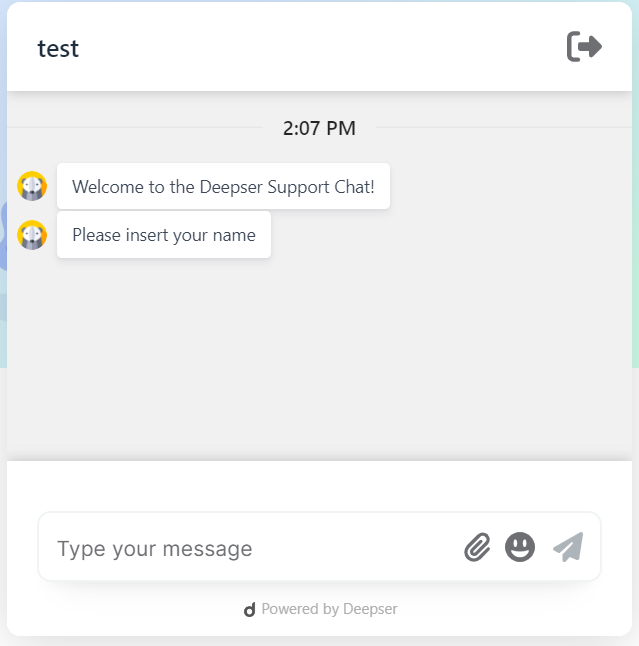
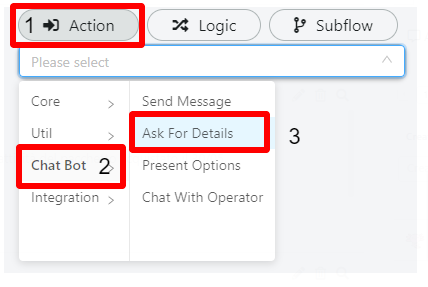
To configure this action:
- Open Action > Chat Bot > Ask For Details by clicking "+".
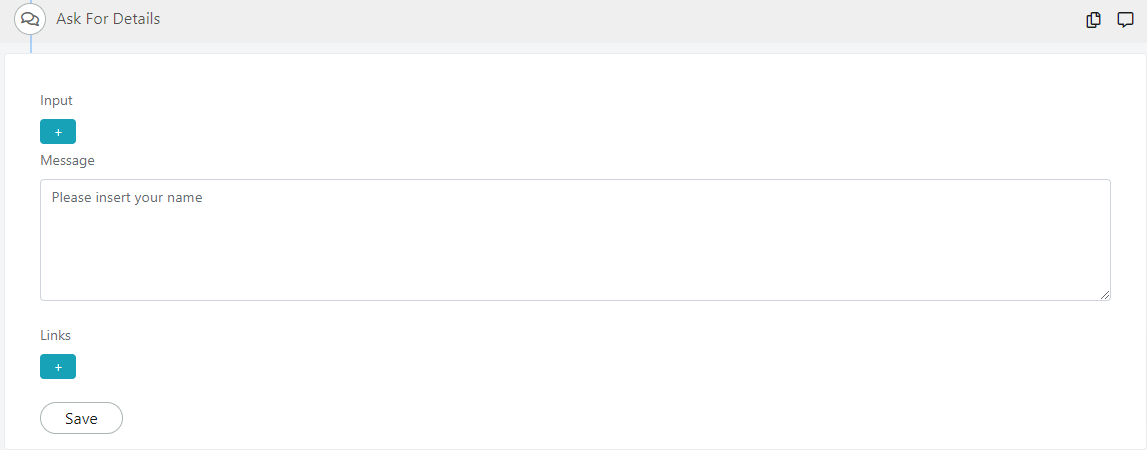
- Write your message in the "Message" field and click Save.
Present Options
This action displays a message with a selection field. The user can choose only one answer and cannot type a custom message or add an attachment. Each option is defined by a "value" field (used as a key) and a "label" field (visible to the user).
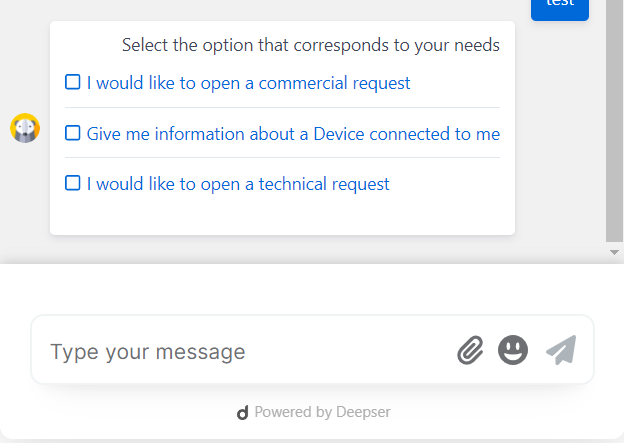
To configure this action:
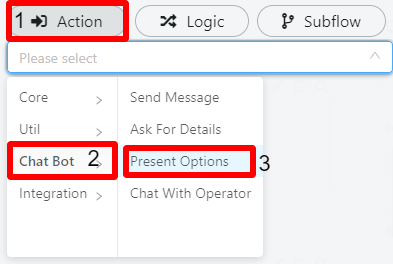
- Open Action > Chat Bot > Present Options by clicking "+".
- Write your message in the "Message" field, add your options in the "Options" field, and click Save.
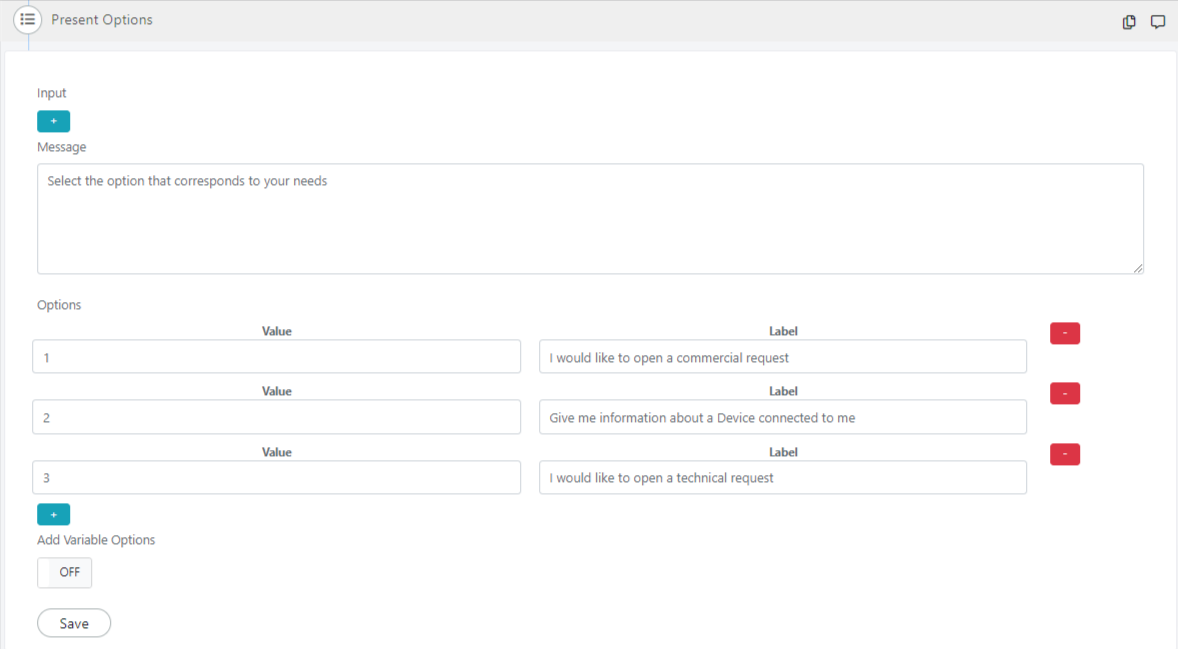
If you set the "Add Variable Options" field to "ON," you can add an array of options retrieved from earlier steps in the flow and stored in an output variable.
Chat with Operator
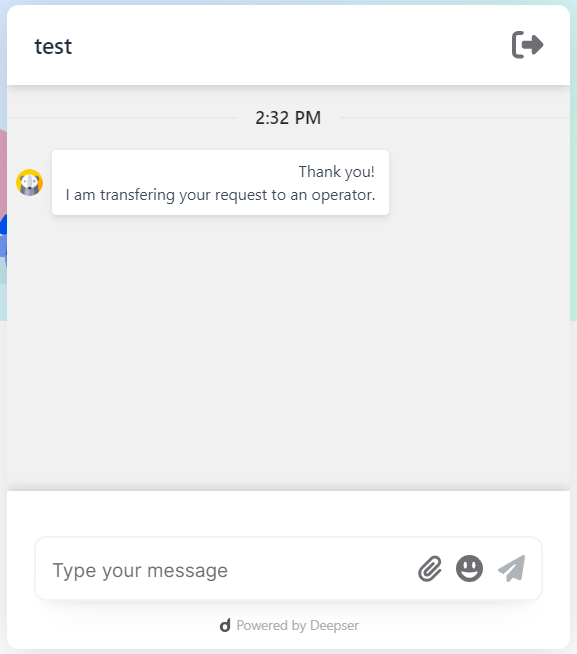
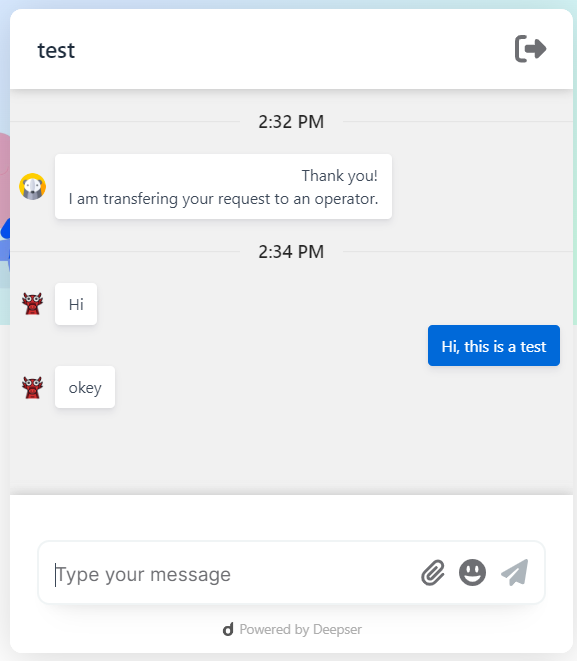
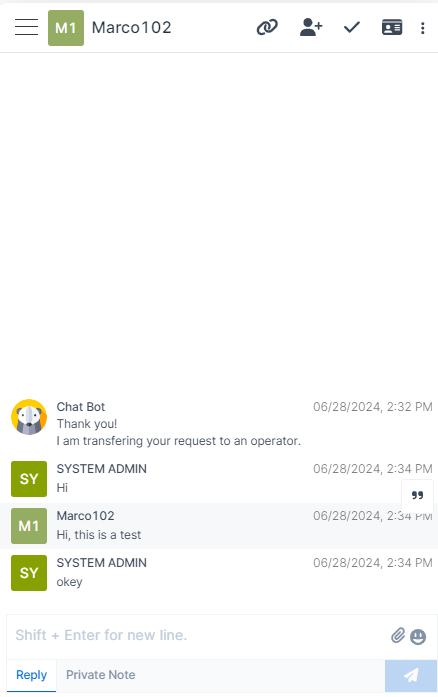
This action assigns the chat to a specific Deepser user (Administrator, Operator, or Key User).
User Portal User
Deepser Backend User
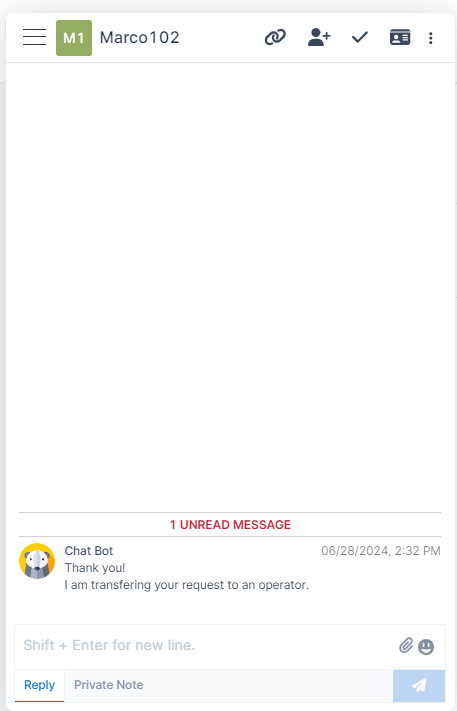
With this action, the assigned user can chat directly with the User Portal user.
To configure this action:
- Open Action > Chat Bot > Chat With Operator by clicking "+".
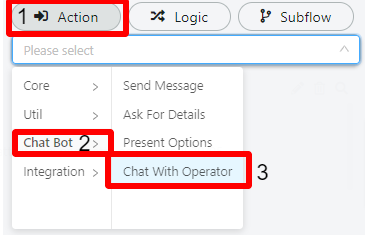
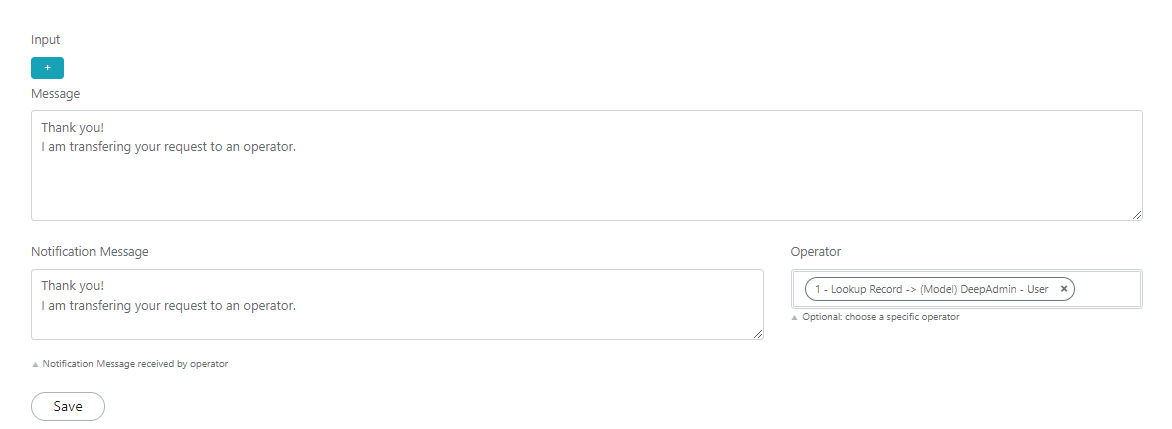
- Configure the following fields:
| Field | Description |
|---|---|
| Message | The text displayed in the chat, informing the User Portal user that their conversation will be assigned to an Operator. |
| Notification Message | The text message sent to the assigned Operator. |
| Operator | A variable of type DeepAdmin-User Model. Assign the user variable retrieved from earlier stages of the flow. |
Chatbot Flow Example
This section walks you through a complete example of setting up a chatbot flow. In this scenario, when a User Portal user needs information, the chatbot routes the chat to the correct Deepser Backend Operator based on the user's selection.
For this example, three different users are used:

Trigger
First, set the trigger type to Chatbot.
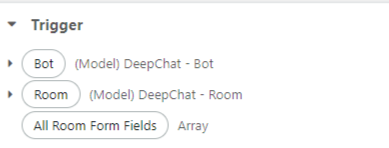
This block produces the following variables:
| Variable | Description |
|---|---|
| Bot | The model of the bot, containing all form template fields. |
| Room | The chat room variable. |
| All Room Form Fields | All form template fields of the room model as an array. |
Block 1: Welcome Message
Add a welcome message to the User Portal chat.
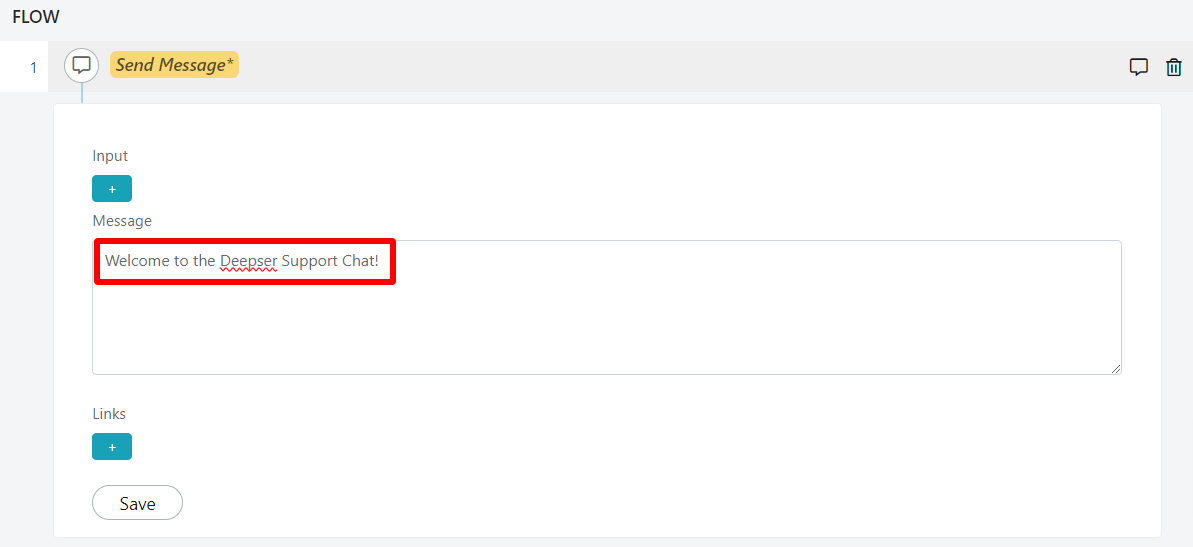
When the User Portal user starts the chat, the message written in the "Message" field is automatically sent.
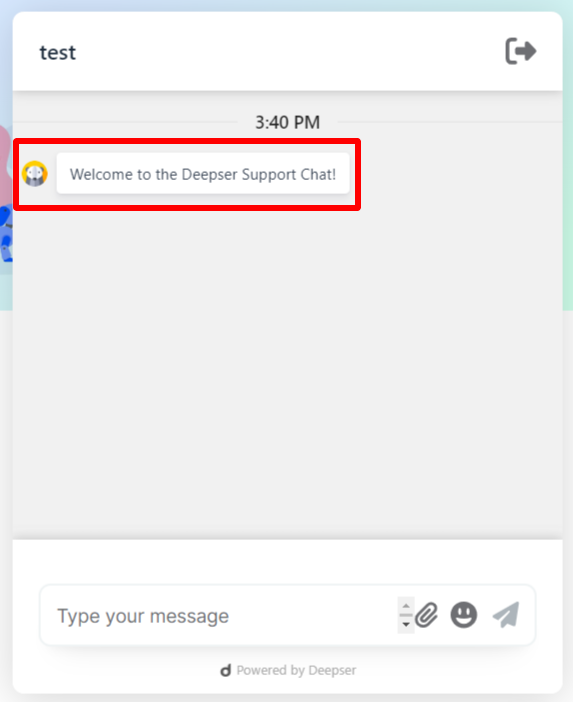
This block does not produce any output variables.

Block 2: Ask for Details
Ask the User Portal user to enter their first and last name. This information renames the room.
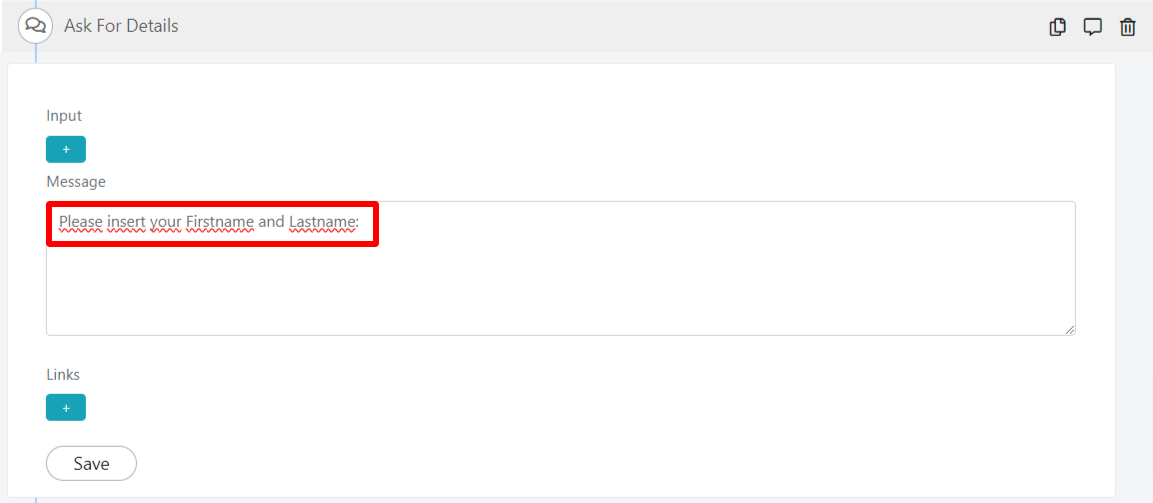
The message is sent immediately after the welcome message.
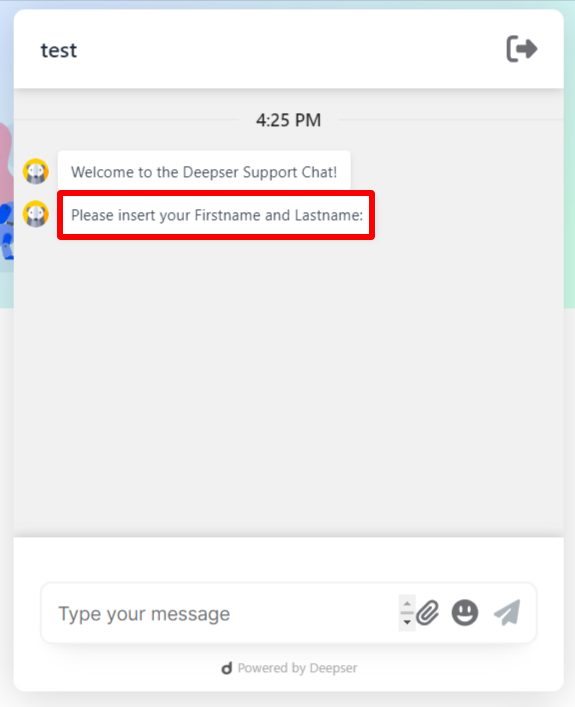
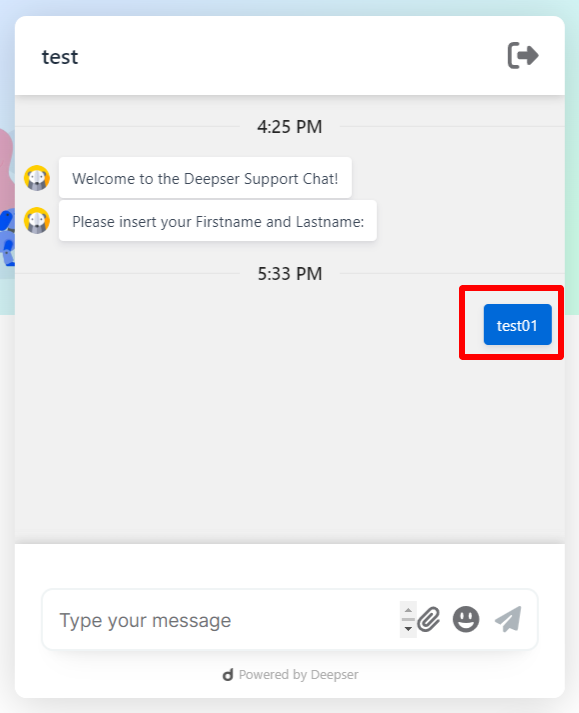
The user replies by entering the requested information, which is saved in the "Response" variable.
This block produces the following variables:
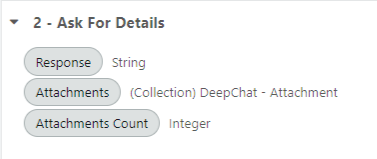
| Variable | Description |
|---|---|
| Response | The response entered by the User Portal user. |
| Attachments | Any attachments the user included. |
| Attachments Count | The total number of attachments. |
Block 3: Update Room Name
This block renames the chat room on the Deepser Backend side.
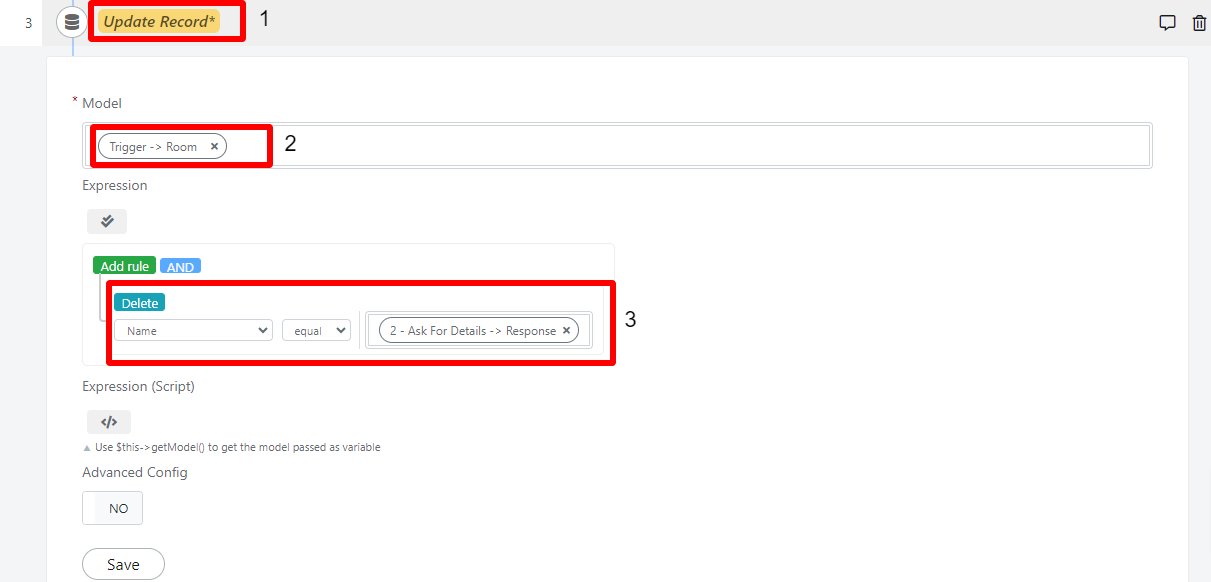
| N | Description | Note |
|---|---|---|
| 1 | Choose the "Update Record" block. | This allows you to change the name of the room. |
| 2 | Choose the chat room as your model. | The room is one of the variables obtained in the trigger. |
| 3 | Enter the "Name" field in the query builder, populated with the user's response. | The response is one of the variables obtained in Block 2. |
This configuration takes effect when the "Chat with Operator" block is added.
This block produces the following variable:

| Variable | Description |
|---|---|
| (Model) DeepChat -- Room | Room template with updated name. |
Block 4: Present Options
Present three selectable options to the user.
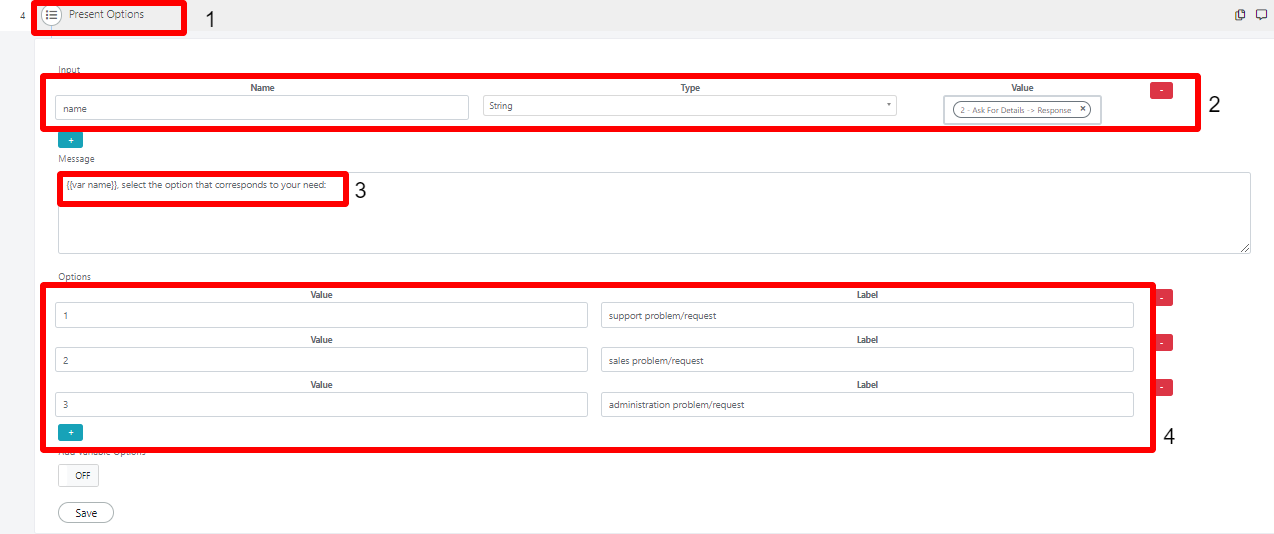
| N | Description | Note |
|---|---|---|
| 1 | Choose the "Present Options" block. | This creates the options shown to the User Portal user. |
| 2 | Add variables. | Optional. In this example, the user's name is used as input. |
| 3 | Enter the message that appears as a header for the options. | The text {{var name}} inserts the user's name provided as input. |
| 4 | Define the options available to the user. |
The following message is sent to the user:
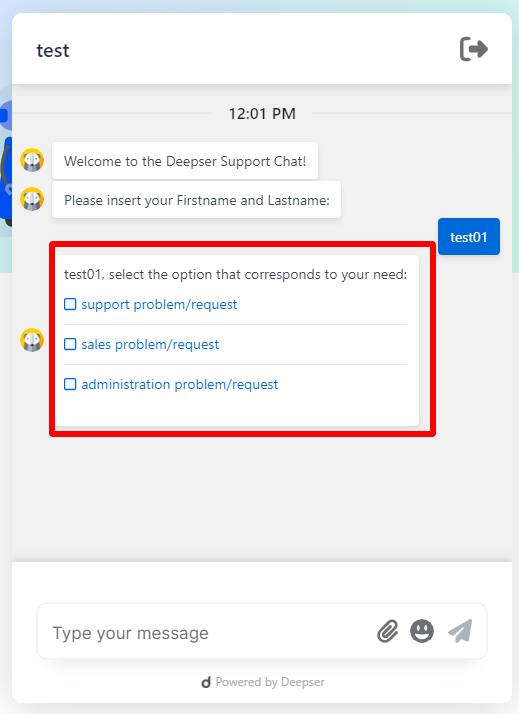
Clicking the chosen answer automatically sends the selection as if it had been typed by the user.
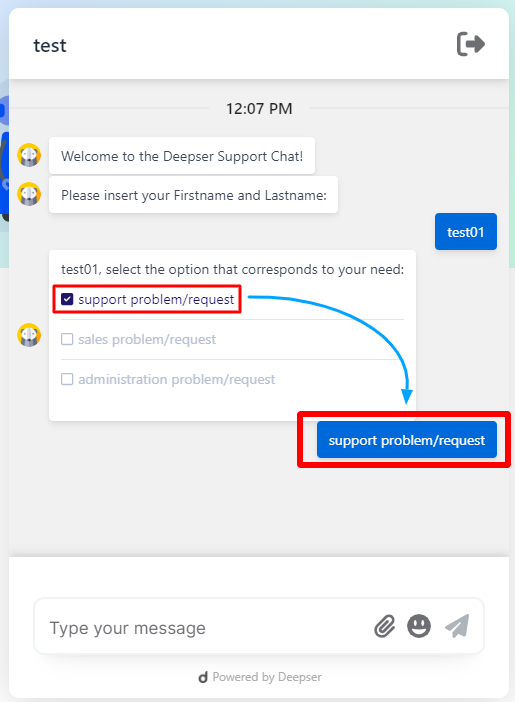
This block produces the following variables:

| Variable | Description |
|---|---|
| Response | The response entered by the User Portal user (string). |
| Value | The response value. |
Block 5: Condition for Option 1
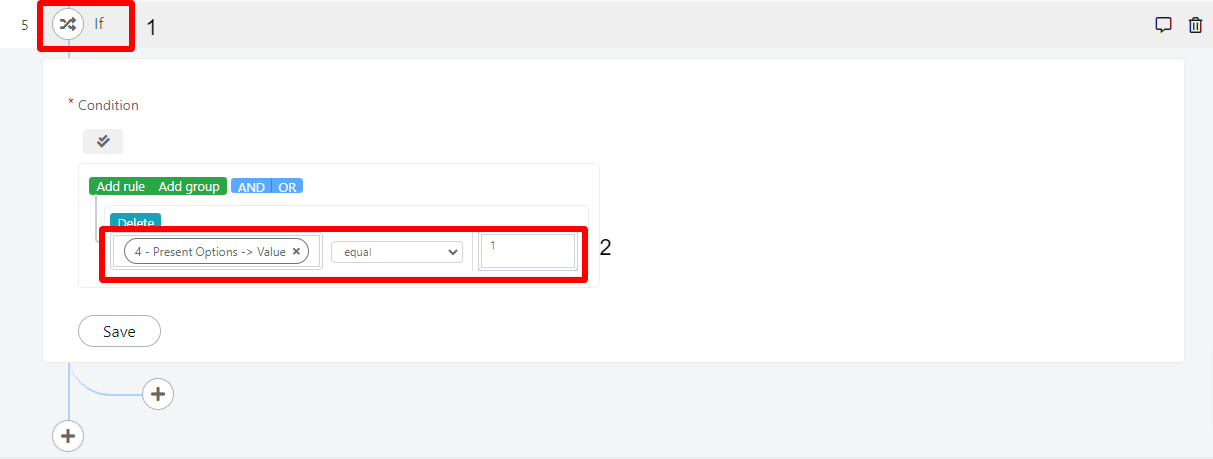
Add a condition to check if option 1 was chosen.
| N | Description | Note |
|---|---|---|
| 1 | Choose the "If" block. | |
| 2 | Set the desired condition. | In this case, the user-chosen value is "support incident/request." |
Block 6: Look Up Support User
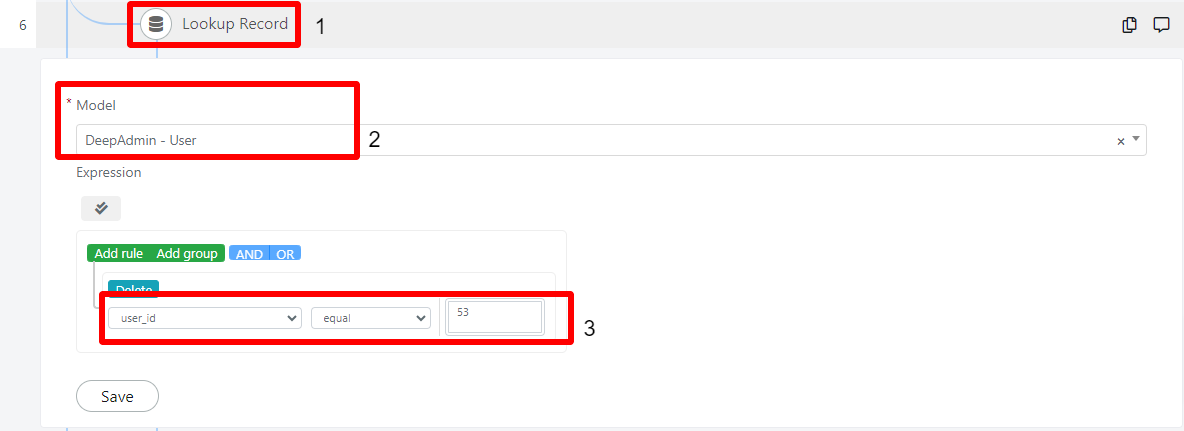
This block executes only if the User Portal user chose "support incident/request" (option 1). It retrieves the "Support" user who will be the Operator receiving the chat.

| N | Description | Note |
|---|---|---|
| 1 | Choose the "Lookup Record" block. | This retrieves the user "Support." |
| 2 | Choose the model "DeepAdmin -- User." | |
| 3 | Set the filter to "user_id." | In this example, the user "Support" has ID 53. |
This block produces the following variables:

| Variable | Description |
|---|---|
| (Model) DeepAdmin -- User | Model with user data. |
| Model Alias | For this model it will be "deep_admin/user." |
Block 7: Hand Over to Support Operator
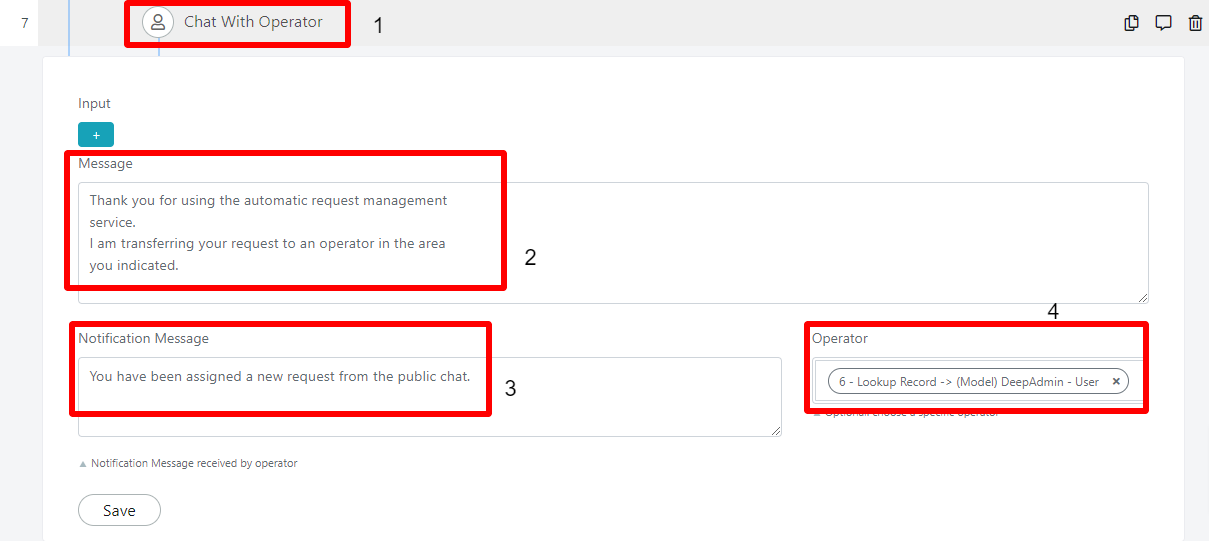
This block handles the handover of the chat to the "Support" Operator.
| N | Description | Note |
|---|---|---|
| 1 | Choose the "Chat with Operator" block. | |
| 2 | Message displayed to the User Portal user. | Optional. |
| 3 | Message sent to the Operator. | Optional. |
| 4 | Insert the user retrieved in Block 6 from the variables. | Optional. If left blank, the chat is sent to all enabled users. |
Block 8: Condition for Option 2
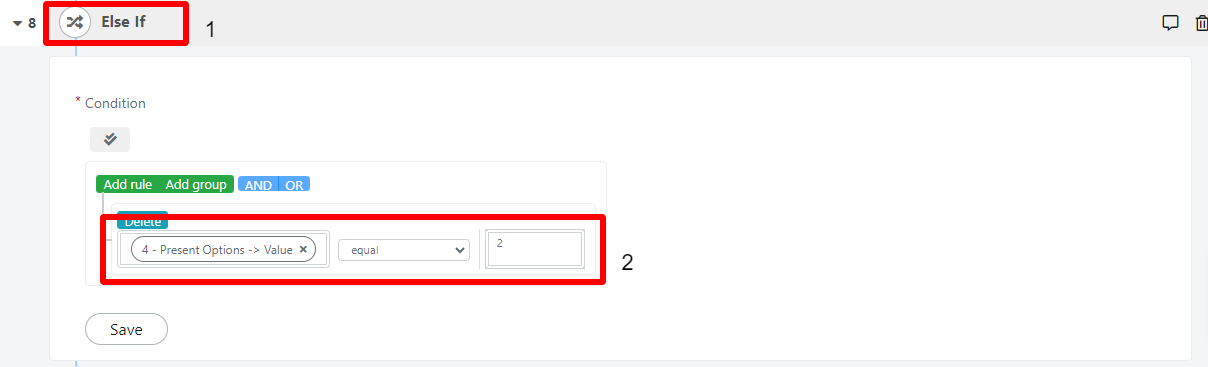
Add a condition to check if option 2 was chosen.
| N | Description | Note |
|---|---|---|
| 1 | Choose the "Else If" block. | |
| 2 | Set the desired condition. | In this case, the value chosen by the user is "sales problem/request." |
Block 9: Look Up Sales User
This block executes only if the User Portal user chose "sales problem/request" (option 2). It retrieves the "Sales" user who will be the Operator receiving the chat.

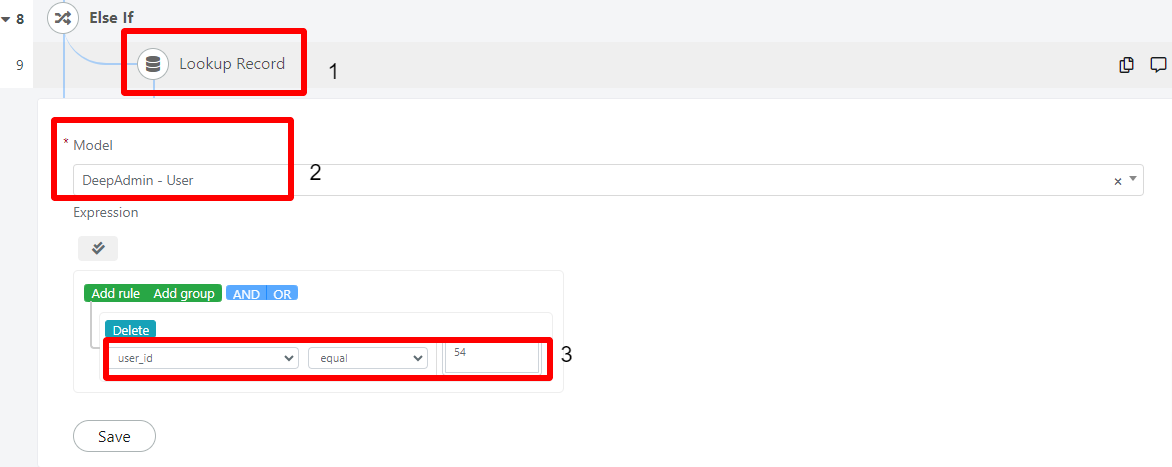
| N | Description | Note |
|---|---|---|
| 1 | Choose the "Lookup Record" block. | This retrieves the user "Sales." |
| 2 | Choose the model "DeepAdmin -- User." | |
| 3 | Set the filter to user_id. | In this example, the user "Sales" has ID 54. |
This block produces the following variables:

| Variable | Description |
|---|---|
| (Model) DeepAdmin -- User | Model with user data. |
| Model Alias | For this model it will be "deep_admin/user." |
Block 10: Hand Over to Sales Operator
This block handles the handover of the chat to the "Sales" Operator.
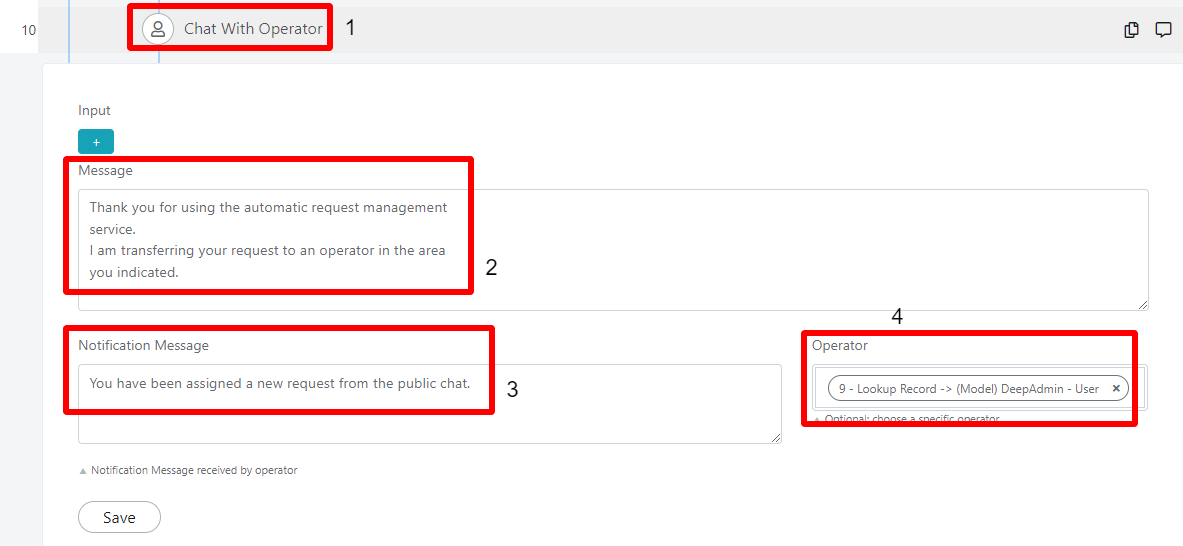
| N | Description | Note |
|---|---|---|
| 1 | Choose the "Chat with Operator" block. | |
| 2 | Message displayed to the User Portal user. | Optional. |
| 3 | Message sent to the Operator. | Optional. |
| 4 | Insert the user retrieved in Block 9 from the variables. | Optional. If left blank, the chat is sent to all enabled users. |
Block 11: Condition for Option 3
Add a condition to check if option 3 was chosen.
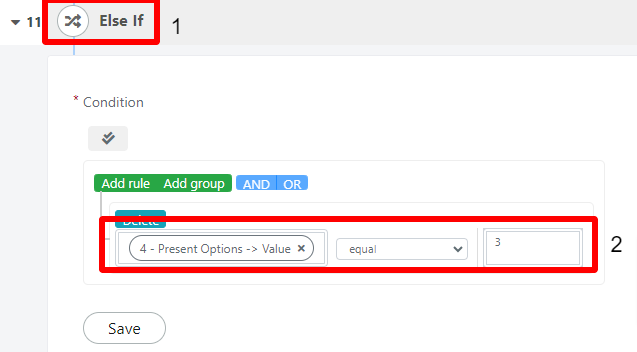
| N | Description | Note |
|---|---|---|
| 1 | Choose the "Else If" block. | |
| 2 | Set the desired condition. | In this case, the value chosen by the user is "administration incident/request." |
Block 12: Look Up Administration User
This block executes only if the User Portal user chose "administration incident/request" (option 3). It retrieves the "Administration" user who will be the Operator receiving the chat.

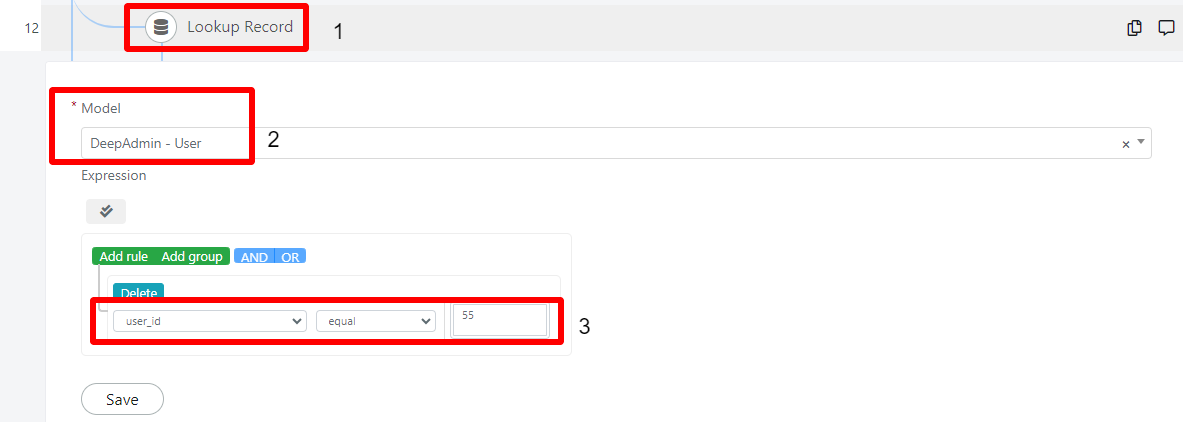
| N | Description | Note |
|---|---|---|
| 1 | Choose the "Lookup Record" block. | This retrieves the user "Administration." |
| 2 | Choose the model "DeepAdmin -- User." | |
| 3 | Set the filter to user_id. | In this example, the user "Administration" has ID 55. |
This block produces the following variables:

| Variable | Description |
|---|---|
| (Model) DeepAdmin -- User | Model with user data. |
| Model Alias | For this model it will be "deep_admin/user." |
Block 13: Hand Over to Administration Operator
This block handles the handover of the chat to the "Administration" Operator.
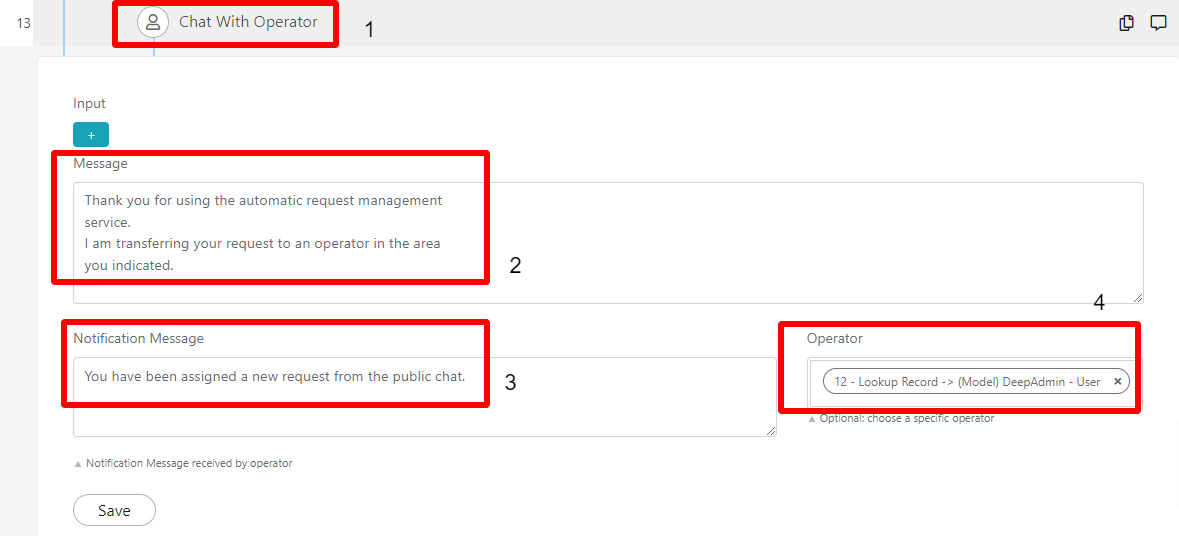
| N | Description | Note |
|---|---|---|
| 1 | Choose the "Chat with Operator" block. | |
| 2 | Message displayed to the User Portal user. | Optional. |
| 3 | Message sent to the Operator. | Optional. |
| 4 | Insert the user retrieved in Block 12 from the variables. | Optional. If left blank, the chat is sent to all enabled users. |