Datto RMM Integration
Deepser provides a dedicated module for integrating with Datto RMM. By configuring flows, you can synchronize sites, devices, and alerts between both platforms and automate Service Operation management.
The integration supports the following functionality:
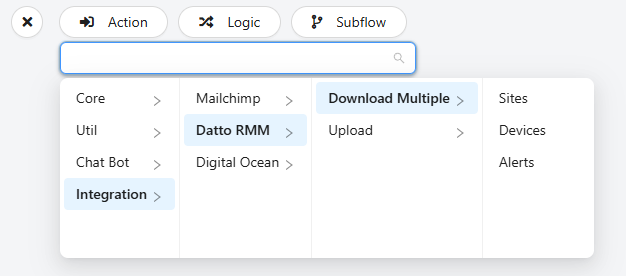
- Download all Sites
- Download all Devices
- Download all Alerts
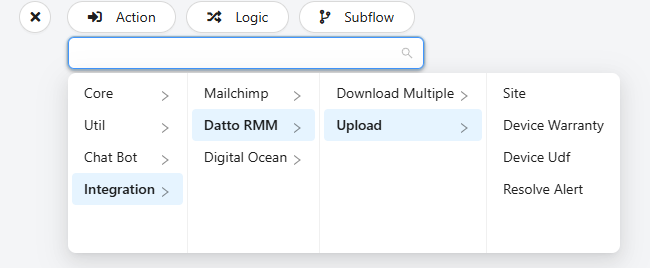
- Create or Update a Site
- Create or Update a Device Warranty (Device Warranty)
- Create or Update user-defined Device fields (Device Udf)
- Create or Update an Alert to Resolved
The following is a summary of the available flow-side actions for the integration:
Enable Datto Integration in Deepser
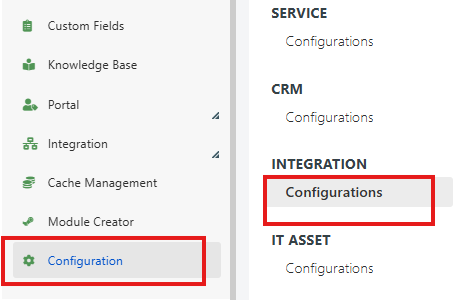
To enable the integrations module, go to the Deepser Backend menu at System > Configurations > Integrations – Configurations, select and enable Datto RMM, then Save:
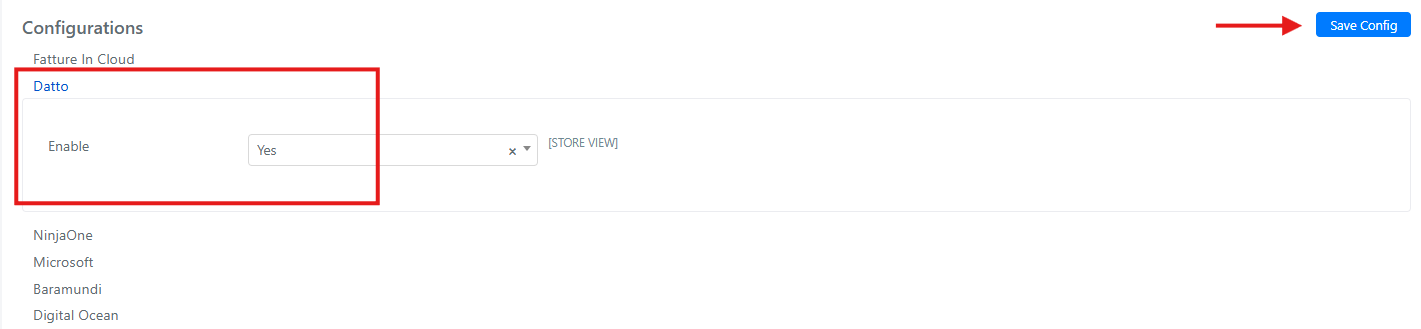
Once the integration is enabled in the menu, you will see the new item:

Sites
Sites in Datto RMM represent an organizational unit that generally corresponds to a client or a physical location of a client. They are used to group and manage devices by client or location to securely separate data.
Within Deepser, in the Integration > Datto > RMM > Site section, you will find Sites that have been created on Datto RMM and synchronized.
Below are the main fields provided and synchronized in Deepser:
| Field | Definition |
|---|---|
| Site Id | Unique identifier automatically assigned by Datto RMM to the Site |
| Uid | Unique code in UUID format assigned to the Site |
| Name | The descriptive name of the Site |
Devices
Devices in Datto RMM correspond to the endpoints that are monitored and managed through the platform. These can include computers, laptops, servers, network devices, printers, and more.
The main functions associated with Devices include monitoring, remote management, and alerting.
Within Deepser, in the Integration > Datto > RMM > Devices section, you will find the Devices that have been created on Datto RMM and synchronized.
Below are the main fields provided and synchronized in Deepser:
| Field | Definition |
|---|---|
| Device Id | Unique identifier automatically assigned by Datto RMM to the Device |
| Uid | Unique code in UUID format assigned to the Device |
| Hostname | Device hostname |
| Site Uid | Uid code of the Site with which the Device is associated |
| Site Name | Name of the Site with which the Device is associated |
| Type | Device Type |
| Category | Device Category |
| Domain | Device Domain |
| Description | Device Description |
Alerts
Alerts in Datto RMM are notifications automatically generated by the system when specific problems, anomalies, or conditions are detected on monitored devices.
The most common types of Alerts include:
- Hardware: problems with RAM, disk, temperature, etc.
- Software/services: shutdown of a Windows service, failure to update antivirus, etc.
- Performance: excessive CPU or RAM usage, slowdowns.
- Device status: offline for too long, agents not updated.
- Patches/updates: failure to install or errors during update.
These can be manually closed or auto-resolved if the condition that generated them returns to normal parameters.
Within Deepser, in the Integration > Datto > RMM > Alerts section, you will find the alerts that have been created on Datto RMM and synchronized.
Below are the main fields provided and synchronized in Deepser:
| Field | Definition |
|---|---|
| Alert Uid | Unique code in UUID format assigned to the Alert |
| Priority | Alert Priority |
| Resolved | Indicates whether the Alert is resolved |
| Resolved By | Operator who resolved the Alert |
| Resolved On | Alert resolution date |
| Service Operation Number | Number of the Service Operation linked to the alert |
| Device Uid | Uid code of the device that triggered the alert |
| Device Name | Name of the device that triggered the alert |
| Site Uid | Uid code of the site connected to the device |
| Site Name | Name of the site connected to the device |
Datto RMM Configuration
The following sections explain how to configure the integration on both the Deepser side and the Datto RMM side.
Connection
From the Deepser Backend menu, go to System > Integration > Datto > RMM > Connection, and create a new Connection by clicking the "Add Connection" button.

In the screen that opens, set:
- Name: the name you assign to the connection
- OAuth Client: select an existing OAuth client or create a new one via the + button located below the drop-down menu

OAuth Client
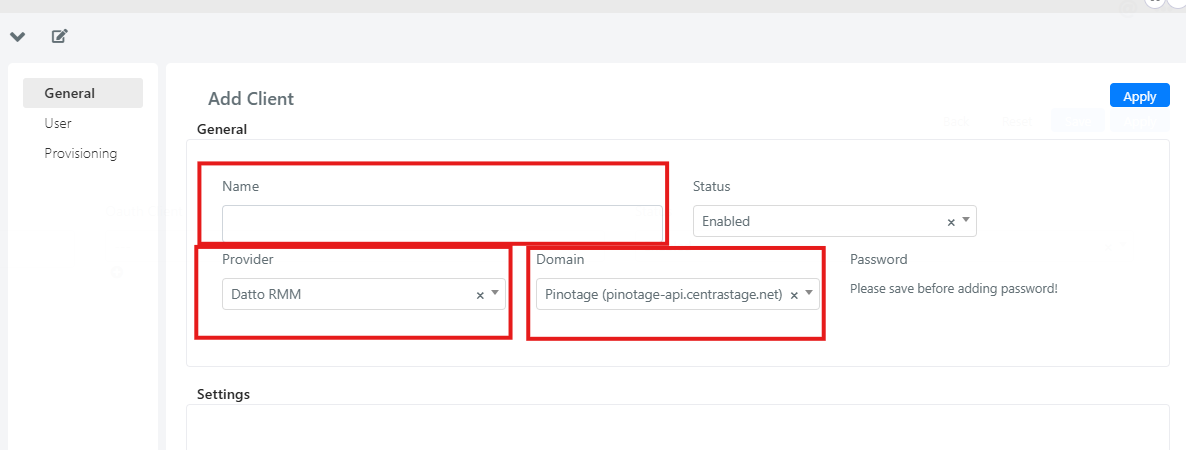
In the floating window that opens, set the following fields:
- Name: name of the OAuth Client
- Provider: Datto RMM
- Domain: Select the domain related to your geographic area.
App Configuration
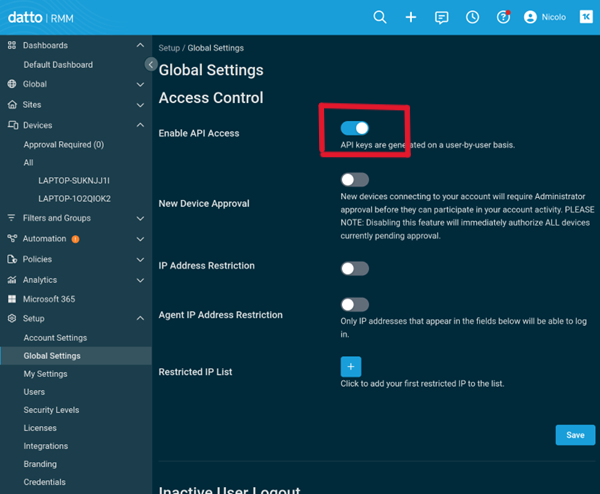
On Datto RMM, navigate to Setup > Global Settings.
Here you enable the "Enable API Access" switch.
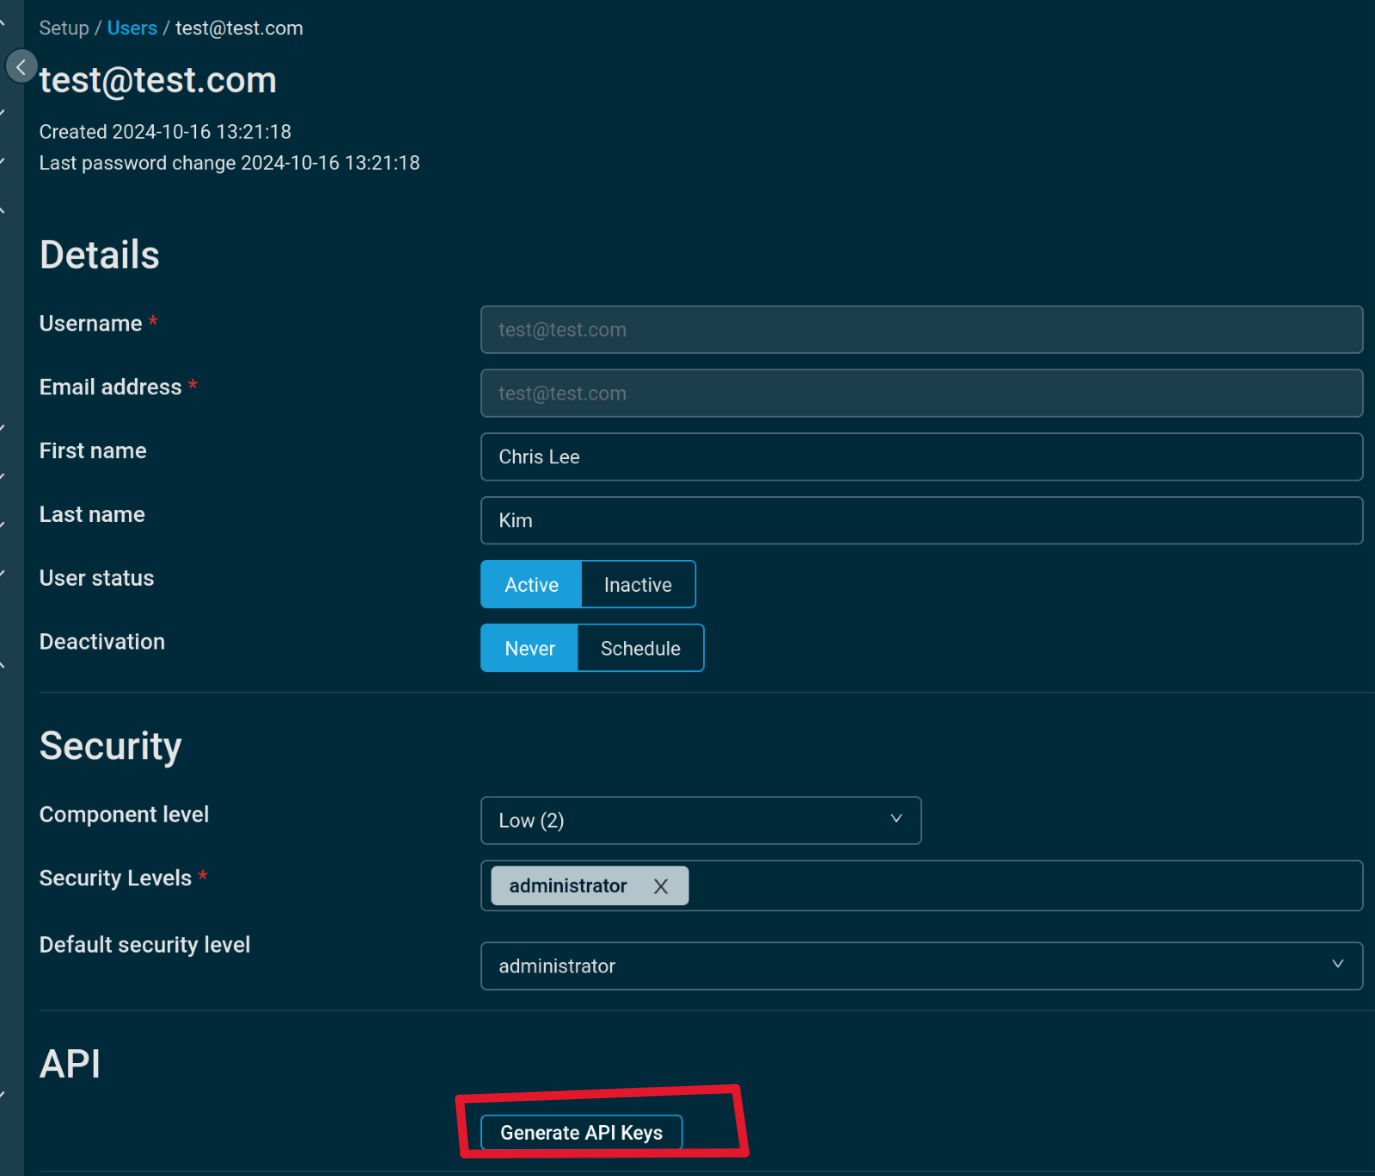
Then navigate to Setup > Users, and open the form for editing a user.
At the bottom of the form, click the "Generate API Keys" button.
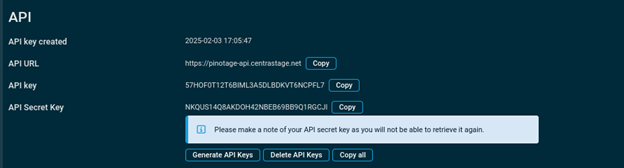
Once you click the button, the following will be generated:
- API URL: the URL of your Datto RMM instance.
- API key.
- API Secret Key.
Go back to Deepser and access the DeepPassword module from the "Password" item in the menu on the left.

To use the Password module, you must first have created a Passphrase. See the related documentation: Password Management
From the DeepPassword form, create a new Password entry with the following values:
- Username: value of the API key
- Password: value of the API Secret Key
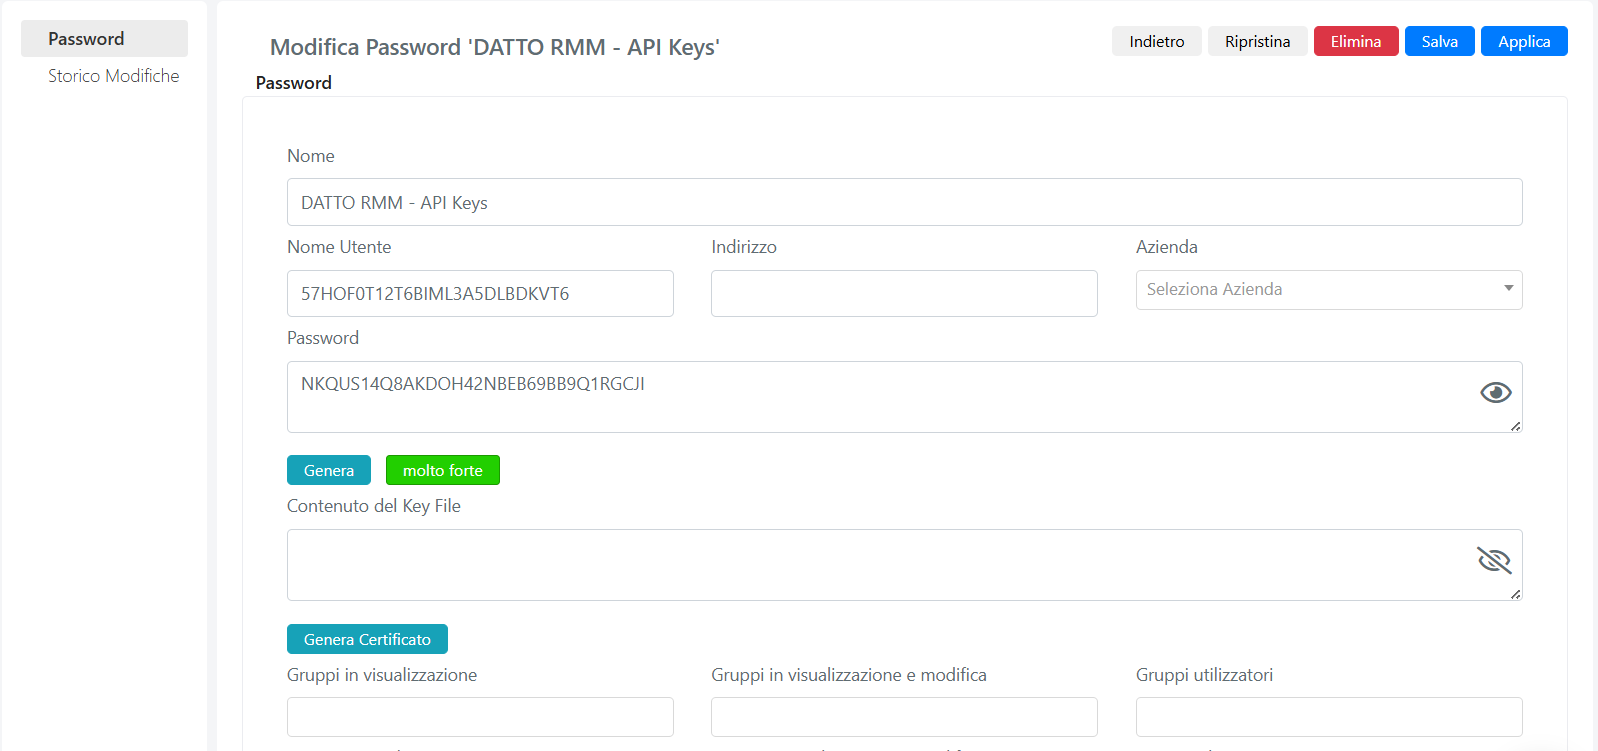
Save the Password and return to the Deepser OAuth Client.
Set the "Password" field with the password you just created.
You should now have the following configuration on the Deepser OAuth Client:
- Provider: Datto RMM
- Domain: domain related to your geographic area
- Password: the password you just created, selected from the drop-down menu
An example configuration of a Deepser OAuth Client is shown below:
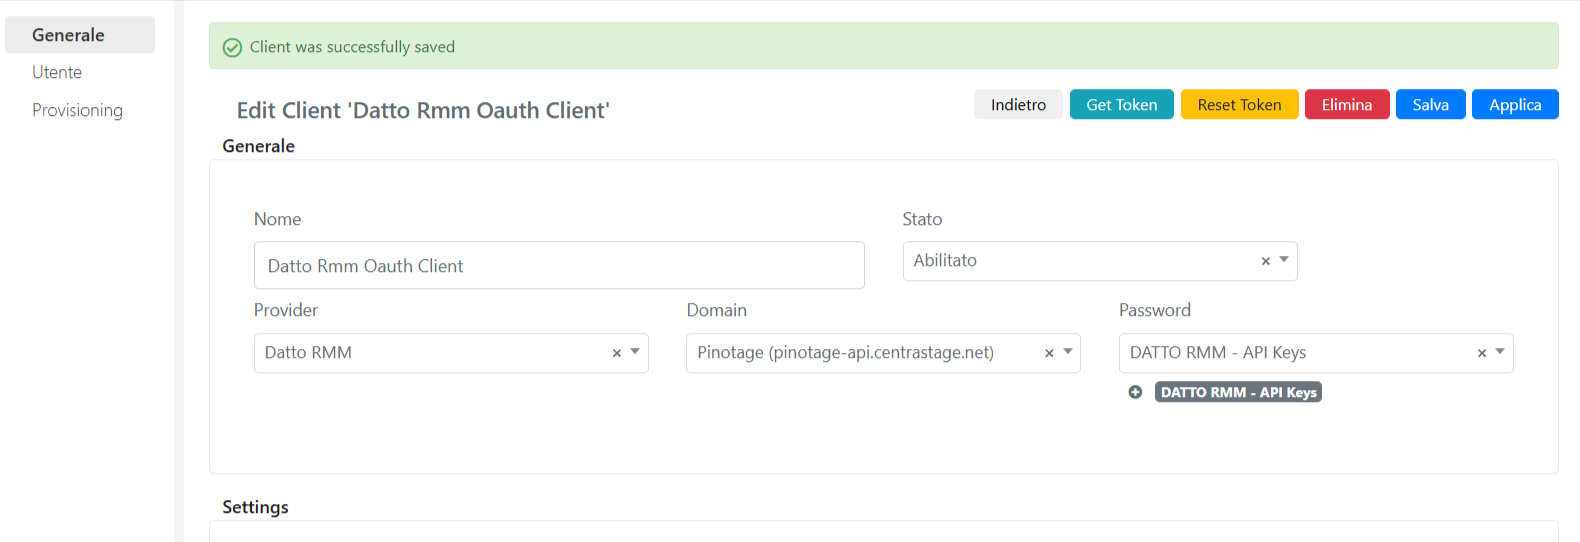
If everything has been configured correctly, clicking the Get Token button will return the first Access Token.
The Datto RMM OAuth Client is now correctly configured and ready to be used within a Connection. You are now ready to use this Connection within the Actions of the Download and Upload Flow of Datto RMM entities.
Get Sites, Devices, and Alerts
To retrieve and create/update Sites and Devices on Deepser, you use a flow with a cron trigger.
Go to Flow > Designer from the Deepser Backend menu and click the New button, then select Flow.
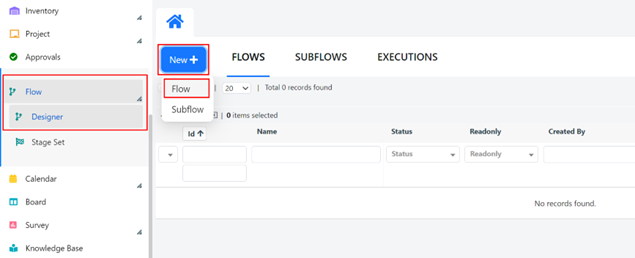
Give the flow a Name and click Save.
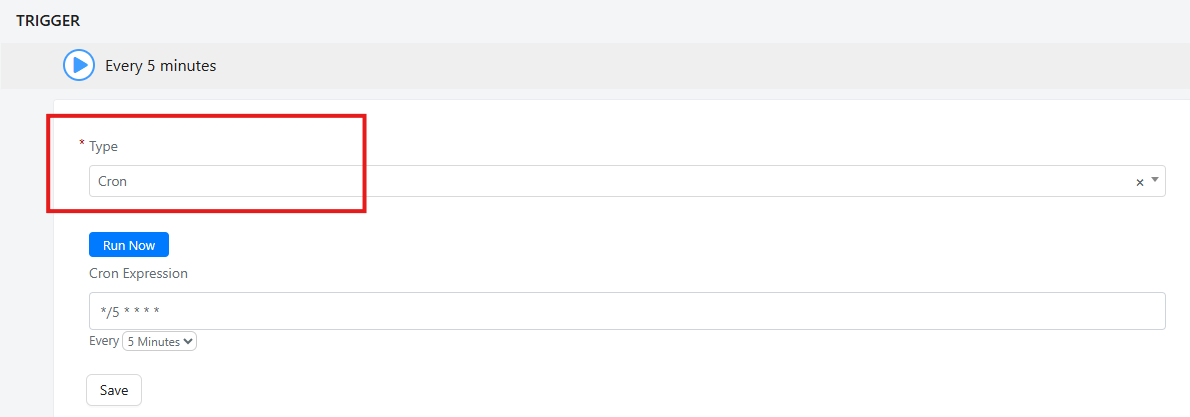
As a Trigger for the flow, set "Cron" and configure a time value. This value determines how often Sites and Devices will be created and/or updated on Deepser.
In the Flow, click + to add a new node, then select Action.
In the drop-down menu, select Integration > Datto RMM > Download Multiple > Sites.
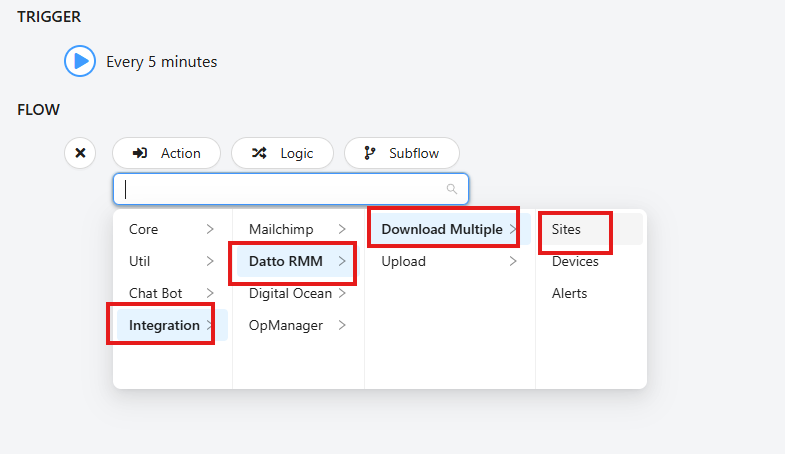
Once the action is added, select the previously configured connection to Datto RMM and click "Save".

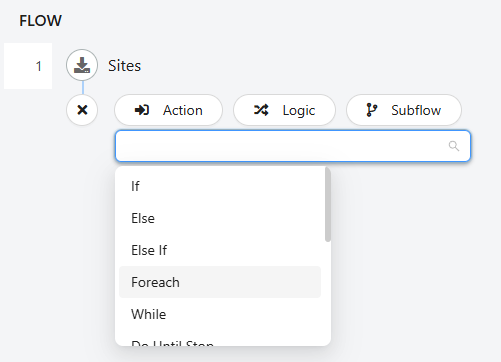
Once the Sites have been retrieved, you can proceed to iterate through them. Add a new node with the + button, then select Logic and Foreach:
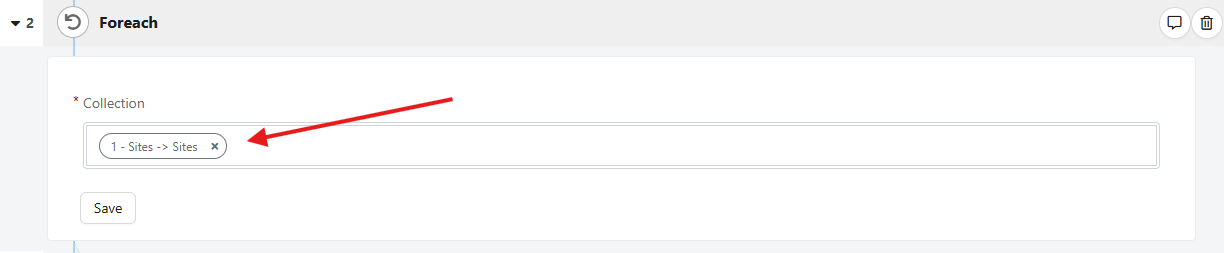
Select the Sites collection created earlier (from the right-hand menu).
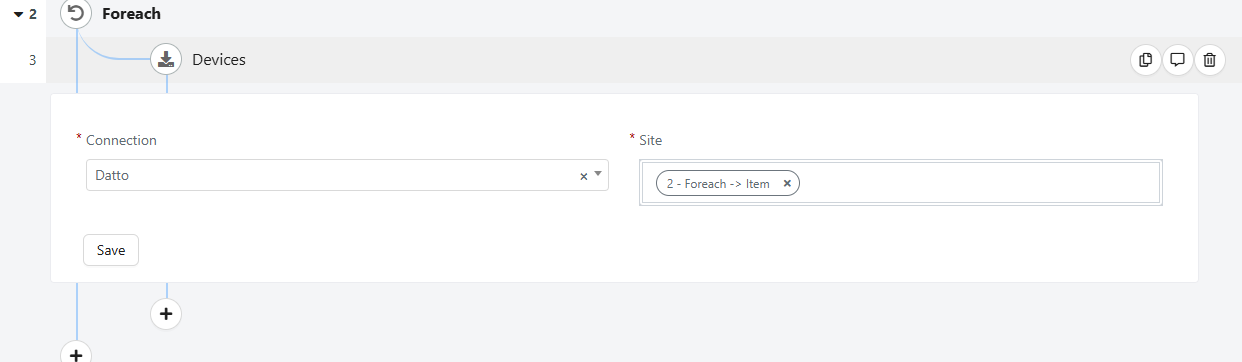
Finally, for each Site obtained by the foreach loop, retrieve the associated devices.
Webhook
Webhooks provide a real-time method for receiving notifications within the Datto RMM platform. Datto RMM uses HTTP POST requests to integrate with external services, streamlining the management and automation of IT workflows.
You can use webhooks to automatically create a Service Operation in Deepser whenever an alert is generated in Datto RMM.
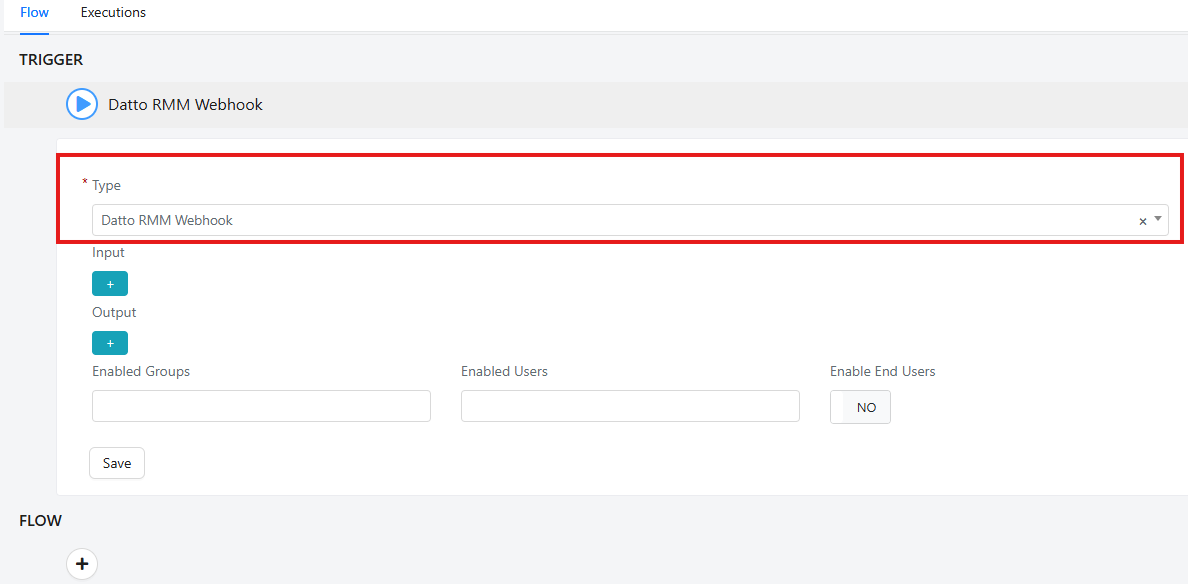
As a flow trigger, select "Datto RMM Webhook" and click "Save."
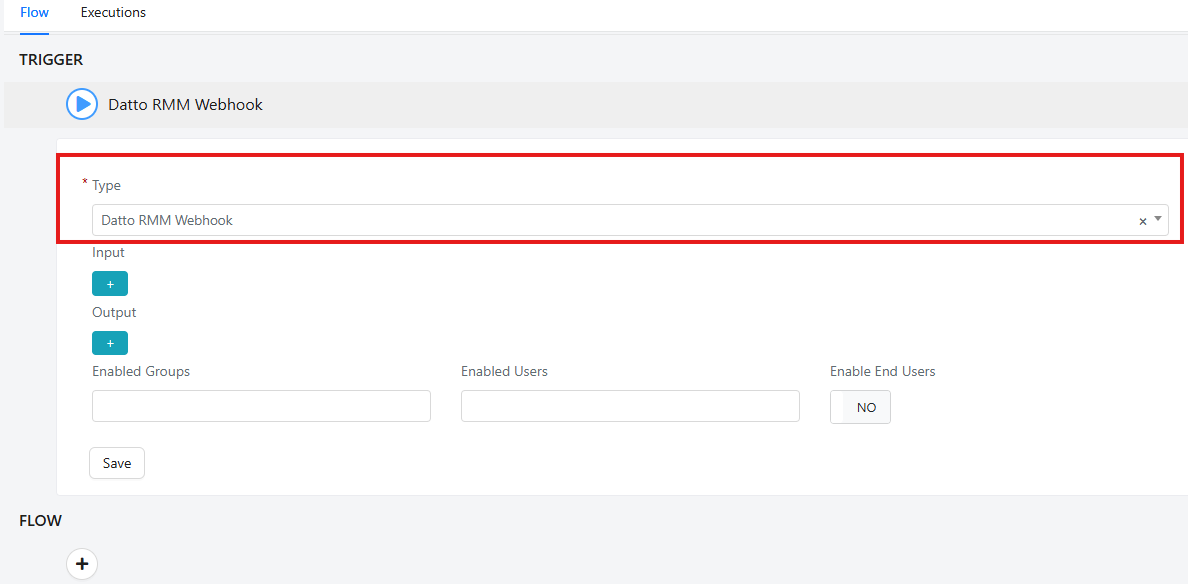
From the trigger you just created, copy the link highlighted in the screenshot below.
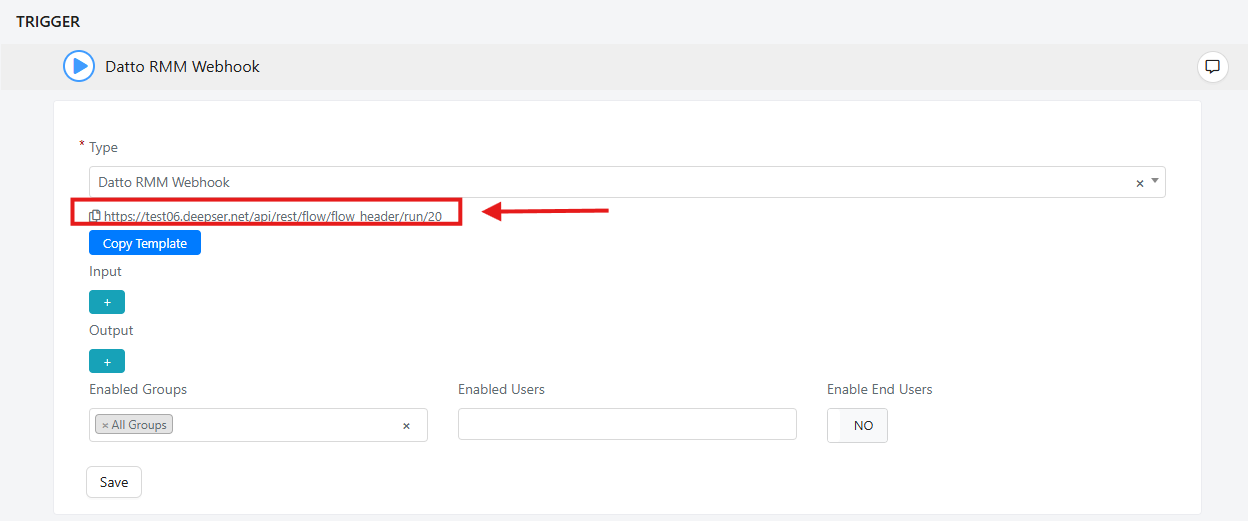
Webhook Configuration in Datto RMM
After creating the flow and copying the link, proceed to Datto RMM to configure the webhook within the application.
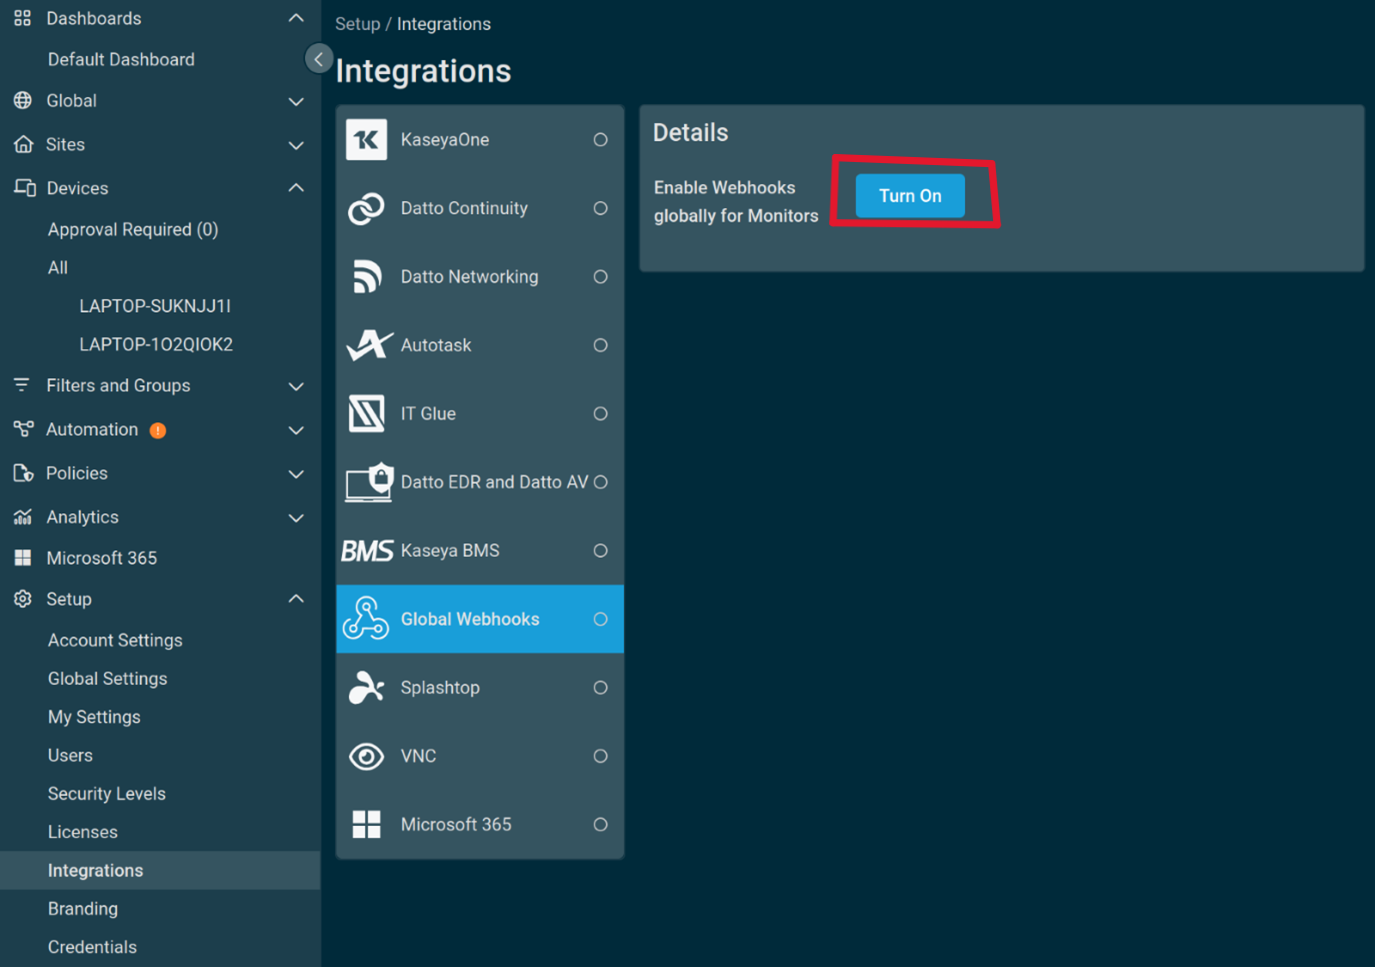
Navigate to Setup > Integrations > Global Webhooks.
Click the "Turn On" button to activate webhooks:
Configure the following parameters:
- URL: Enter the URL copied previously from the Flow with API Trigger.
- Content-Type: Select application/json.
- Custom Request Headers: Set the following headers:
- Authorization: Bearer <deepser_user_api_token>
- Accept: */*
- Alert Raised Payload: Customize the request body that Datto RMM will send to Deepser.
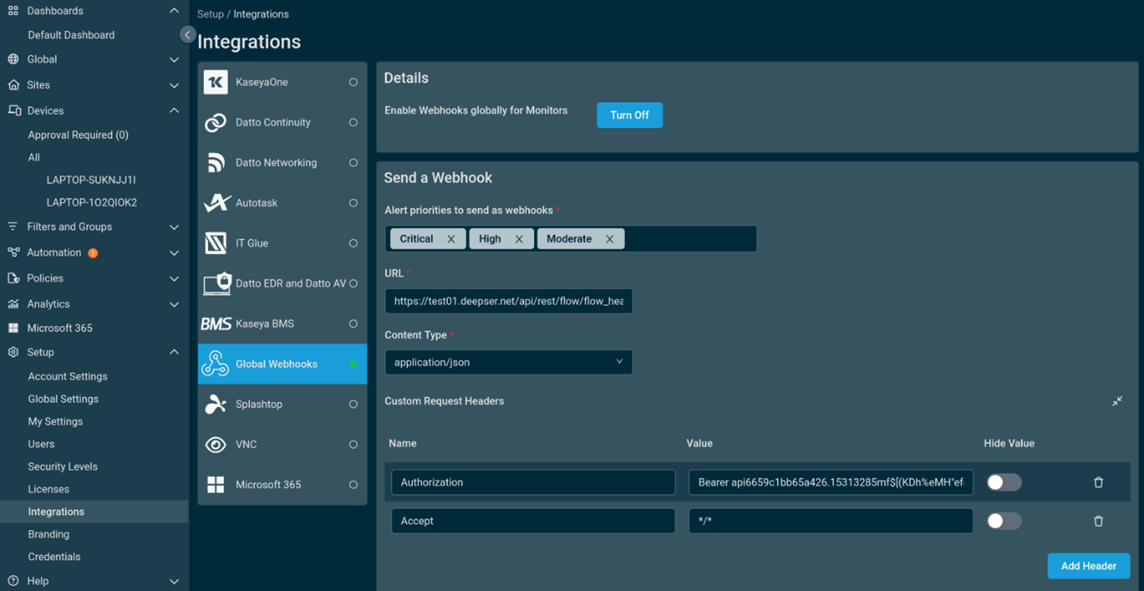
Once configured, you can test the Datto RMM call to Deepser by clicking the "Test Alert Raised Webhook" button located at the bottom right of the page.
The authorization token is obtained from the API user created in Deepser. For more information, refer to API Authentication.
Datto RMM Flow Configuration
In this example, you will set up a flow to create a Service Operation when an alert is raised and to update its status upon resolution.
Begin by configuring the trigger and selecting "Datto RMM Webhook."
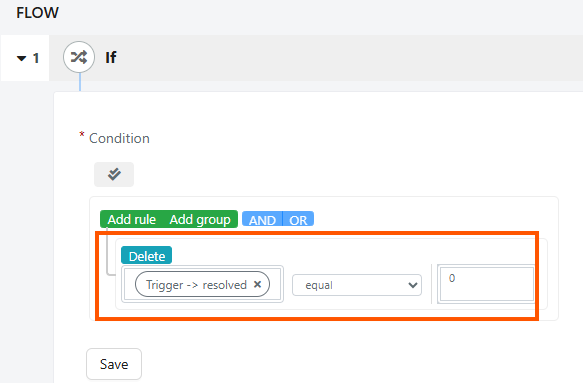
As the second step in the flow, insert a conditional check to identify whether the received alert is a trigger event or a resolution event. The check is performed on the alert's "Resolved" field:
- If the value is 0, it signifies an event trigger alert.
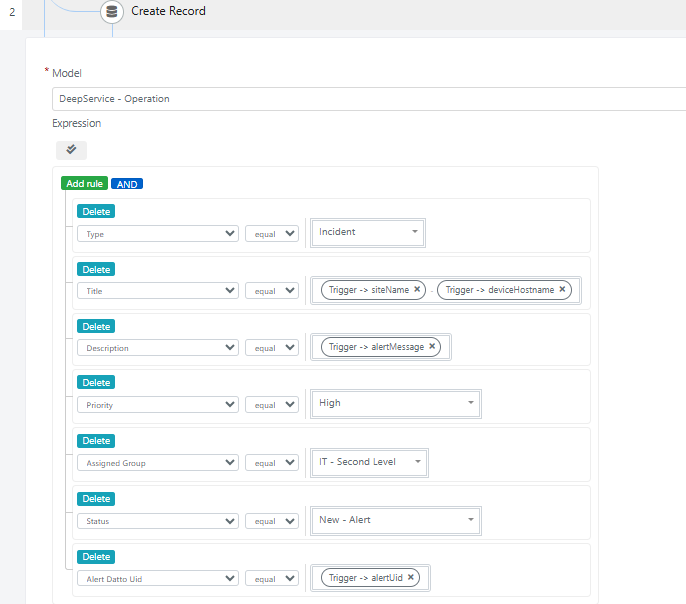
Next, create a node for Service Operation creation, defining the required values for the Service Operation that will be created in Deepser.
The "Alert Datto UID" field is a custom field used to store the alert identifier. This field is crucial for retrieving the Service Operation during resolution.
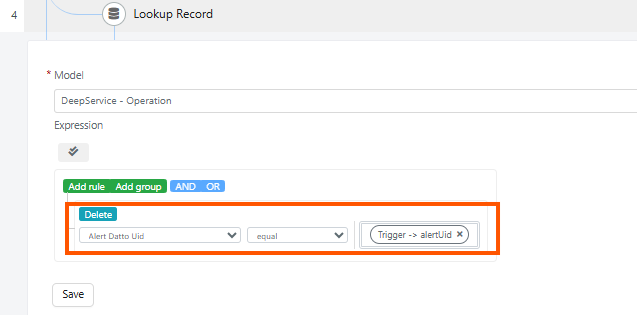
Now, address the portion of the flow for updating the status upon alert resolution. First, insert the "Else" node.

Next, retrieve the existing Service Operation by filtering using the "Alert Datto UID" field with the "Lookup Record" node.
Once the open Service Operation is retrieved, proceed with updating the status using the "Update Record" node.
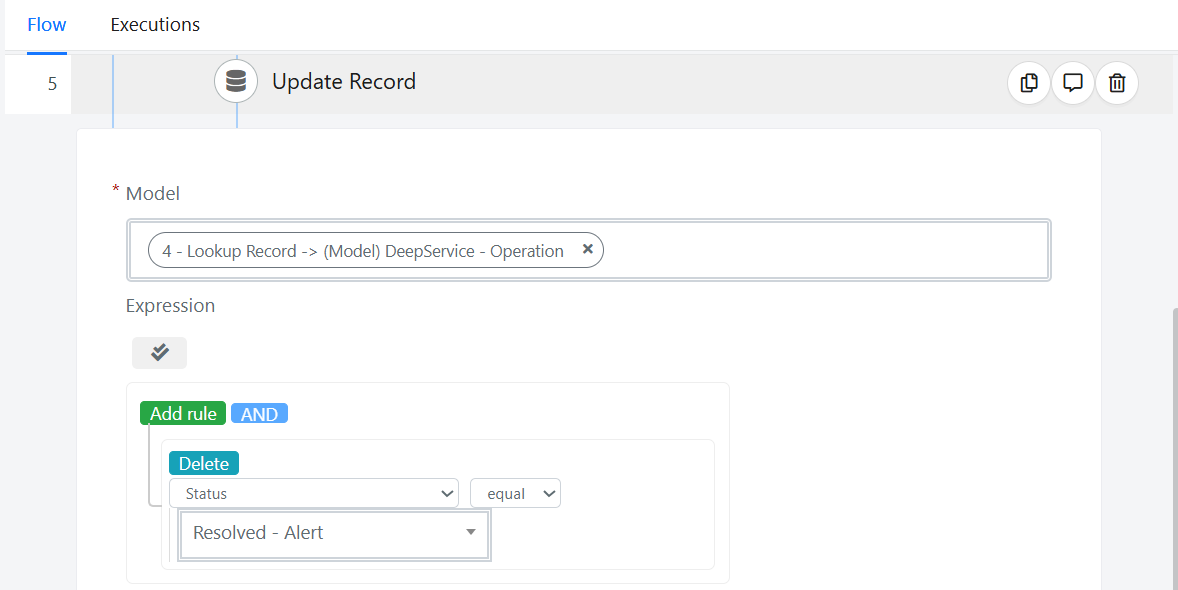
After completing the flow configuration, ensure the flow is enabled.
