ITAM Configuration
The ITAM Configuration section allows you to customize every aspect of your IT Asset Management setup. From defining device types to configuring scan jobs and monitoring rules, you can tailor the module to fit your organization's needs. The module configuration is accessible from System > IT Asset Configuration in the Deepser Backend and is visible only to System Administrators.
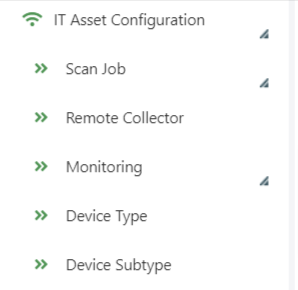
In this section, you can configure:
- Device Types: Define and manage the different types of devices tracked in Deepser.
- Device Subtypes: Specify subcategories for more detailed asset classification.
- Scan Jobs: Set up and manage jobs for scanning devices to gather necessary data.
- Monitoring Rules: Establish rules for monitoring scan jobs and other system activities to ensure proper functioning and performance.
- Remote Collector Configuration: Configure settings for remote collectors to efficiently collect and manage data from devices.
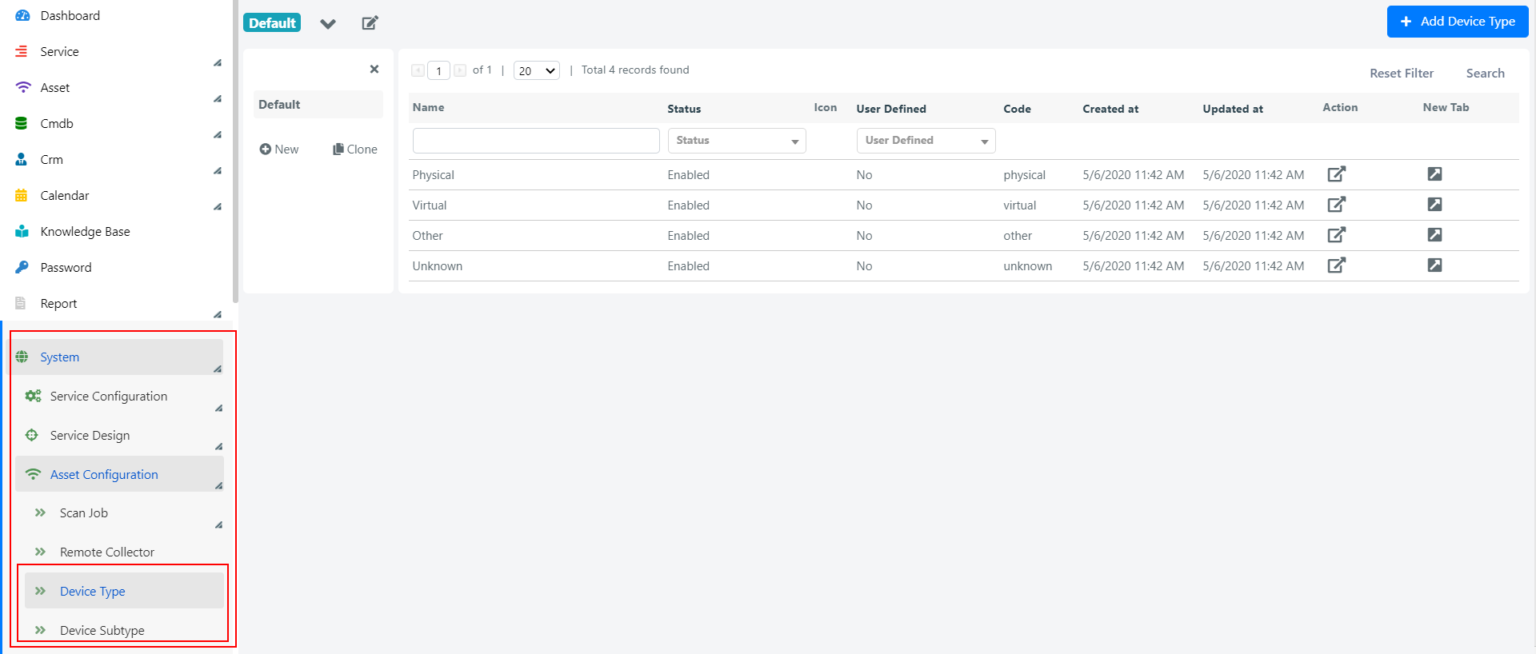
Device Type
To manage the types of assets in Deepser, go to System > Asset Configuration > Device Type in the Deepser Backend.
From this section, you can configure new device types in addition to the default ones by clicking the button in the top right corner.
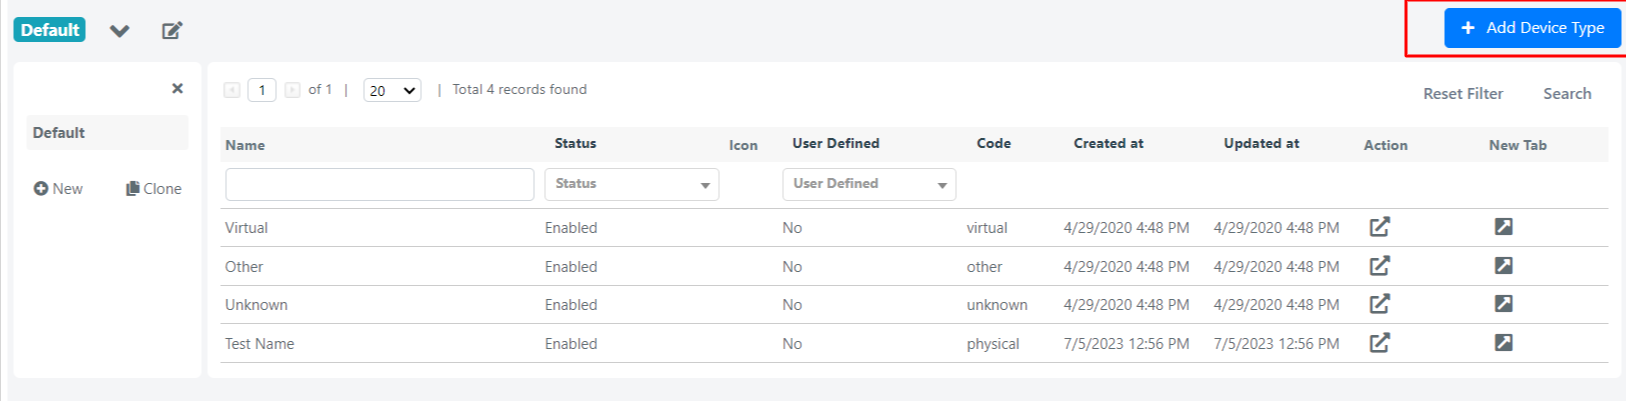
Device Type Configuration
In the device type edit or creation process, the following screen will appear:
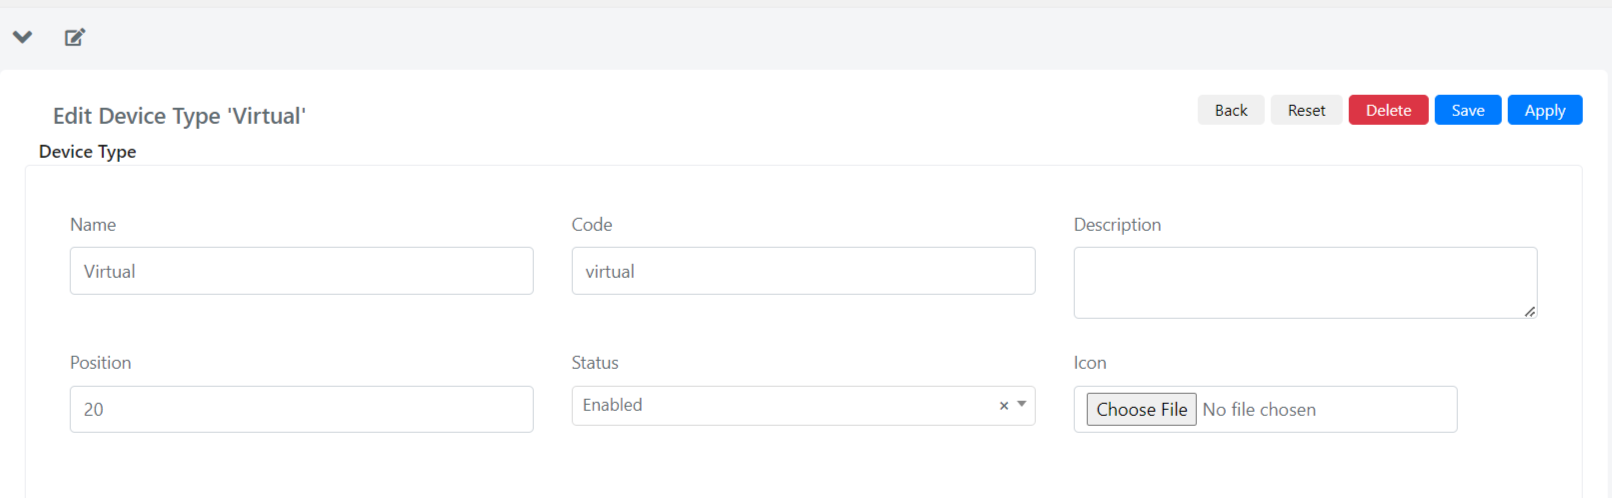
For the device type configuration, the following fields are available:
| Field | Description |
|---|---|
| Name | A text field for entering the name of the device type. |
| Code | A text field where you can add a unique code for the device type. |
| Description | A text area field where you can add a description. |
| Position | A text field that accepts a numerical value, representing the order of this device type in the grid. |
| Status | A select field that indicates whether the device type is enabled or disabled, determining if it can be used for the device model. |
| Icon | A file uploader field where you can upload an image to be set as the icon for this device type. |
Device Subtype
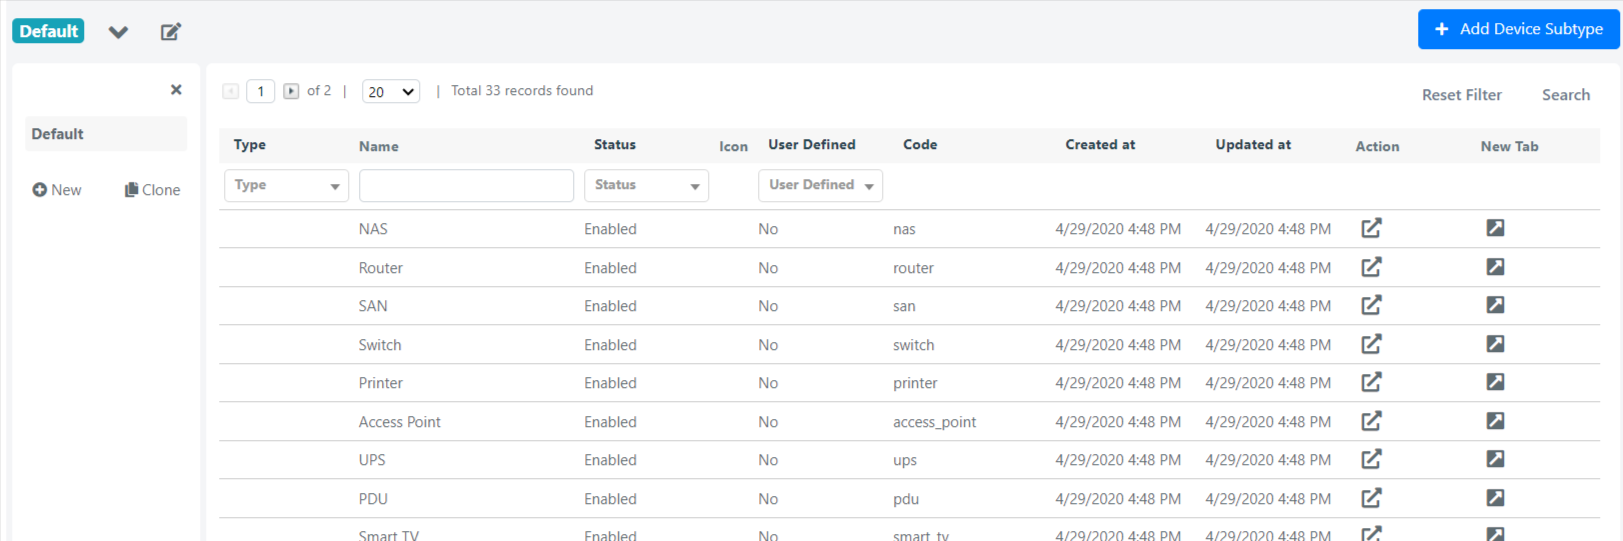
In the configuration section of the Asset Management module, you can manage subtypes of assets added in Deepser.
To access their configuration, go to System > Asset Configuration > Device Subtype in the Deepser Backend.
From this section, you can configure device subtypes for each existing device type.
Device Subtype Configuration
In the device subtype edit or creation process, the following screen will appear:
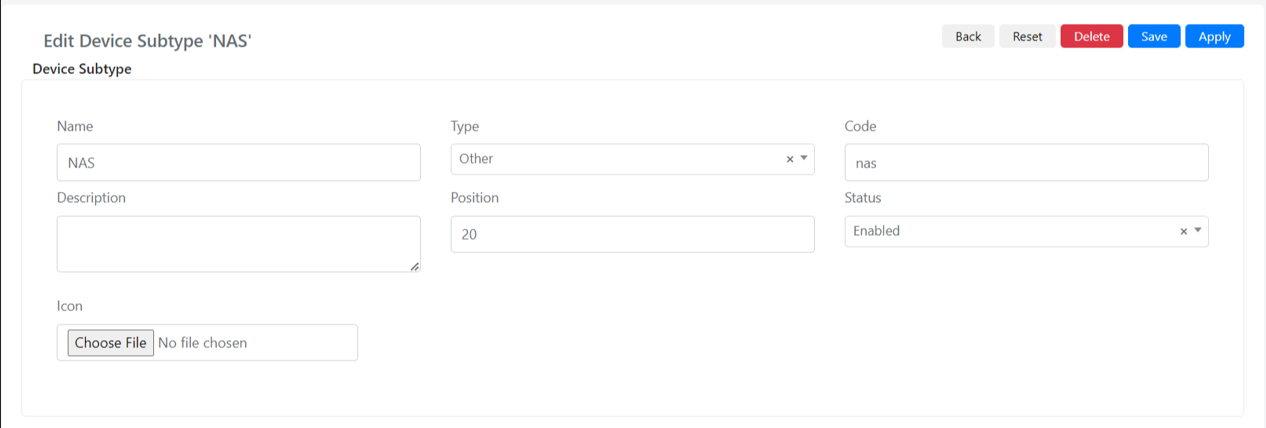
For the device subtype configuration, the following fields are available:
| Field | Description |
|---|---|
| Name | Text field with the device subtype's name. |
| Code | Text field where you can add a unique code for the device subtype. |
| Type | Select field with all the device types. You can link the device subtype with a type. |
| Description | Text area field where you can add a description. |
| Position | Text field that accepts a numerical value, representing the order of this device subtype in the grid. |
| Status | Select field indicating whether the device subtype is enabled or disabled for use on the device model. |
| Icon | File uploader field where you can upload an image to be set as an icon for this device subtype. |
Job Rules
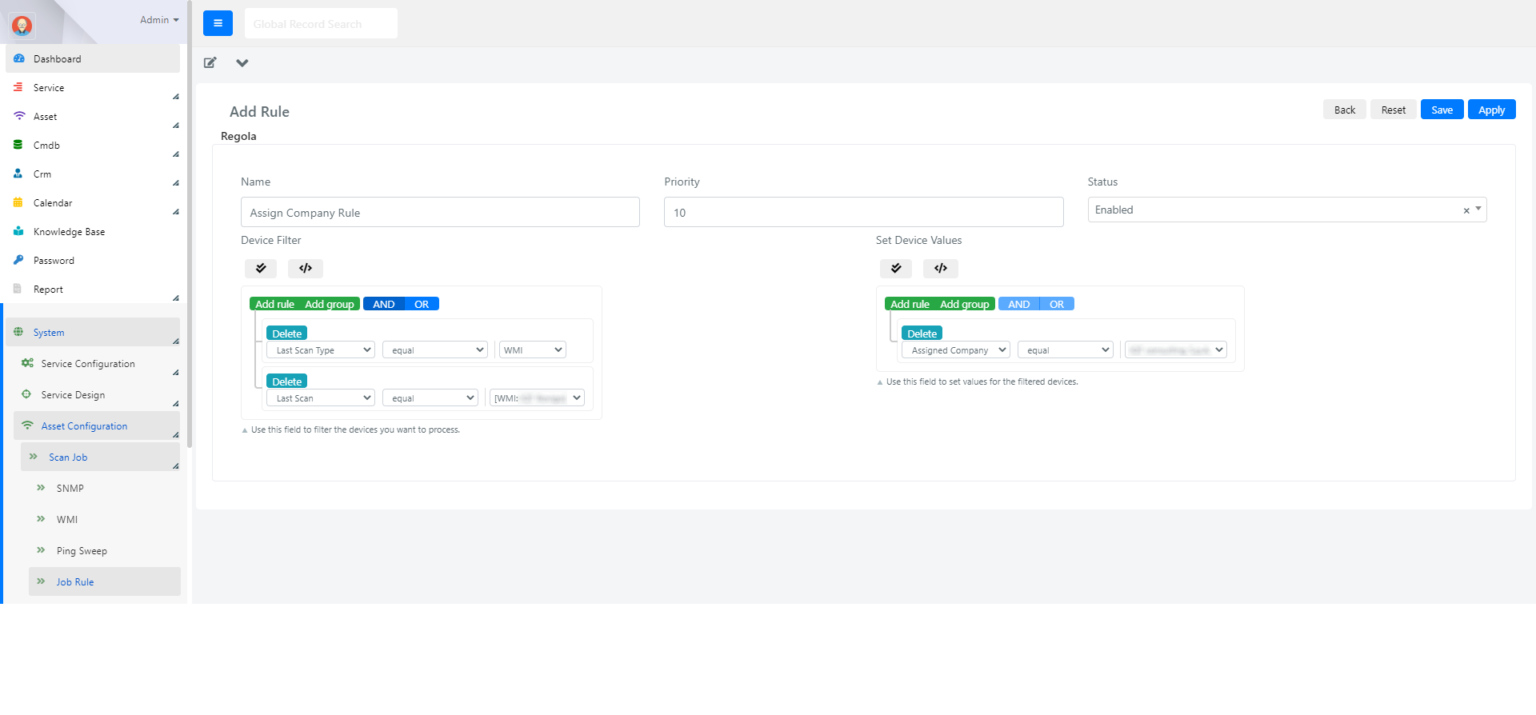
By configuring job rules, you can automatically populate collected device fields, such as assigning a company to a device according to the network where it was detected.
To configure a job rule, go to the System > Asset Configuration > Scan Job > Job Rule section in the Deepser Backend.
Through the query-builder "Device Filter" you can define a condition that is tested on devices. If this condition is satisfied, the device data is automatically set as defined by the query-builder "Set Device Values".
When you have multiple job rules, their execution order is decided by the assigned "Priority" value (descending order).
The rule is executed every time the remote collector sends data related to a device.
Scan Jobs
In this section you can find the available scan job protocols supported and configurable in Deepser:
- SNMP: SNMP scanning involves querying SNMP agents running on network devices to gather information about their configuration, status, and performance.
- WMI: WMI scanning involves querying Windows-based systems using WMI to gather detailed information about their hardware, software, and configuration.
- SSH: SSH scanning involves establishing SSH connections with various hosts on a network. This type of scanning is used for Unix devices.
- Ping Sweep: Ping scanning involves sending ICMP echo requests (ping packets) to a range of IP addresses within a network. By analyzing the responses, a scanner can determine which hosts are online and responsive.
SNMP Scan
To add a job that performs an SNMP scan, go to the System > Asset Configuration > Scan Job > SNMP section in the Deepser Backend, and click the "Add SNMP" button at the top right. The form for configuring an SNMP job will open.
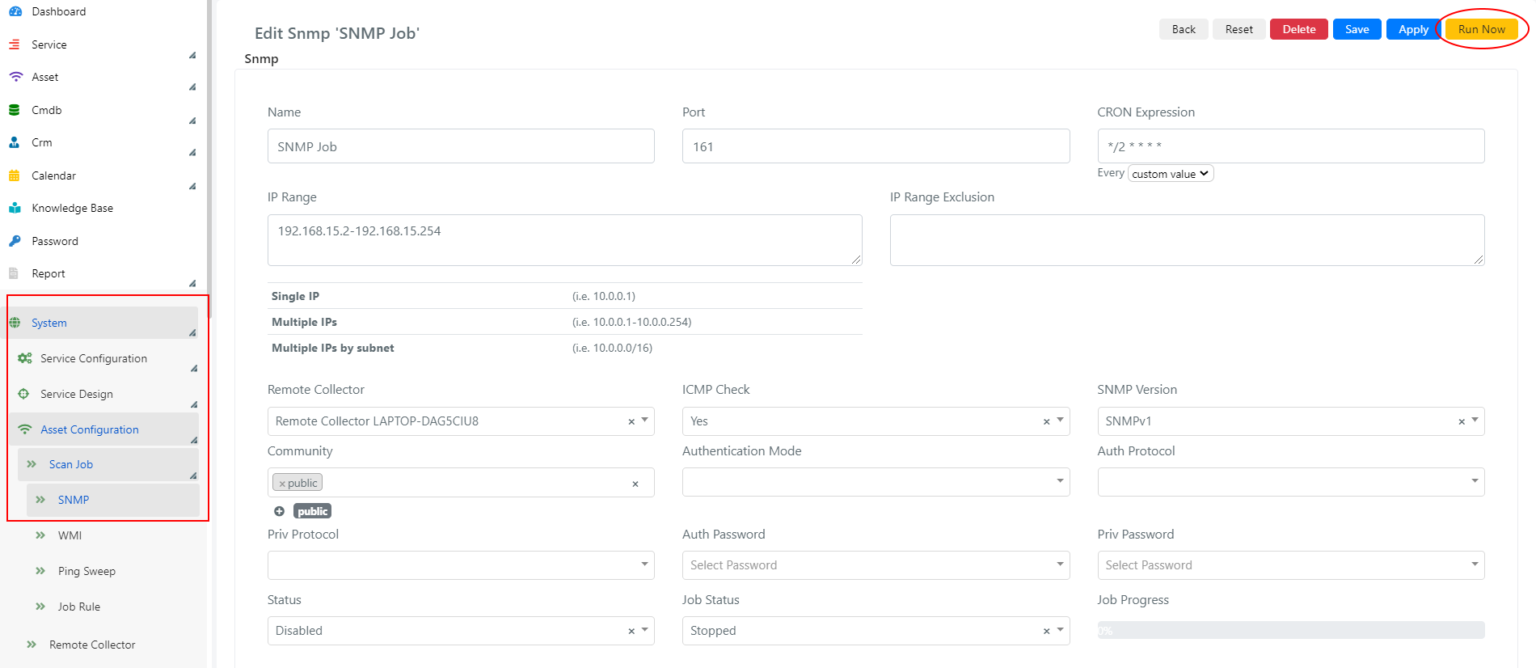
Form fields have the following meaning:
| Field | Meaning |
|---|---|
| Name | Name of the job. |
| Port | UDP port used by the remote collector to communicate with devices. The default is 161. |
| CRON Expression | Allows you to define the run interval of the job. |
| IP Range | Define the range of IP addresses to scan. You can specify one or more IP addresses, one or more ranges of IP addresses, or one or more subnets in CIDR notation. |
| IP Range Exclusion | Define which IP addresses should be excluded from the scan. The compilation rules are the same as in the "IP Range" field. |
| Remote Collector | Declare which remote collector will execute the job. |
| ICMP Check | Decide whether to perform an SNMP scan only for IPs that are reachable by ping. |
| SNMP Version | SNMP protocol version used to perform the network scan. Options are: SNMPv1, SNMPv2c, and SNMPv3. |
| Community | For each device, the remote collector will attempt authentication using each community string (following the insertion order) until it gets a positive response. The community strings must be saved within the Deepser Password module. Note: For the SNMPv3 version, the username used will be the one set in the "Username" field present in the record of the Password form. |
| Authentication Mode | Only for SNMPv3: set the authentication mode. |
| Auth Protocol | Only for SNMPv3: indicate the Auth Protocol. |
| Priv Protocol | Only for SNMPv3: indicate the Priv Protocol. |
| Auth Password | Only for SNMPv3: enter the password if the selected Auth Protocol requires it. The password must be stored within the Deepser Password module. |
| Priv Password | Only for SNMPv3: enter the password if the selected Priv Protocol requires it. The password must be stored within the Deepser Password module. |
| Status | If "Enabled", the job will be sent to the remote collector to be executed. |
| Job Status | Job execution status. Values are "Running" during execution by the remote collector or "Stopped". |
| Job Progress | Progress bar indicating the percentage of job execution. |
| Run Now | Once the job has been saved, use the yellow button at the top right to run it immediately. |
Once the job has been configured and executed, the collected devices will be visible in the Asset > Device section in the Deepser Backend.
WMI Scan - Windows Devices
To add a job that performs a WMI scan, go to the System > Asset Configuration > Scan Job > WMI section of the Deepser Backend, and click the "Add WMI" button at the top right.
The form for configuring a WMI job will open.
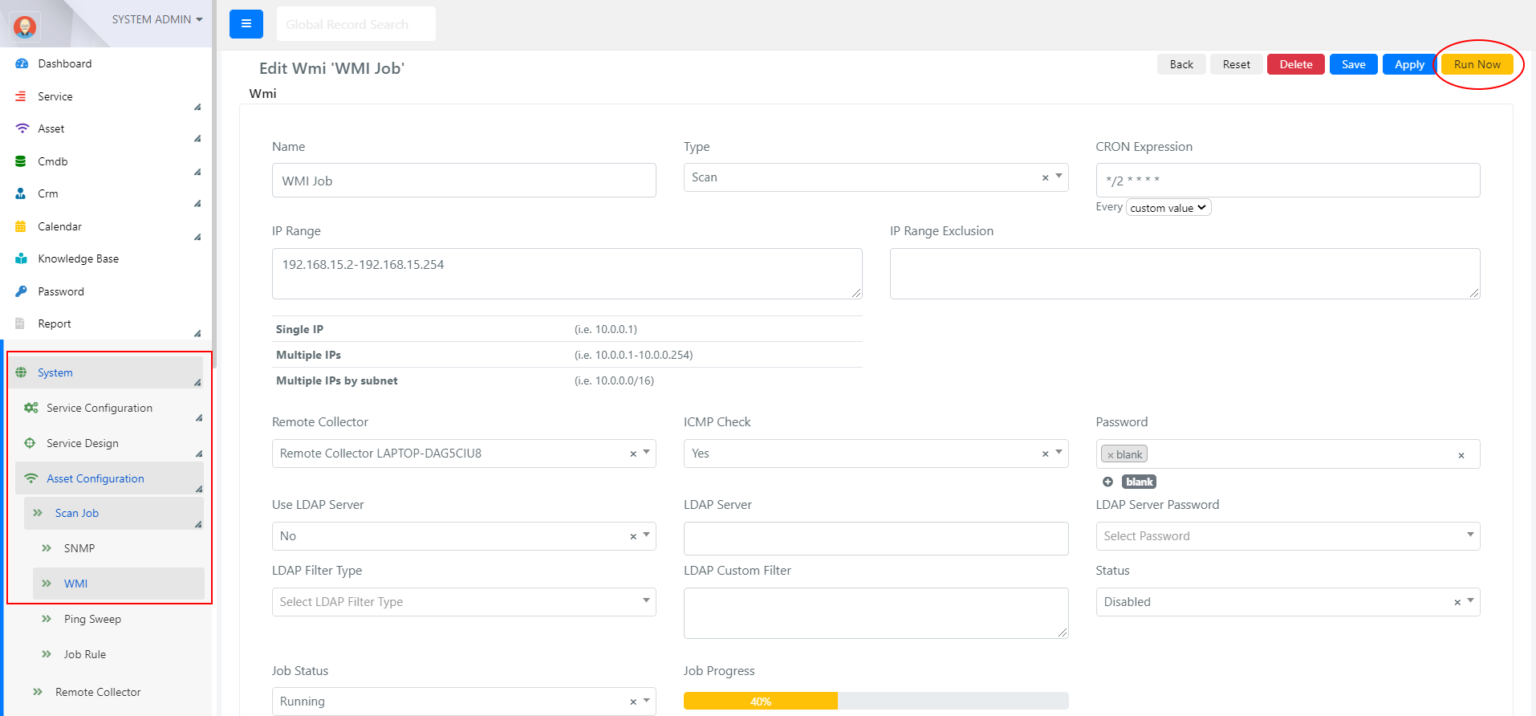
Form fields have the following meaning:
| Field | Meaning |
|---|---|
| Name | Name of the job. |
| Type | Choose whether the job you are configuring is a scan ("Scan") or "Agent Deploy". |
| CRON Expression | Allows you to define the run interval of the job. |
| IP Range | Define the range of IP addresses to scan. You can specify one or more IP addresses, one or more ranges of IP addresses, or one or more subnets in CIDR notation. |
| IP Range Exclusion | Define which IP addresses should be excluded from the scan. The compilation rules are the same as in the "IP Range" field. |
| Remote Collector | Declare which remote collector will execute the job. |
| ICMP Check | Decide whether to perform a WMI scan only for IPs that are reachable by ping. |
| Password | Specify one or more passwords to access devices. For each device, the remote collector will attempt authentication using each password (following the insertion order) until it obtains a positive response. Passwords must be stored in the Deepser Password module. |
| Use LDAP Server | Indicates whether an LDAP integration is needed. |
| LDAP Server | LDAP server. |
| LDAP Server Password | Password for authentication to the LDAP server. The password must be saved within the Deepser Password module. |
| LDAP Filter Type | Set one of the proposed LDAP filters or specify a custom filter. |
| LDAP Custom Filter | Custom LDAP filter. |
| Status | If "Enabled", the job will be sent to the remote collector to be executed. |
| Job Status | Execution status of the job. Values are "Running" during execution by the remote collector or "Stopped". |
| Job Progress | Progress bar indicating the percentage of job execution. |
| Run Now | Once the job has been saved, you can run it immediately using the yellow "Run Now" button at the top right. |
Once the job has been configured and executed, the collected devices will be displayed in the Asset > Device section in the Deepser Backend.
SSH Scan
To configure a job that performs an SSH scan, go to the System > Asset Configuration > Scan Job > SSH section in the Deepser Backend, and click the "Add SSH" button at the top right.
The form for configuring an SSH job will open.
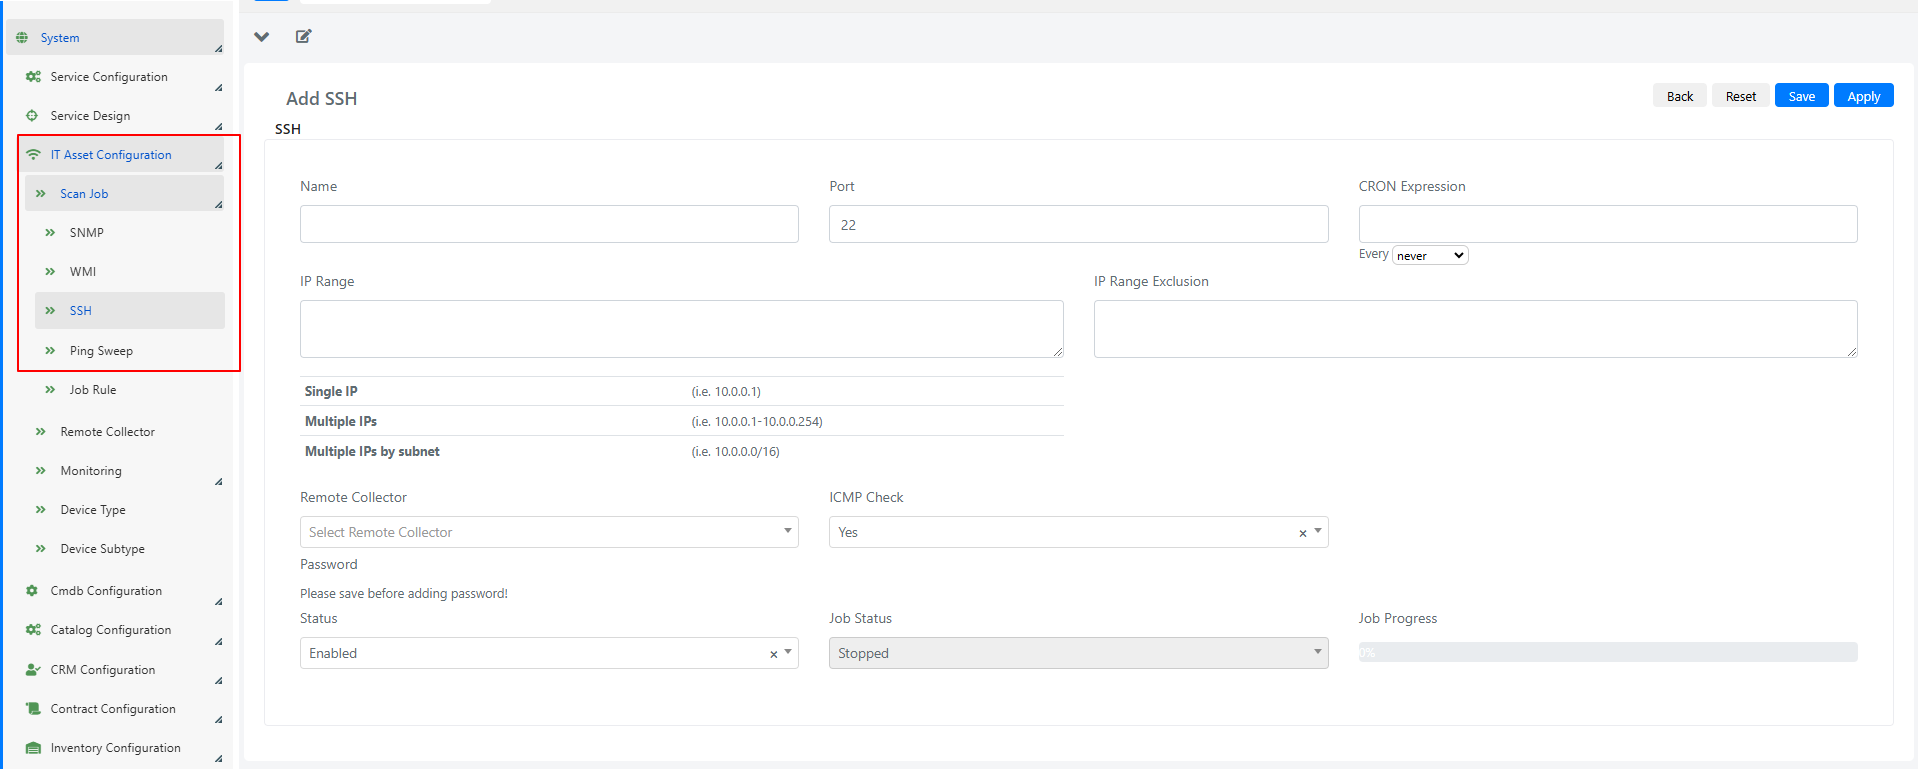
Form fields have the following meaning:
| Field | Description |
|---|---|
| Name | Name of the job. |
| Port | The port used for SSH connection. The default SSH port is 22. |
| Cron Expression | Allows you to define the run interval of the job. |
| IP Range | Define the range of IP addresses to scan. You can specify one or more IP addresses, one or more ranges of IP addresses, or one or more subnets in CIDR notation. |
| IP Range Exclusion | Define which IP addresses should be excluded from the scan. The compilation rules are the same as in the "IP Range" field. |
| Remote Collector | Declare which remote collector will execute the job. |
| ICMP Check | When set to YES, tests the reachability of a host on an IP network before scanning. |
| Password | A multiselect password field where you can specify one or more passwords to access devices. For each provided password, the remote collector will attempt authentication in the order they are listed until it receives a positive response. This field is related to the Deepser Password module, so you need to store the passwords in that module before they can be used here. To use the passwords in this field, you must set the "Use Password" field to "Yes" in the Password record. |
| Status | If "Enabled", the job will be sent to the remote collector to be executed based on the Cron Expression. |
| Job Status | Execution status of the job. Values are "Running" during execution by the remote collector or "Stopped". |
| Progress | Progress bar indicating the percentage of job execution. |
| Run Now | Once the job has been saved, you can run it immediately using the yellow "Run Now" button at the top right. |
Once the job has been configured and executed, the devices discovered during the scan will be visible in the grid under the Asset > Device section in the Deepser Backend.
Ping Sweep
To configure a job that performs a Ping Sweep scan, go to the System > Asset Configuration > Scan Job > Ping-Sweep section in the Deepser Backend, and click the "Add Ping Sweep" button at the top right.
The form for configuring a Ping Sweep job will open.
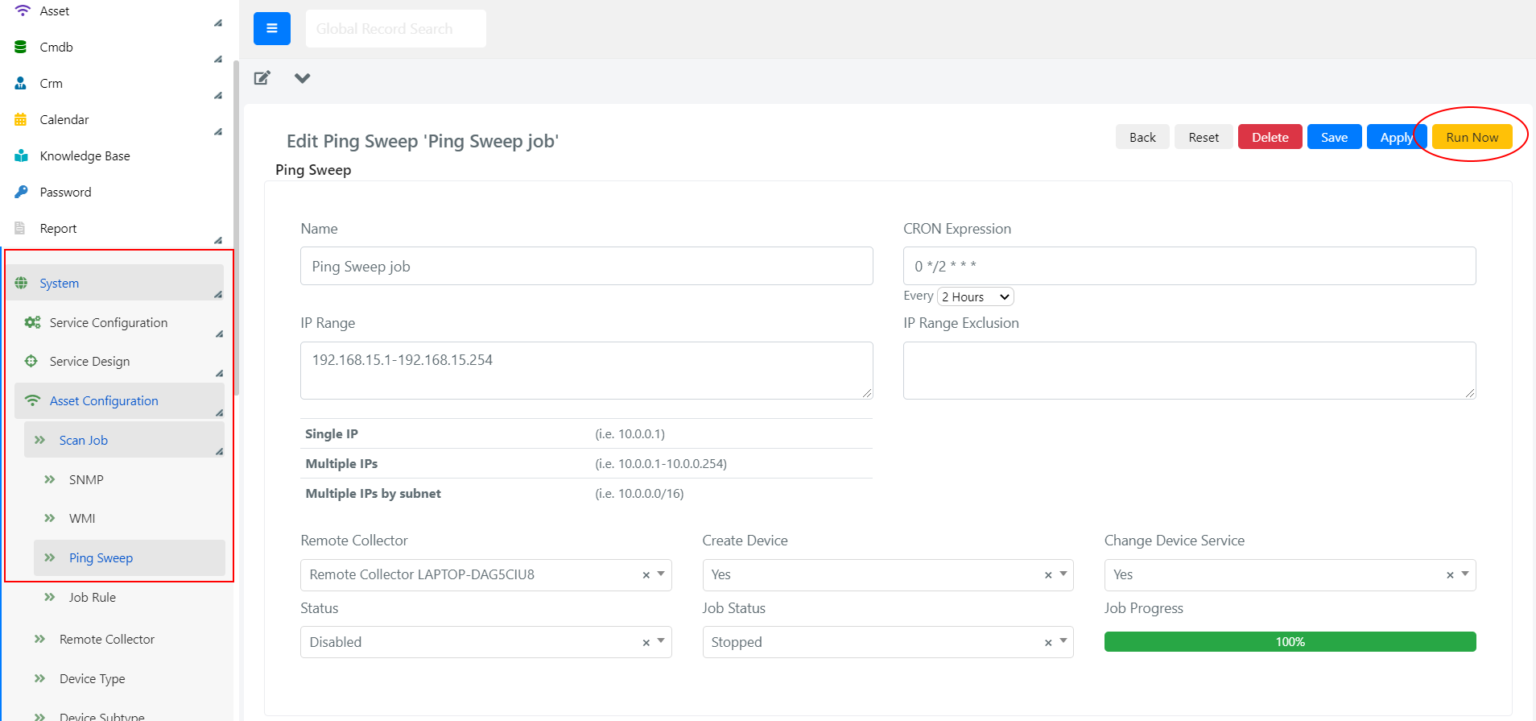
Form fields have the following meaning:
| Field | Meaning |
|---|---|
| Name | Name of the job. |
| CRON Expression | Allows you to define the run interval of the job. |
| IP Range | Define the range of IP addresses to scan. You can specify one or more IP addresses, one or more ranges of IP addresses, or one or more subnets in CIDR notation. |
| IP Range Exclusion | Define which IP addresses should be excluded from the scan. The compilation rules are the same as in the "IP Range" field. |
| Remote Collector | Declare which remote collector will execute the job. |
| Create Device | Decide whether you want to create devices in Deepser that represent the scanned IP addresses by marking them as "In Service". |
| Change Device Service | By enabling this option, you can change the service status of a device. When a previously added device is unreachable, it will be marked as "Not in service". This behavior also applies in the reverse case. |
| Status | If "Enabled", the job will be sent to the remote collector to be executed. |
| Job Status | Job execution status. Values are "Running" during execution by the remote collector or "Stopped". |
| Job Progress | Progress bar indicating the percentage of job execution. |
| Run Now | Once the job has been saved, use the yellow button at the top right to run it immediately. |
Once the job has been configured and executed, the devices found during the scan will be visible in the grid in the Asset > Device section in the Deepser Backend.
Remote Collector
A remote collector is a component in a network monitoring or management system designed to gather data from various devices and systems within a network.
You can find more details about its complete configuration here.
To check and verify all configured remote collectors (RCs), go to System > IT Asset Configuration > Remote Collector. By clicking on an RC record, the following screen will appear:
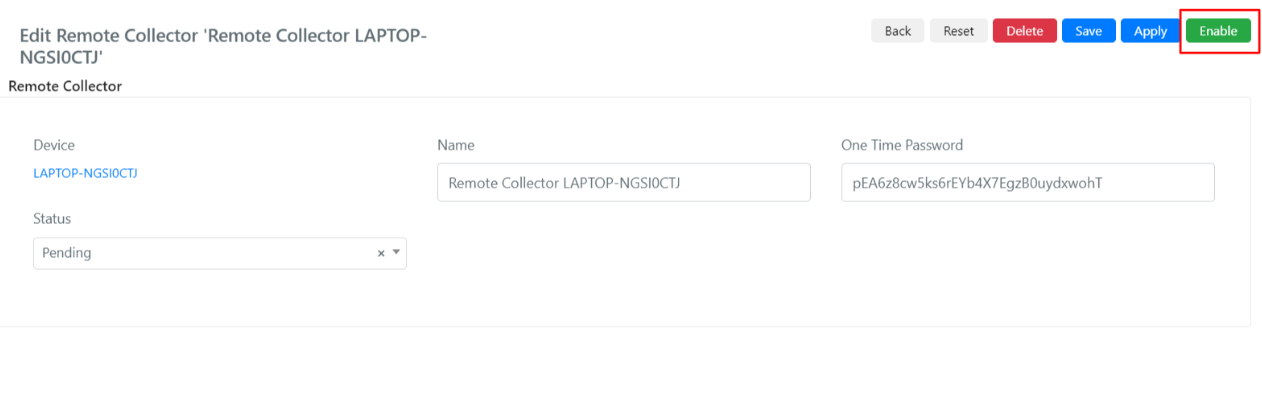
For remote collector editing or creation, the following fields are available:
| Field | Description |
|---|---|
| Device | Read-only field containing the relation to the device that originated the remote collector. |
| Name | Field for setting a custom name for the remote collector. If the RC was created via agent, the name will be pre-filled based on the name of the device configured as the RC. |
| One Time Password | OTP field automatically created on remote collector creation. You can use it for the RC configuration. |
| Status | Enable, Disable, or set the RC to Pending status. On creation, the default status is "Pending". |
Monitoring
The Monitoring model provides a comprehensive system for tracking and analyzing various device metrics. It helps maintain optimal performance and stability of the IT infrastructure by allowing for timely interventions based on real-time data and predefined thresholds.
To access the Monitoring section, navigate to System > IT Asset Configuration > Monitoring. In this section, you can:
- Configure Monitoring Rules: Select "Rule" to set up, view, or edit monitoring rules. These rules define the criteria and thresholds for monitoring device metrics and trigger alerts or actions when certain conditions are met.
- View Monitoring Events: Click on "Event" to review execution information and historical data related to monitoring rules. This section provides insights into rule triggers, alert statuses, and any actions taken based on the monitoring criteria.
These functionalities enable effective management of IT infrastructure by ensuring that potential issues are detected and addressed promptly, thereby minimizing downtime and optimizing performance.
Rule
By using the Rule model, you can create specific rules for monitoring different device metrics and set up alerts or Service Operation creation when the specified conditions are met.
Clicking on the "Add Rule" button will open the following screen:
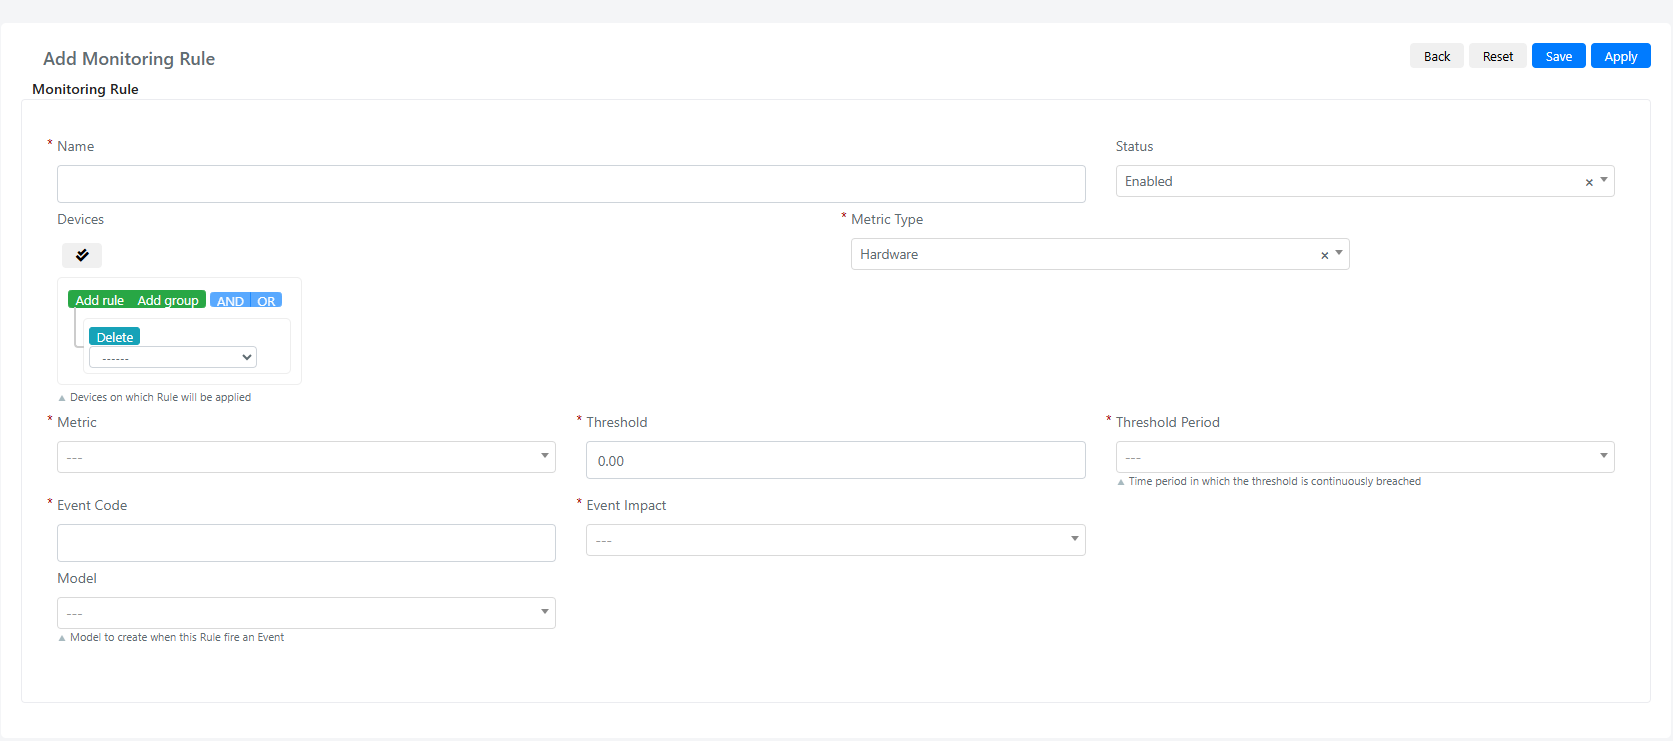
For a rule configuration, the following fields are available:
| Field | Description |
|---|---|
| Name | Text field that identifies the rule. |
| Status | Select field that enables or disables the rule. |
| Devices | Query Builder field where you can filter the devices for which this rule will apply. |
| Metrics Type | Select field with the available metrics types for the device. |
| Metric | Select field where you can choose the metric on which the rule will be based. |
| Threshold | Specifies the threshold value for the selected metric. When the metric exceeds this value, the rule triggers an alert or action. |
| Threshold Period | Numeric field that sets the time period over which the threshold is evaluated. It ensures that temporary spikes or anomalies do not trigger unnecessary alerts. |
| Event Code | A unique code identifying the event executed by this rule. |
| Event Impact | Select field describing the potential impact of the event, such as "Low", "Medium", or "High". |
| Model | Select field where you can set a model like operation or activity, which will be created after the rule is triggered. When a model is selected, a new query builder will appear that allows you to set the information for the model record you want to create. |
Event
In the Event section of the monitoring, you can see all the rules executed based on your configurations. This section contains the log of rule executions.
Clicking on a single log record provides information about the executed rule and its related details.
This detailed view helps you understand the context of rule triggers, evaluate the effectiveness of the monitoring rules, and troubleshoot any issues that may have arisen.