Create a Custom Module
The Module Creator is a Deepser component that allows Administrators to build new custom modules through a graphical interface, respecting the Deepser data structure. This guide covers the full lifecycle of a custom module: creation, installation, regeneration, and import/export.
Access the Module Creator
To access the Module Creator, navigate to System > Module Creator.
The following screen will open:
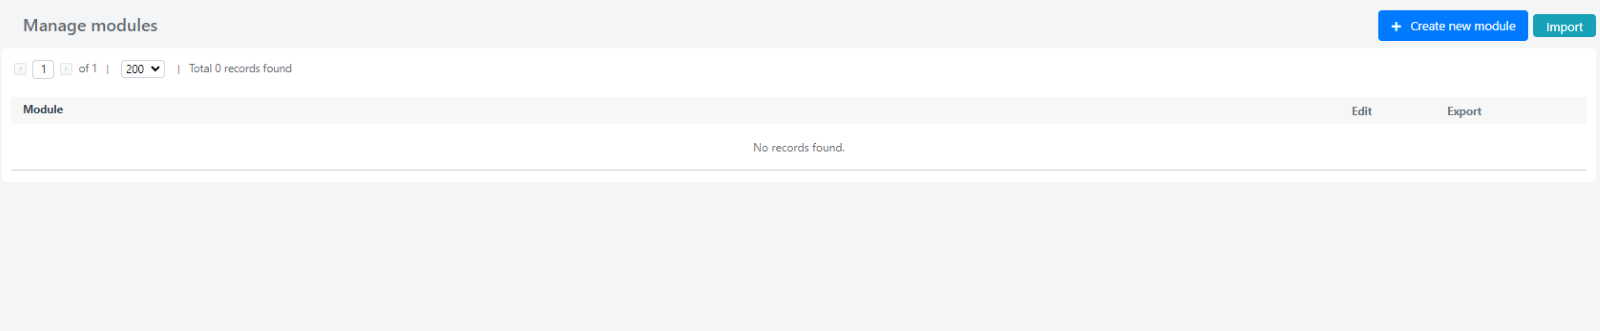
Create a New Module
- Click the "Create new module" button at the top right. The following screen will appear:
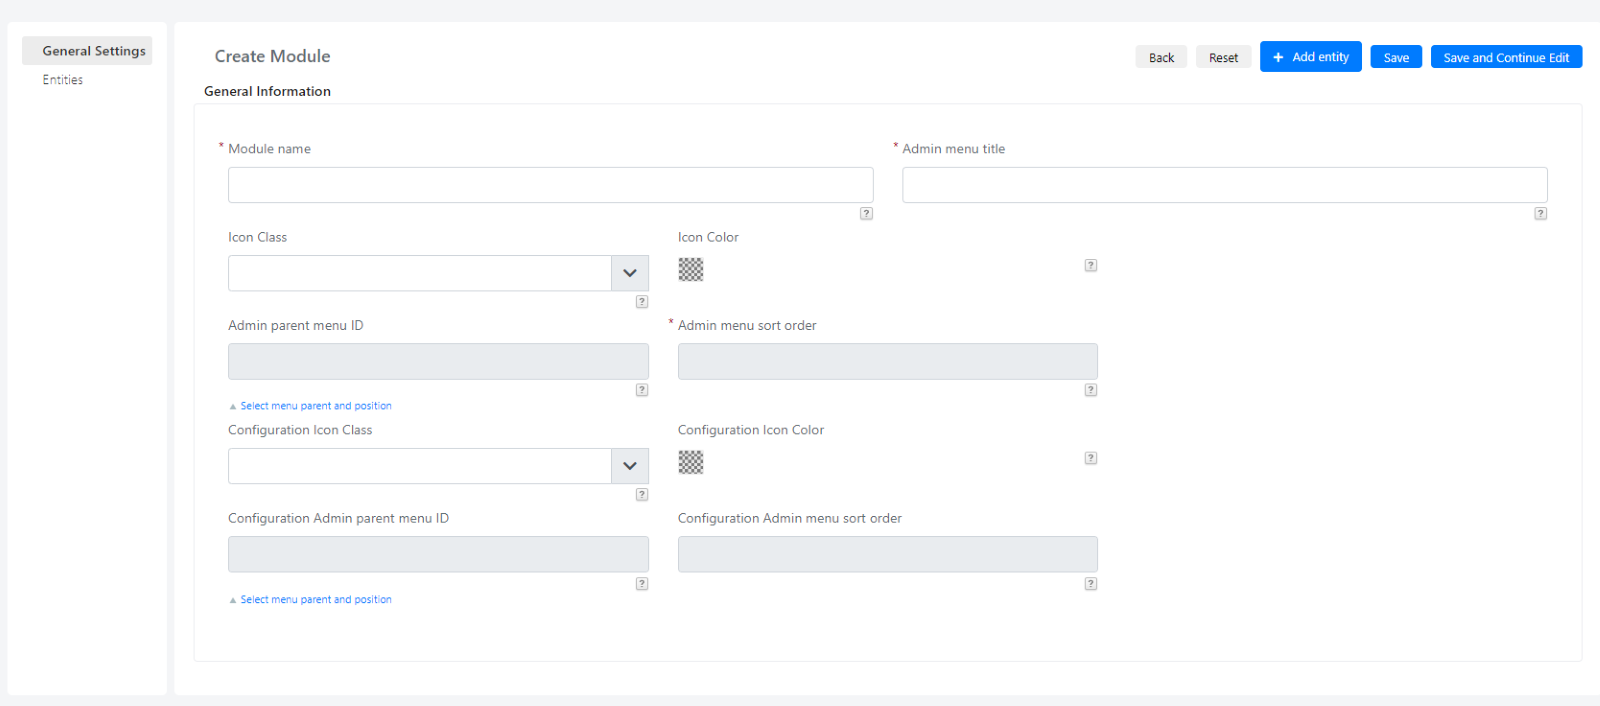
General Settings Fields
Below is a list of the fields in the "General Settings" tab and their meanings:
| Field | Description |
|---|---|
| Module name | Name of the new custom module you want to create. Note: It can only contain letters or numbers -- no other characters (no spaces allowed). |
| Admin menu title | This field indicates the name of the module in the left-hand menu. |
| Icon Class | Associates an icon with the new custom module, which will be displayed in the main menu. This field refers to the section accessible to all Deepser Backend users. |
| Icon Color | Selects the color to be applied to the icon and label displayed on the menu. This field refers to the section accessible to all Deepser Backend users. |
| Admin parent menu ID | Determines the exact position in the menu where the operational references of the new module will be displayed. The selection must be made by clicking on the note of the "Select menu parent and position" field. |
| Admin menu sort order | This read-only field is automatically populated based on the selection made through the "Admin parent menu ID" field. |
| Configuration Icon Class | Associates an icon with the configuration section of the newly created custom module. This field refers to the section accessible to Deepser admin users. |
| Configuration Icon Color | Selects the color for the icon and the configuration label of the new custom module displayed on the menu. This field refers to the section accessible to Deepser admin users. |
| Configuration Admin parent menu ID | Determines the exact position in the menu where the configuration section references will be displayed. The selection must be made by clicking on the note of the "Select menu parent and position" field. Normally, the configuration section is located in the System menu. |
| Configuration Admin menu sort order | This read-only field is automatically populated based on the selection made through the "Configuration Admin parent menu ID" field. |
Select the Menu Location
To select the position of the new module within the menu:
- Click "Select menu parent and position".
- Click "Insert here" in the selection popup.
Here is an example:
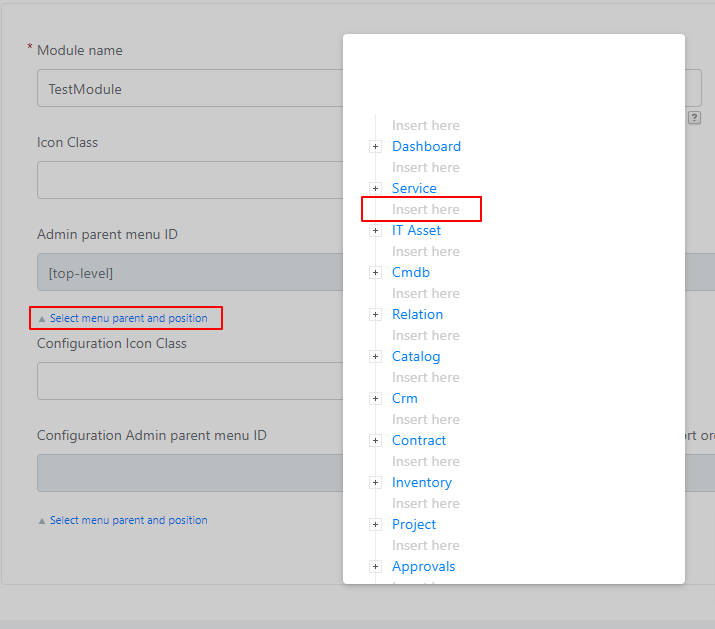
In the example above, according to the screenshot, the new module would be inserted between the "Service" and "IT Asset" sections of the menu.
Configure Entities
Once you have finished filling in the fields of the "General Settings" tab, navigate to the "Entities" tab. To proceed with saving, the new module must have at least one entity associated with it.
- Click the "Add entity" button located at the top right corner.
Each new entity is divided into "Settings" and "Fields/Attributes":

Entity Settings
Through the "Settings" section, you can enable modules for some of Deepser's standard management tasks, such as associating categories, configuring types, and more.
To fully view all the fields in the "Settings" or "Fields/Attributes" section, click on the "+" icon next to them. Below is the screenshot of all configurable fields for the "Settings" section:
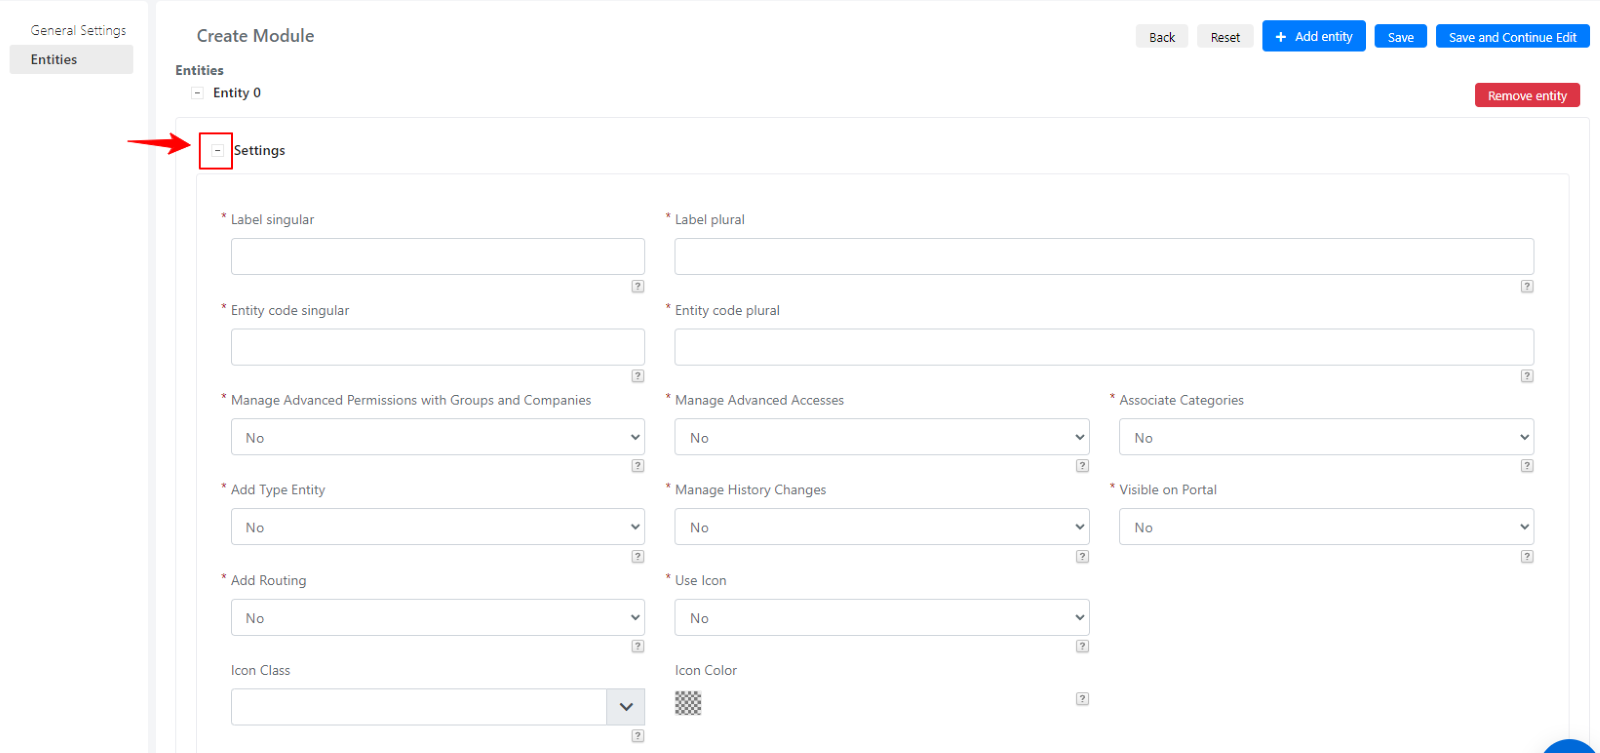
Below is a list of the fields in the "Settings" section and their meanings:
| Field | Description |
|---|---|
| Label singular | Label of the new custom module in singular form. |
| Label plural | Label of the new custom module in plural form. |
| Entity code singular | The value entered in this field (which should refer to the name of the new module) will be used for the names of variables, files, and tables within Deepser. This simplifies the process of making configurations via the scripting area. The value should be specified in singular form. |
| Entity code plural | Serves the same purpose as the "Entity code singular" field, except the value should be specified in plural form. |
| Manage Advanced Permissions with Groups and Companies | If set to YES, the "Owner Group", "Owner Company", and "Owner User" fields will be created. Through these fields you can manage the entity of the new module using custom group rules. |
| Manage Advanced Accesses | Setting this field to YES will create the "Access Group", "Access Companies", and "Access Users" fields, typically used to expand visibility for the records. |
| Associate Categories | Setting this field to YES will create the fields "category1", "category2", "category3", "category4", allowing you to associate standard Deepser categories with the entity of this new module. |
| Add Type Entity | Setting this field to YES will create the "Type" field, allowing you to manage types on this entity. |
| Manage History Changes | Setting this field to YES will create the "History Changes" field for this entity, providing a history of all changes made on a record. |
| Visible on Portal | Setting this field to YES will allow you to manage the new entity on the User Portal side as well. |
| Add Routing | Setting this field to YES will allow you to use the new entity in Deepser routing rules. |
| Use Icon | Setting this field to YES will create an "icon" selection field, enabling you to associate an icon with the new entity. |
| Icon Class | Selects an icon to display in the menu for this new entity. |
| Icon Color | Selects a color for the icon and label of the entity. |
Fields and Attributes
Once you have finished filling in the "Settings" section, you can create new dedicated fields for the new entity. To access the details of the "Fields/Attributes" section, click on the "+" icon. From here, you can add new fields by clicking the "Add field / attribute" button.
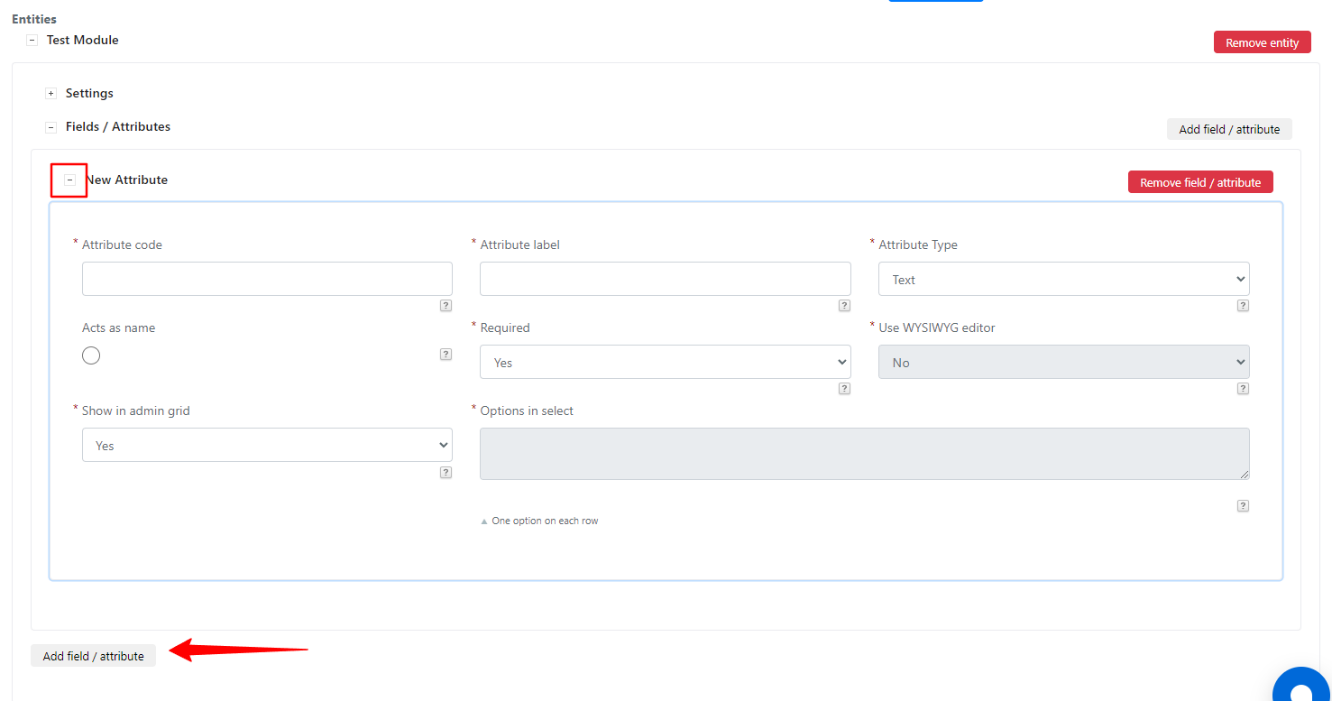
Below is the list of configurable fields for a new field/attribute:
| Field | Description |
|---|---|
| Attribute code | The field code that will be used for tables and variables in Deepser. Guidelines: the first character must be a letter; only lowercase letters, numbers, or underscores (_) can be entered; reserved names such as "data" or "child" cannot be used. |
| Attribute label | The label of the field that will be displayed in the forms. |
| Attribute Type | The type of field you want to create. |
| Acts as name | Each entity must have an attribute that functions as its "Name". This attribute will be used to distinguish between different entities and will appear in dropdown menus. This option is only available for text, numeric, and decimal attributes. Note: Only one of the defined fields can have this flag. Normally you should use it for the main field of the entity you are creating. |
| Required | If set to Yes, indicates a required field. |
| Use WYSIWYG editor | If set to Yes, indicates that the field can be managed by an editor. This option is only activated if the field type is "Textarea". |
| Show in admin grid | When set to Yes, includes the new field in the entity's default grid. |
| Options in select | A list of values for select or multiselect fields. All values must be separated by a pipe (|) delimiter. If you want to include an empty option as the first value, start with a pipe symbol. |
Save and Install the Module
- Once you have completed all configurations and entered all fields, click "Save" or "Save and Continue Edit".
- After saving, click the "Install" button to install the new module:

Once the installation is complete, you will find the new module and its entity in the Deepser menu.
Regenerate a Module
Within the configuration of the new custom module, a "Regenerate" button will appear:

Use this button to regenerate the module when its configuration changes. For example, if a feature is enabled on one of its entities or a new field is added, clicking "Regenerate" will propagate and apply the changes.
The Regenerate button will back up the data entered so far in the custom module, delete and recreate the module structure, and then restore the previously entered data.
Uninstall a Module
After installation, an "Uninstall" button will also appear.
Clicking the Uninstall button will permanently delete the entire configuration of the custom module and the module itself, including all records saved within it. You will not be able to recover the data.
Import and Export Modules
Through the Module Creator, you can export and import the entire configuration of a created module.
- Save the module configuration.
- Return to the main list at System > Module Creator.
- Use the "Export" column on each configuration record to export, or click the "Import" button to import a module configuration.
