Workflow Logic Blocks
Logical blocks in Deepser workflows allow you to redirect the flow of code execution based on conditions, loops, and error handling. This page covers all available logic blocks and how to configure them.
If Conditional Block

The conditional block "IF" is part of the flow control instructions. It allows you to direct the flow towards the execution of certain blocks or others based on whether the condition evaluates to true or false.
The "IF" block is located in the menu: Logic. To access it, click on the search bar that will appear:

The "IF" block visually has 2 branches: the left branch (executed if the condition evaluates to false, and considered the continuation of the flow execution) and the right branch (executed if the condition evaluates to true).
Important: If an ELSE block is not placed in the left branch, or an "End Flow" block is not specified in the right branch after the last instruction, the flow will first execute the right branch and then the left branch.
Example: Configuring the If Block
Suppose that when creating a Service Operation, you want to assign a specific mailbox if the type of service is "Incident."
The "IF" block will then be configured as follows:

And the flow will look like this:

Now in the right branch, insert an "Update Record" block configured as follows:
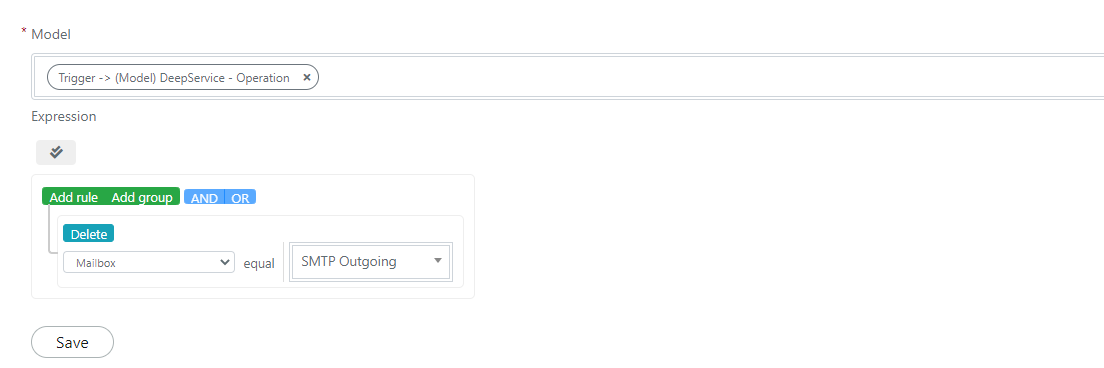
The flow will eventually look like this:

Once this flow is activated, new "Incident" Service Operations will have the mailbox defined in the flow.
Else Conditional Block
The conditional block "ELSE" is part of the flow control instructions. It allows you to direct the flow towards the execution of certain blocks or others based on the condition of the associated "IF" block.
The "ELSE" block requires an associated "IF" block in order to be used.
The ELSE block is located in the menu: "Logic." To access it, click on the search bar that will appear:
The "ELSE" block visually has 2 branches: the left branch (considered the continuation of the flow execution) and the right branch (executed if the condition of the associated "IF" block evaluates to false).
Important: If an "End Flow" block is not placed in the right branch after the last instruction, the flow will first execute the right branch and then the left branch.
Example: Configuring the Else Block
Suppose you want to create a flow that, when a new Service Operation is created, automatically assigns the priority -- assigning high priority if the urgency is high, otherwise assigning medium priority.
To do this, add an "If" block configured as follows:
Now in the right branch, insert an "Update Record" block configured as follows:
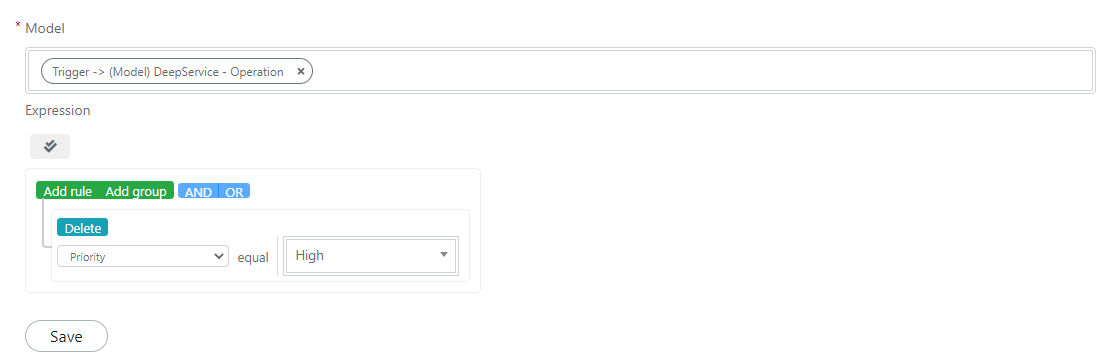
In the left branch, insert an "ELSE" block. In its right branch, insert an "Update Record" block configured as follows:
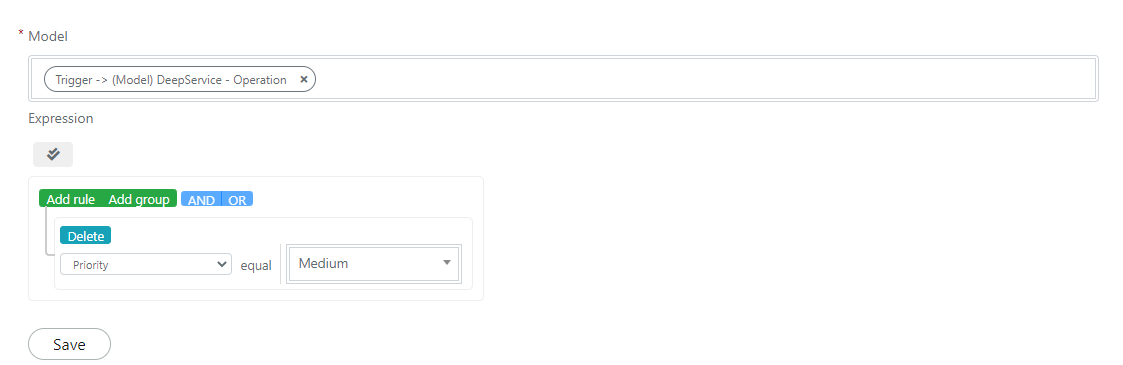
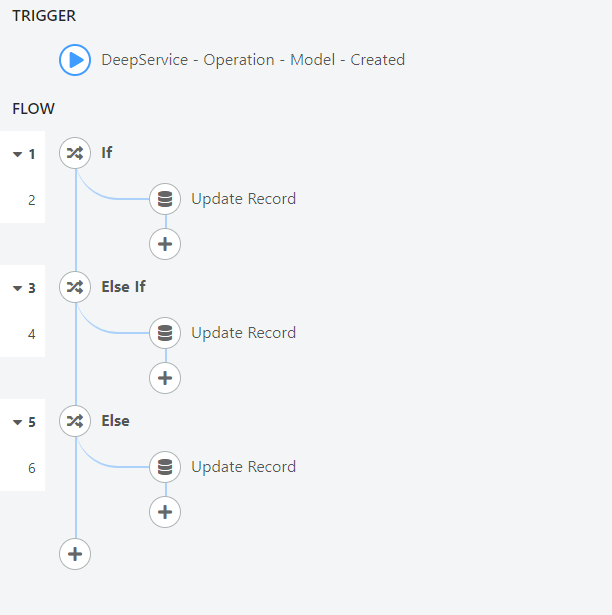
The flow will look like this:
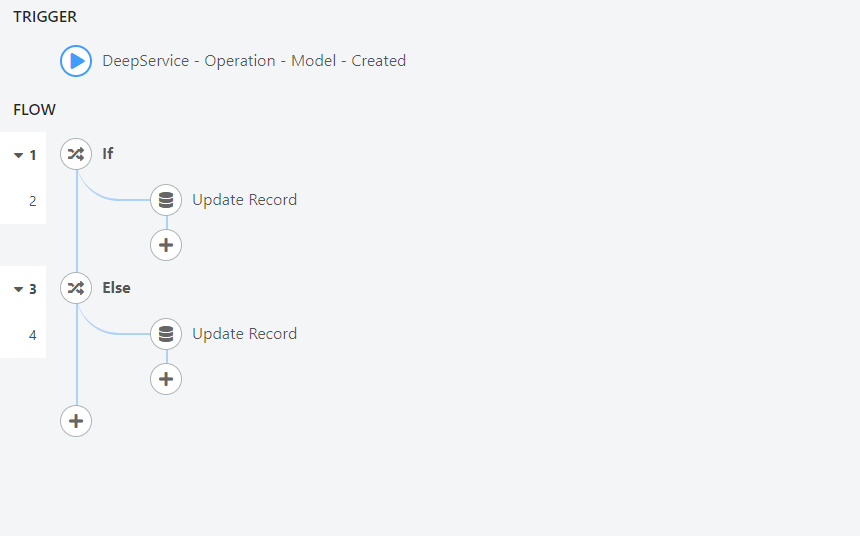
Else If Conditional Block

The conditional block "ELSE IF" is part of the flow control instructions. It allows you to direct the flow towards the execution of certain blocks or others based on the condition of the associated "IF" block and the condition specified in the "ELSE IF" block itself.
The "ELSE IF" block requires an associated "IF" block. It can be associated with one or more "ELSE IF" blocks but with only a single "ELSE" block.
The "ELSE IF" block is located in the menu: Logic. To access it, click on the search bar that will appear:
The "ELSE IF" block visually has 2 branches: the left branch (considered the continuation of the flow execution) and the right branch (executed if the condition of the associated "IF" block evaluates to false and the condition specified in the "ELSE IF" block evaluates to true).
Important: If an ELSE block is not placed in the left branch, or an "End Flow" block is not specified in the right branch after the last instruction, the flow will first execute the right branch and then the left branch.
Example: Configuring the Else If Block
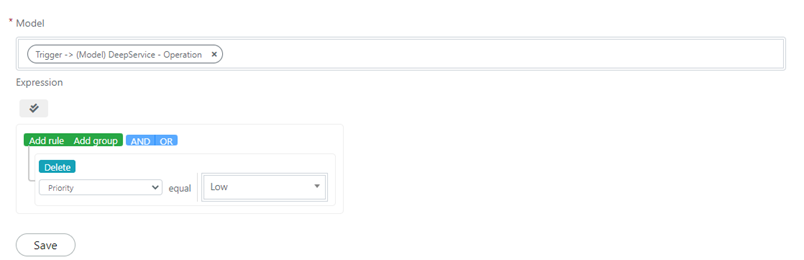
Suppose you want to extend the flow created in the previous example. You want to assign the newly created Service Operation a low priority if the urgency is low.
To do this, add an "ELSE IF" block before the ELSE block. Position yourself on top of the ELSE block and click the "+" symbol that will appear:

Once clicked, enter from the "Logic" menu an "ELSE IF" element configured as follows:
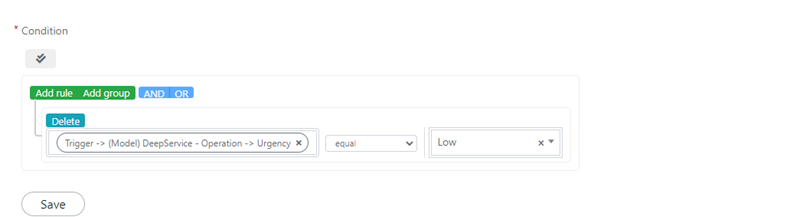
In the right branch of the "ELSE IF" block, insert an "Update Record" block with the following configuration:
The final flow will look like this:
Foreach Block
The "FOREACH" block allows you to iterate on collections of entities in Deepser and perform one or more actions for each entity in the collection.
The "FOREACH" block is located in the menu: Logic. To access it, click on the search bar that will appear:
The "FOREACH" block visually has 2 branches: the left branch (considered the continuation of the flow execution) and the right branch (where you place the actions to be performed for each iteration of the cycle).
If you insert an "End Flow" block in the left branch, the execution of the flow will end.
Example: Configuring the Foreach Block
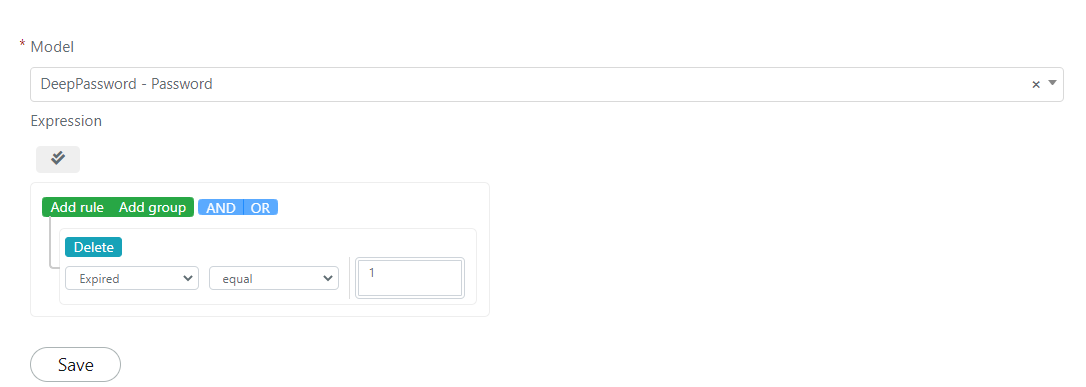
Suppose you want to send an email notification to the user who created a password in the password manager when it expires. For this example, we consider a password expired when its "Expired" field is set to "Yes."
To do this, first recover the collection of entities of type "DeepPassword -- Password" that are expired. Insert a "Lookup Records" block configured as follows:
You can then iterate on the password entities by adding a "FOREACH" block below the previous block. In its right branch, insert a "Send Email" block:

The "FOREACH" block will be configured as follows:

The "Send Email" block will be configured as follows:
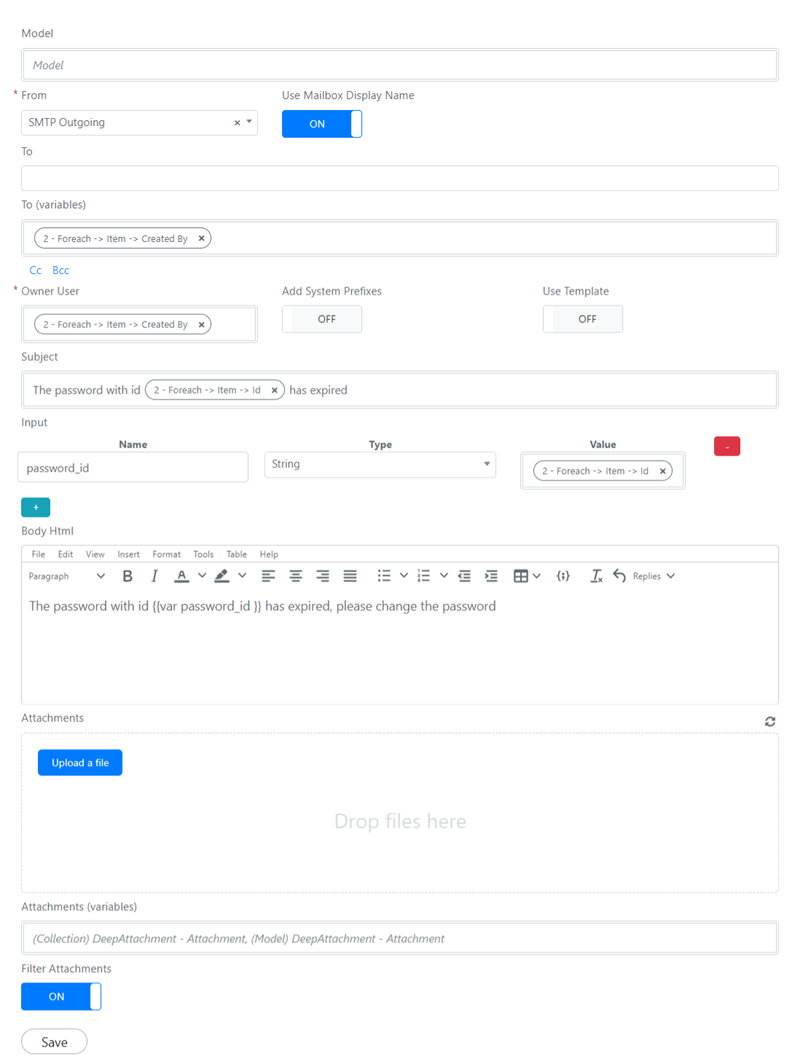
While Block

The "WHILE" block allows you to iteratively perform operations as long as a condition is met.
The "WHILE" block is located in the menu: Logic. To access it, click on the search bar that will appear:
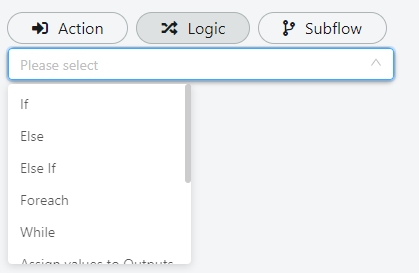
The "WHILE" block visually has 2 branches: the left branch (considered the continuation of the flow execution) and the right branch (where you place the actions to be performed for each iteration of the cycle).
If you insert an "End Flow" block in the right branch, the execution of the flow will end immediately, similar to what would happen with a break statement in classical programming.
Assign Value to Variable Block
The "Assign value to Variable" block allows you to assign an arbitrary value or the result of processing to a variable.

Example: While Block Configuration
Suppose you want to create a series of task review tasks to assign to the Service Operation assignee, one per month for a total of 10 months.
Assume in addition that you want to calculate the date and save it in a custom field "Two Dates."
To do this, configure the flow trigger as follows:
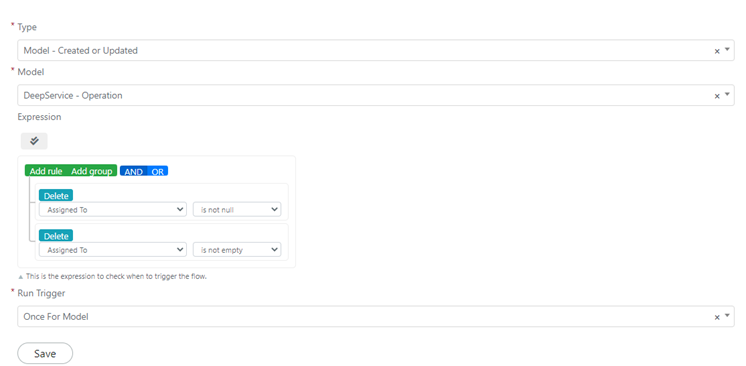
Next, add a script block that defines an iteration variable for the "WHILE" cycle.
The Script block will be configured as follows:
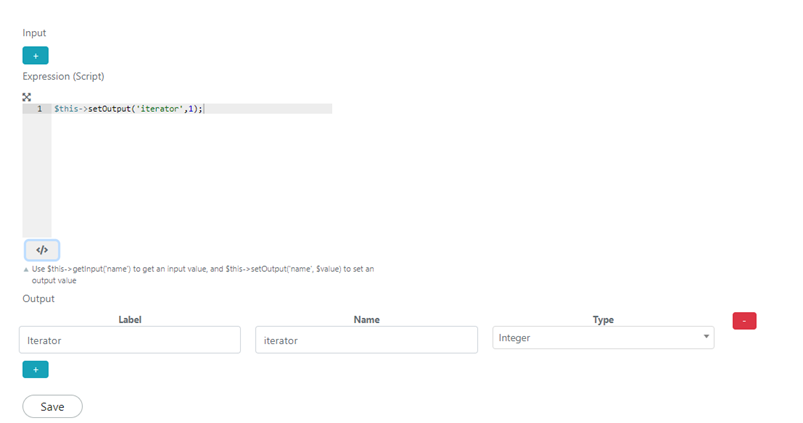
Now add from the Logic section the "WHILE" block, configured as follows:
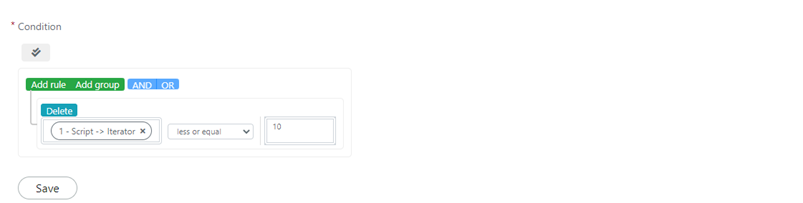
In the right branch, add a new script block that handles incrementing the variable and calculating the due date for the review of the Service Operation.
The script will be configured like this:
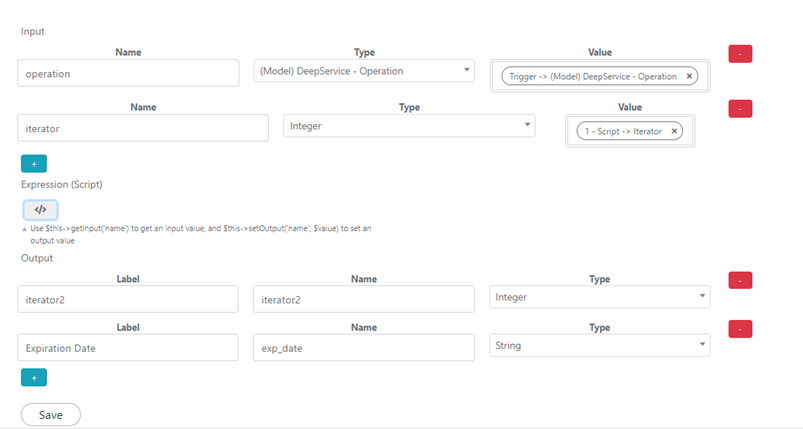
In the "Expression (Script)" field, enter the following code:
$iterator = $this->getInput('iterator');
$operation = $this->getInput('operation');

$expirationDate = new DateTime($operation->getCreatedAt());
$interval = new DateInterval("P{$iterator}M");
$expirationDate->add($interval);

$this->setOutput('exp_date',$expirationDate->format('Y-m-d'));
$this->setOutput('iterator2', $iterator+=1);
Below the previous block, add a "Create Record" block configured to create a task at each iteration with the variables calculated by the previous script.
For the creation of tasks, refer to the image below:
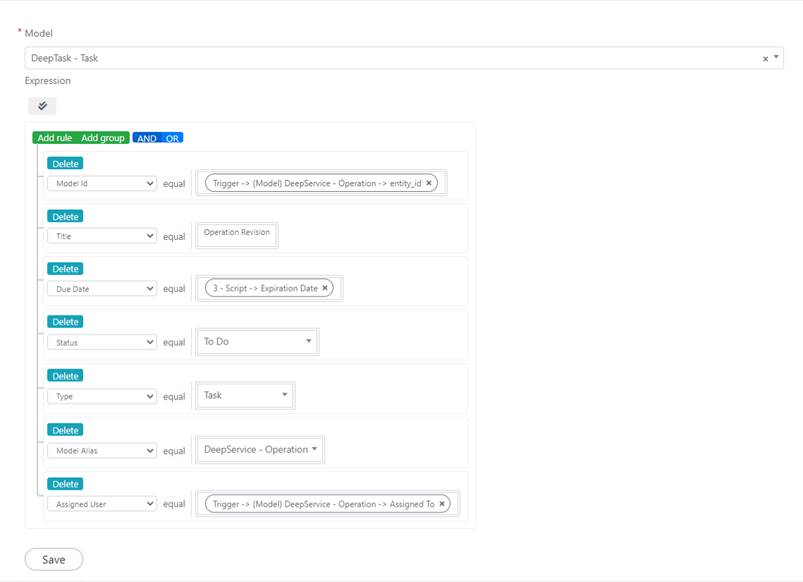
If you do not specify the "Model Id" and "Model Alias" fields, the tasks created will not be displayed in the Service Operation.
As a last block, insert an "Assign Value to Variable" block configured as follows:

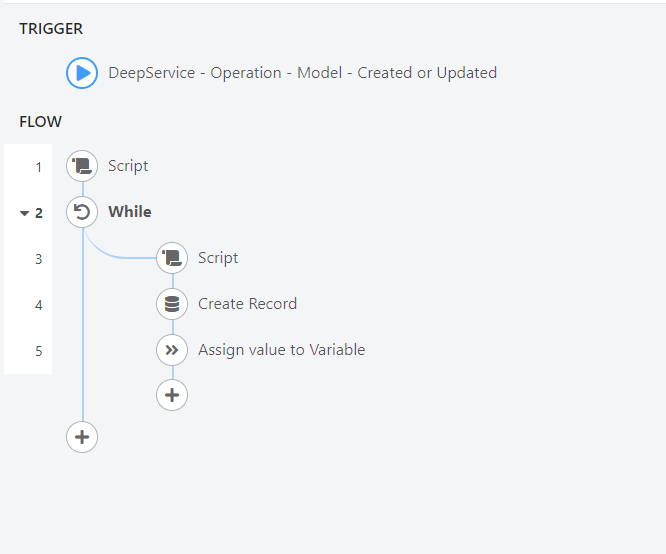
The final result will look like this:
Try -- Catch and End Flow
Try -- Catch Construct
The try-catch construct is a block that allows you to capture exceptions that can be generated by the various blocks of Deepser flows.
It consists of two blocks: the Try block and the Catch block.
In the right branch of the Try block, insert the blocks for which you want to capture any exceptions. In the left branch, place a Catch block, which will execute the actions placed in its right branch if and only if an exception is generated in the Try block.
Example: Configuring the Try -- Catch Block
Suppose you want to run a script that might throw an exception during execution, and you want to log a custom error message if an exception is raised.
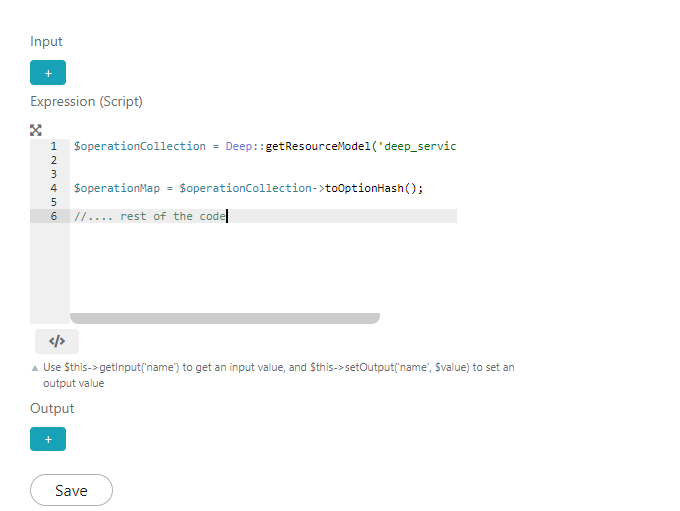
To do this, insert a Try block. In its right branch, insert a "Script" block with the following code:
$operationCollection = Deep::getResourceModel('deep_service/operation');

$operationMap = $operationCollection->toOptionHash();

//.... rest of the code
In this example, the code deliberately contains an error to test the TRY-CATCH construct. Specifically, the alias to get the Operation collection is "deep_service/operation_collection" and not "deep_service/operation", which is the alias to retrieve a single operation.
Then the script block will be configured like this:
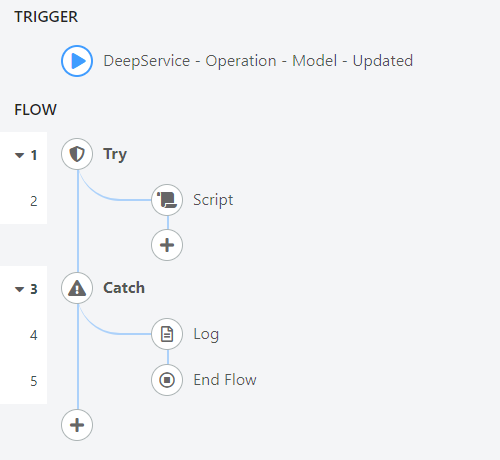
In the left branch of the Try block, insert a "Catch" block. In its right branch, insert your custom logging function.
Specifically, in the right branch of the Catch block, insert a "Log" block configured as follows:

Below the "Log" block, insert an "End Flow" block. In this specific case it could be omitted since there are no other actions to perform, but in a more general case it may be sensible to exit the flow when an exception occurs.
The result will look like this:
Assign Value to Outputs Block

The "Assign Value to Outputs" block can only be used in subflows to set the value of an output.
When inserted in a SubFlow that has at least one output, the block will be rendered as follows:

If the block is used in a flow, it will display as follows:
Example: Assign Value to Outputs Block Configuration
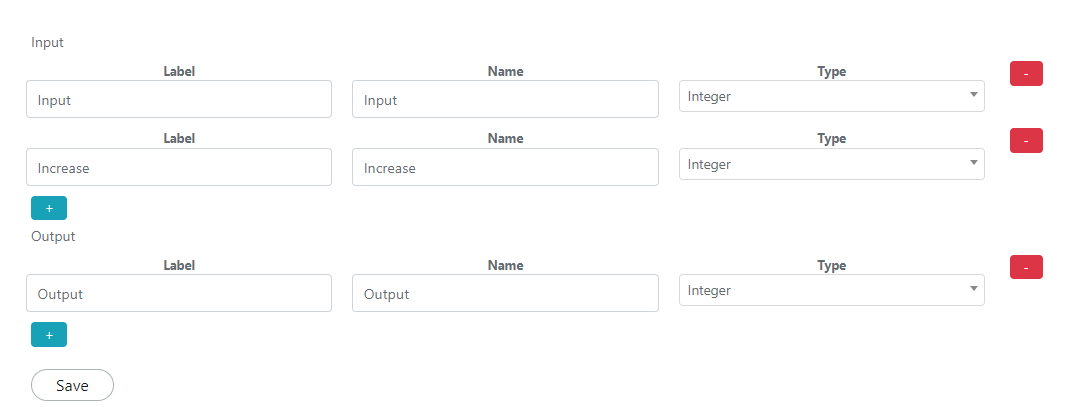
Suppose you want to create a subflow that increments an integer variable passed as input.
To do this, create a new SubFlow whose "INPUTS & OUTPUTS" section will be configured as follows:
Now add a "Script" block configured as shown here:
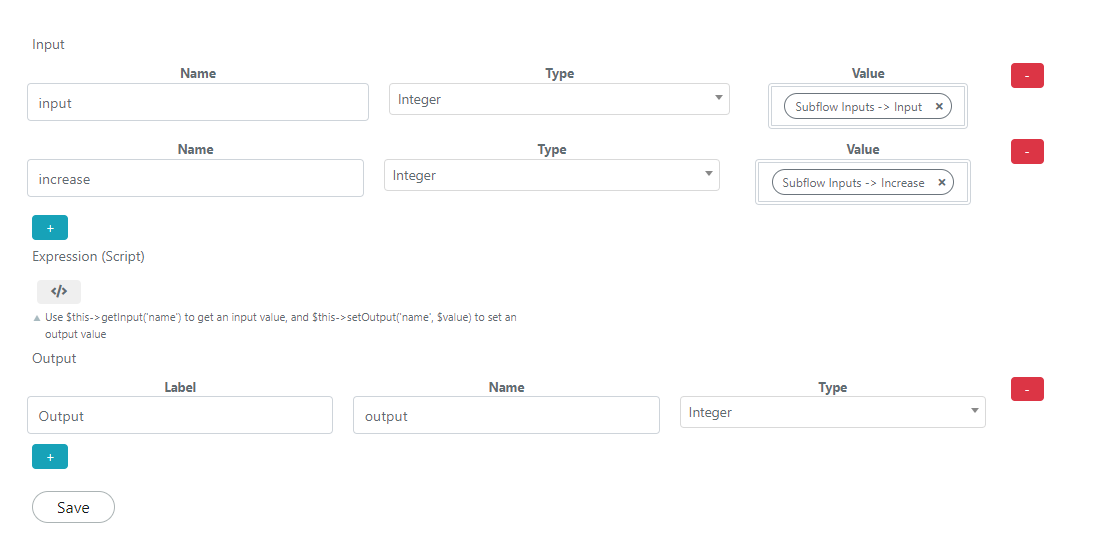
In the "Expression (Script)" section, enter the following code:
$input = $this->getInput('input');
$increase = $this->getInput('increase');

$this->setOutput('output',$input+$increase);
After the script block, add an "Assign Value to Outputs" block and configure it to set in the output "output" the value increased by the script:

Finally, activate the SubFlow to make it available to flows.
Related Articles
- Use the Flow Designer -- Build and manage workflows
- Workflow Actions -- Available action blocks
- SubFlow -- Create reusable workflow components