Deepser Deepser
  • Documentation
  • Start Free Trial
Start Free Trial
Deepser Deepser
Start Free Trial
Deepser
  • Documentation
  • Start Free Trial
loading
  1. Home
  2. Documentation
  3. Access and Visibility
  4. Creating a new user
Updated on April 22, 2025

Documentation

  • Access and Visibility
    • Resources
    • Roles
    • Creating and Managing Roles in Deepser
    • Creating a new user
    • Password Reset
    • New User Registration
    • LDAP Configuration
    • SSO Deepser Configuration
    • SSO Login/Provisioning Configuration – Azure
    • Multi Factor
    • Groups
    • Groups Creation
    • Manage Users in Groups
    • Company
    • Companies in Deepser
    • Company Creation
    • Parent Companies
    • Email Domains
    • Sync Account CRM Companies
    • Advanced Sync
    • Visibility management in Deepser
    • Permission and Visibility Handling
    • Groups and Rules Definition
    • End Users Visibility Overview
    • Entities Portal Visibility
    • Empowered End User (EEU)
    • Company Supervisors
    • Additional Companies
    • Access Groups
    • Access Users
  • Activity, Worklogs & Comments
    • DeepActivity Comments
    • Placing a comment
    • Comments System Configuration
    • DeepActivity Worklog
    • Entering a Worklog
    • Enabling Worklogs in the User Portal
    • Worklog Global Grid
    • Worklog Global Grid Configuration
    • Activity Global Grid Advanced Configuration
  • Board
    • Enable groups to create boards
    • Creating a FreeForm Board
    • Creating and customizing a Lane
    • Entry Creation
    • Board Live
    • Live Board Creation
    • Advanced Live Board Configuration
    • Creating and customizing a Lane
    • Creation and Advanced Configuration of a Lane and Drop Code
  • Categories
    • Category Overview
    • Category Configuration
    • Category Usage
  • Chat
    • Using the Chat
    • Enabling the Chat on Portals
    • Chat Rooms and Moderators
    • Public Chat
    • Configure a Public Chat Widget
    • Chatbot
    • Chatbot Flow – Example
  • CMDB
    • Deepser CMDB
    • Enable CMDB in the User Portal
    • User Portal CMDB Grid Configuration
    • Advanced Configuration of CMDB Grids
    • Class, Type and Subtype
    • Configuring a CI
  • CRM
    • Deep CRM
    • Creating an account in the CRM
    • Creating a contact in the CRM
    • Creating an opportunity in the CRM
    • Contact Types in CRM
    • Opportunity Types in CRM
    • CRM Lists
    • Sync Contacts and Accounts
    • Address Functioning
    • Sales
    • Mailchimp Integration
  • Deepser API
    • API Notions
    • API Endpoint and URL
    • API Verbs and Format
    • API Authentication
    • API Main Methods
    • Retrieve
    • Multiple Retrieve
    • Create
    • Update
    • Delete
    • API Entities
    • API Company
    • User API
    • Group API
    • Service Operation API
    • Service Type API
    • Activity API
    • CMDB CI API
  • Deepser Fundamentals
    • Deepser Backend
    • Deepser User Menu
    • Deepser Navigation Menu
    • Global Search Usage
    • Deepser Home Page
    • Grids
    • Filters and Order
    • Export Data
    • Mass Action
    • Mass Action Configuration
    • Grid Creation and Cloning
    • Configuring Grids
    • Advanced Collection Configuration
    • Grids Render and Options Configuration
    • Grids Custom Options Configurations
    • Grids Renderer Tooltip Example
    • Grids Renderer Link Example
    • Grids System Configuration
    • Form Template Theory
    • FormTemplates
    • FormTemplates Structure and Buttons
    • Form Template Selection and Creation
    • Form Template Configuration
    • Form Template Structure Configuration
    • Formtemplates Fieldset Configuration
    • Formtemplates Buttons Configuration
    • Formtemplates Field Configuration
    • Advanced Form Template Rules
    • Custom Button Configuration
    • Buttons Conditional Hiding
    • User Portal
    • Browsing the user portal
    • Managing Tickets in The User Portal
    • User Portal Additional Features
    • Configuring Portal Groups
    • Configuring Portal Requests
    • Configuring Service Operations in the User Portal
    • Enabling Other Modules in the User Portal
    • Enabling Other Modules in the User Portal Grid
    • Guest Portal
    • Enabling the Guest Portal
    • Guest Portal Visibility Configuration Overview
    • Enabling Service Types on the Guest Portal
    • Adding a Portal Group in the Guest Portal
    • Adding a Portal Request in the Guest Portal
    • Editing Form Templates in the Guest Portal
    • Enabling Categories in the Guest Portal
    • Enabling Notifications for Guest Users
    • Knowledge Base in the Guest Portal
    • CMS in the Guest Portal
    • Cache Management
    • Quick Reply
    • Mentions
    • Module Creator – Creating a custom module
  • Email Integration
    • Email Integration in Service Management
    • Enable Embedded Images on Message Body
    • Mailbox
    • Configuring an Outgoing Mailbox
    • Configuring an Incoming Mailbox
    • OAuth Client for Email Integration
    • Email Loop Management Tool
    • AZURE OAUTH CLIENT
    • Google Oauth Configuration
    • Email Rules
    • Email Rule Configuration
    • Advanced Email Rule Configuration
    • Avoid Duplicate Tickets By Email
    • Managing additional Email recipients
    • Email Events
    • Enabling / Disabling an Email Event
    • Custom Email Events Creation
    • Custom Email Events Configuration
    • Attach Report to Email Notification
    • Email Templates
    • Email Template Configuration
    • New operation notification template for Requester User
    • New or Updated comment notification template for Requester
    • Email Webclient
  • Escalation
    • Escalation rule levels
    • Configuring Escalation Rules
    • Configure an escalation rule that modifies entity.
    • Escalation rule that sends an email notification
    • Create an escalation rule that is based on a metric
    • Configure an escalation rule that generates other entities
  • Importing Data
    • Import Foundamentals
    • Import Creation
    • Import Basic Data Binding
    • Import Before Run
    • Import Before Run Tutorial
    • Import Before Row
    • Import Before Row Tutorial
    • Import After Row
    • Import Binding The Unique Field “Code”
    • Import Binding the Type Value
    • Import Binding the Dates Values
    • Import Binding a Company, creating the record if it doesn’t exist
    • Global Import
  • IT Asset Management
    • IT Asset Models
    • ITAM Automatic Scan Configuration and Usage
    • ITAM Configuration
    • AnyDesk
    • Supremo
  • Knowledge Base
    • Reading the Knowledge Base
    • Knowledge Base in Service Operations
    • Article Configuration in Knowledge Base
    • Knowledge Base Configuration
    • Knowledge Base Standard Filters
    • Knowledge Base Advanced Filters
  • List
    • Introduction to lists
    • Creating a new list
    • List Values and Model Visibility
    • Use a list as the basis of a custom field
  • Password Management
    • Configuring a Password
    • Using a Password
    • Private Password
    • Password System Configuration
    • Enabling Password Manager Portal
    • Custom Deeppassword fields
    • Password Audit
  • Relations
    • Using a Relation Grid field
    • Configuring a Relation
    • Modifying relation using a custom event.
    • Opposite relation
    • Column Configuration
    • Relation Graph View
  • Service Management
    • Introduction to Services in Deepser
    • Service Operations
    • Creating a Service Operation
    • Adding Comments, Activities, Attachments and Tasks to Operations
    • Service Operation Main Fields
    • Service Operation Additional Fields
    • Service Operation Activities, Relations, Email and SLAs
    • Service Types
    • Routing rules
    • Configuring Routing Rules
    • Advanced Routing Configuration
  • SLA
    • Calendar
    • Metrics
    • Goal
  • Task
    • Creation of task type
    • Form configuration of task types
    • Task Global Grid
    • Task Global Grid Configuration
    • Task Global Grid Advanced Configuration
  • Workflow
    • Workflow Overview
    • Flow Designer
    • Flow Trigger
    • Workflow – Stage Set
    • Workflow – Executions
    • Approval workflows
    • Portal Approval Structure
    • Backend Approval Structure
    • Workflow Actions
    • Workflow Logic
    • Workflow Samples
    • Multi Stage Flow
    • SubFlow
  • Inventory
    • Inventory Overview
    • Inventory Configuration
    • Warehouse
    • Item
    • Movement
  • Custom Fields
    • Custom Field Overview
    • Custom Field – Creation
    • Custom Field – Element Type Simple
    • Custom Field – Element Type Advanced
  • Folder icon closed Folder open iconCustom Event
    • Custom Event Overview
    • Custom Event – Creation
    • Custom Event – Type
  • Dashboard
    • Dashboard Overview
    • Panel Configuration
    • Chart Configuration
  • Project
    • Project Module
    • Gantt
    • Project Task
    • Resource Grid
  • Calendar
    • Calendar Configurations
    • Internal Calendar Configuration
    • Calendar Configuration Example
    • External Calendar Configuration
    • External Calendar – Google Calendar Configuration Example
    • External Calendar – Outlook Calendar Configuration Example
    • Calendar Usage
  • Survey
    • Survey Overview
    • Designer
    • Survey
    • Dashboard
  • Contract and Contract Line
    • Contracts and Contract Lines – General Overview
    • Contracts
    • Contract Lines
    • Contract Creation
    • Line Creation
    • Associate a Contract / Line with other entities
    • Contract Type
    • Line Type
    • Contracts and Escalation Rules
  • Report Documentation
    • Report Configuration
    • Report Usage
  • Sales
    • Catalog and Price List Overview
    • Catalog Configurations
    • Product
    • Price List
    • Billing Overview
    • Order Billing
    • Lines Billing
    • Worklogs Billing
    • Movements Billing
    • Operation Billing
  • Folder icon closed Folder open iconIntegrations
    • Teams Integration
    • NinjaOne Integration

Creating a new user

Estimated reading: 6 minutes

A user in Deepser is an individual who interacts with the system, utilizing its features and functionalities.

To create a new user in Deepser you will need to go to the menu System  ->  Permissions  -> Users(1)

In the screen that will open, you will need to click on the “Add User” button(2)

At this point, the following screen will open:
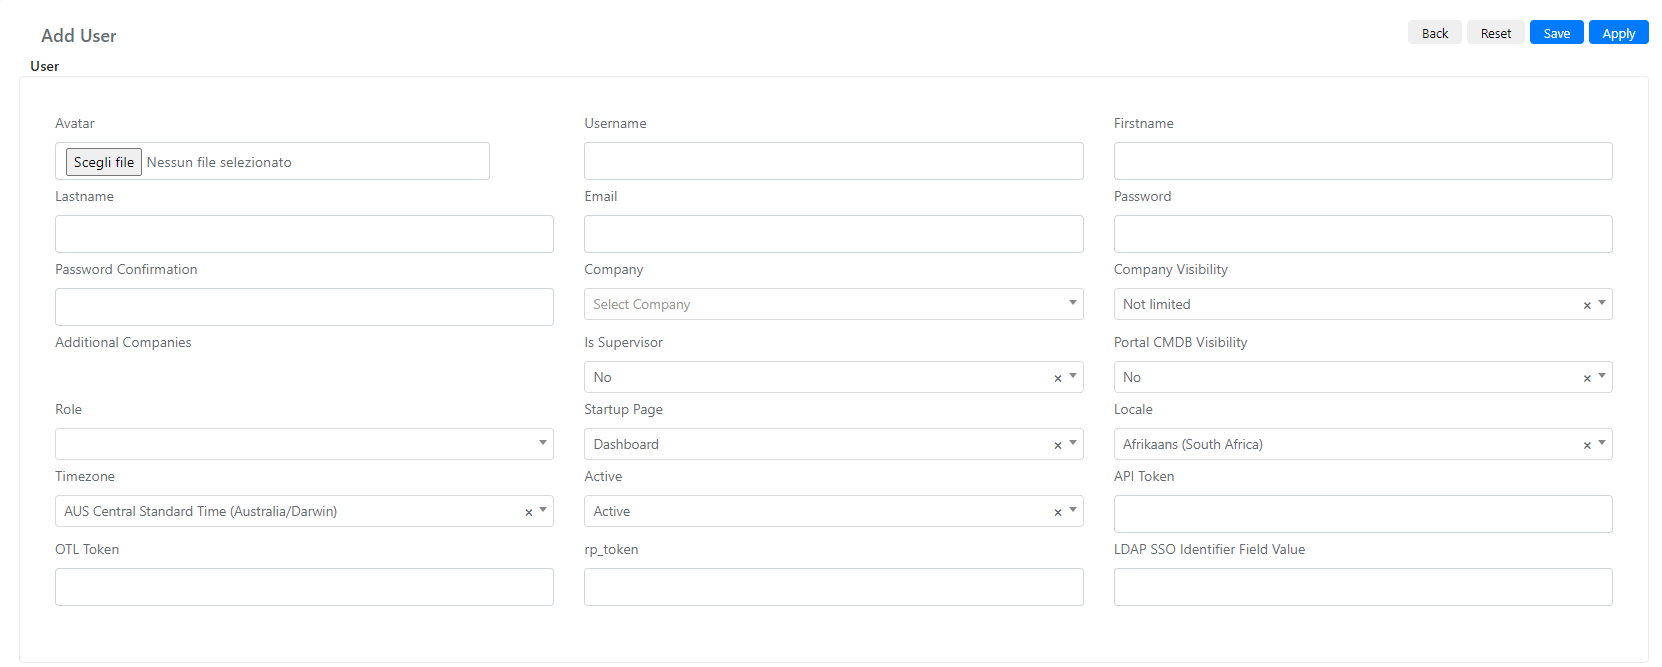
FieldDescription
AvatarProfile picture of the user.
UsernameUsername of the user, this will serve to log in, this is a mandatory field to create and in addition this field must be unique within Deepser.
FirstnameThe name of the user. This is a required field
LastnameUser’s lastname.
EmailUser’s email
PasswordPassword of the user, note that this field is always white because the user’s password is not stored in a database format that is invertible, consequently the field remains unvalued by default even if the user has a password set, except when changing the password itself. In case of changes to this field when saving the user Deepser will automatically update the value of the password present in db.
Password ConfirmationConfirm the user’s password, like the previous field, this is also not valued except when changing the password itself.
RoleThe role of the user, depending on the role the user will have different visibilities on the various parts of the product. For example the Users role, who by default sees only the End User Portal. The roles of the users will be deepened in the dedicated Lesson, click here to go to the corresponding lesson.
ActiveIndicates whether the user is authorized to access Deepser. If the value is “Active” the user will be enabled to access, if the value is “Inactive” then the user will not be authorized to access Deepser.
Startup PageThis field indicates which is the default page to which the user will be redirected after logging in.
LocalIndicates the language in which the user visualizes Deepser interface
TimezoneIt indicates the time zone associated with that user, it is important to indicate the correct time zone so that Deepser can correctly set the format of the dates in notifications and date fields.
CompanyThe company field indicates which company the user belongs to, this field is very important since Deepser companies are one of the key elements in visibility management. The companies will be analyzed in the following lessons, click here to go to the lesson on the companies.
Additional CompaniesAdditional companies indicate to the data of which other companies the user will have access. This topic will be deepened in the lesson on company, this field will be selectable only after the user has been saved at least once
Is SupervisorThis field indicates whether the user will be a company supervisor. A company supervisor will have the ability to view and modify the tickets created by the users of his company
Company VisibilityThis field indicates if the user will have limited visibility to Company Data
Portal CMDB VisibilityThis field indicates if the user will see the cmdb in the user portal.
OTL TokenThis token if passed as a parameter (token) in the url of the request (query string) allows you to access Deepser without logging in. Note that the setting of direct access by token is by default disabled for security reasons, in addition for security reasons this token has validity of only one use, after which it is automatically reset by the system, this is done to avoid data theft.  
rp_tokenThis token is used to reset a user’s login credentials. This is a system field, at the operational level there is no use for this field.
LDAP SSO Identifier Field ValueA system field used to map the correspondence between users from AD and those from sso
API TokenThis is the “Barer Token” for access to Deepser’s A.P.I. (Application Programming Interface) To go to the course Deepser’s A.P.I. click here
EmpoweredIndicates if the user is an Empowered user, Empowered users are end users who are not limited to seeing only tickets for which they are requesters or whose company is the requesting company.

Once you have filled in the fields, you will need to click on the “Apply” or “Save” button.

Add the user directly in a group

After you have created the user you can add it directly in a group by going into the ‘’Groups’’ tab(1) and clicking Add(2).

In the following screen that will open, you will have to check the group(s) that you want the user to be added to(1) and select the action add and then submit it(2).

Then you simply have to close the window and the groups the user is included in will be shown in the “Groups” Tab.

Creating a user from an operation

Another way to create a user is directly from an operation(ticket). To do so go to the Service(1) Module and afterwards go inside a ticket.

To create a new user you have to click on the user+ icon at the Requester fieled(2) and a window will pop up. All you have left to do is fill out the necessary fields explained at the table above.

Another case is when the ticket is created with an email, without a user, like this.

All you have to do is click on the user+ icon at the Requester Field and at the window that will pop up, the email field would be automatically filled for you, so you have to complete the rest of the fields.

Note: On user creation, the default role will always be “Users” (in “Role” field), which identifies an end user. Remember to change the role according to your needs. You can check available roles here.

Create a user from CRM Contacts

To create a user from the CRM Contacts, you will have to go to the CRM module and then Contact (1). At the page that will open you have to click on the Add Contact Button on the top right of the screen(2).

Then you have to fill out the fields of the Contact Data.

The meaning of the fields is as follows:

CampDescription
NameName of the Contact
SurnameSurname of the Contact
SalutationAllows you to Pin the greeting with which Refer to the contact (e.g. Lady or Miss)
StateEnable or Disable L Account
DepartmentThe Department to which the Contact belongs
QualificationThe status of the Contact
ManagerAllows Specifying a Contact Manager
SourceIndicates the source from which the Lead was generated
RatingCustomer Account Satisfaction Level
Associate userAllows Associating Contact to a System User on Deepser
TaskTask Related to Contact

Afterwards you have to complete the information of the user at the Contacts tab and fill out the fields.

The meaning of the fields is as follows:

CampDescription
EmailEmail of the Contact
TelephoneNumber of Fixed Telephony
Mobile phoneNumber of Mobile Telephony
FaxFax of the Contact
AddressAddress of the Contact
CityCity of Contact
ProvinceProvince of Contact
CAPCap of the Contact
StateState

After you have saved the newly created contact, you have to Sync it to a user. You have to go inside the contact and click on ‘Sync User’ on top right of the screen.

Was this guide helpful? Yes No

Share this Doc

Creating a new user

Or copy link

Clipboard Icon
CONTENTS
Leaf Illustration

Deepser srl
Via Luigi Dalla Via 3/B,Torre A, piano 7, int. 12
36015 Schio (VI), Italy

© Deepser. All right reserved.

Privacy Policy
Terms of Service