New User Registration
In Deepser it is possible to implement a user registration procedure to allow new users to register independently among the users present in Deepser.
Below, we will cover the procedure necessary to implement the creation of a registration form in Deepser.
CREATION OF THE NECESSARY STEPS
Deepser allows you to create a registration form by combining one or more Step components.
To create a “Step” you will need to go to the “System -> Permissions -> user Registration -> Step” menu
In the screen that will open, you will need to click on the “Add Step” button.
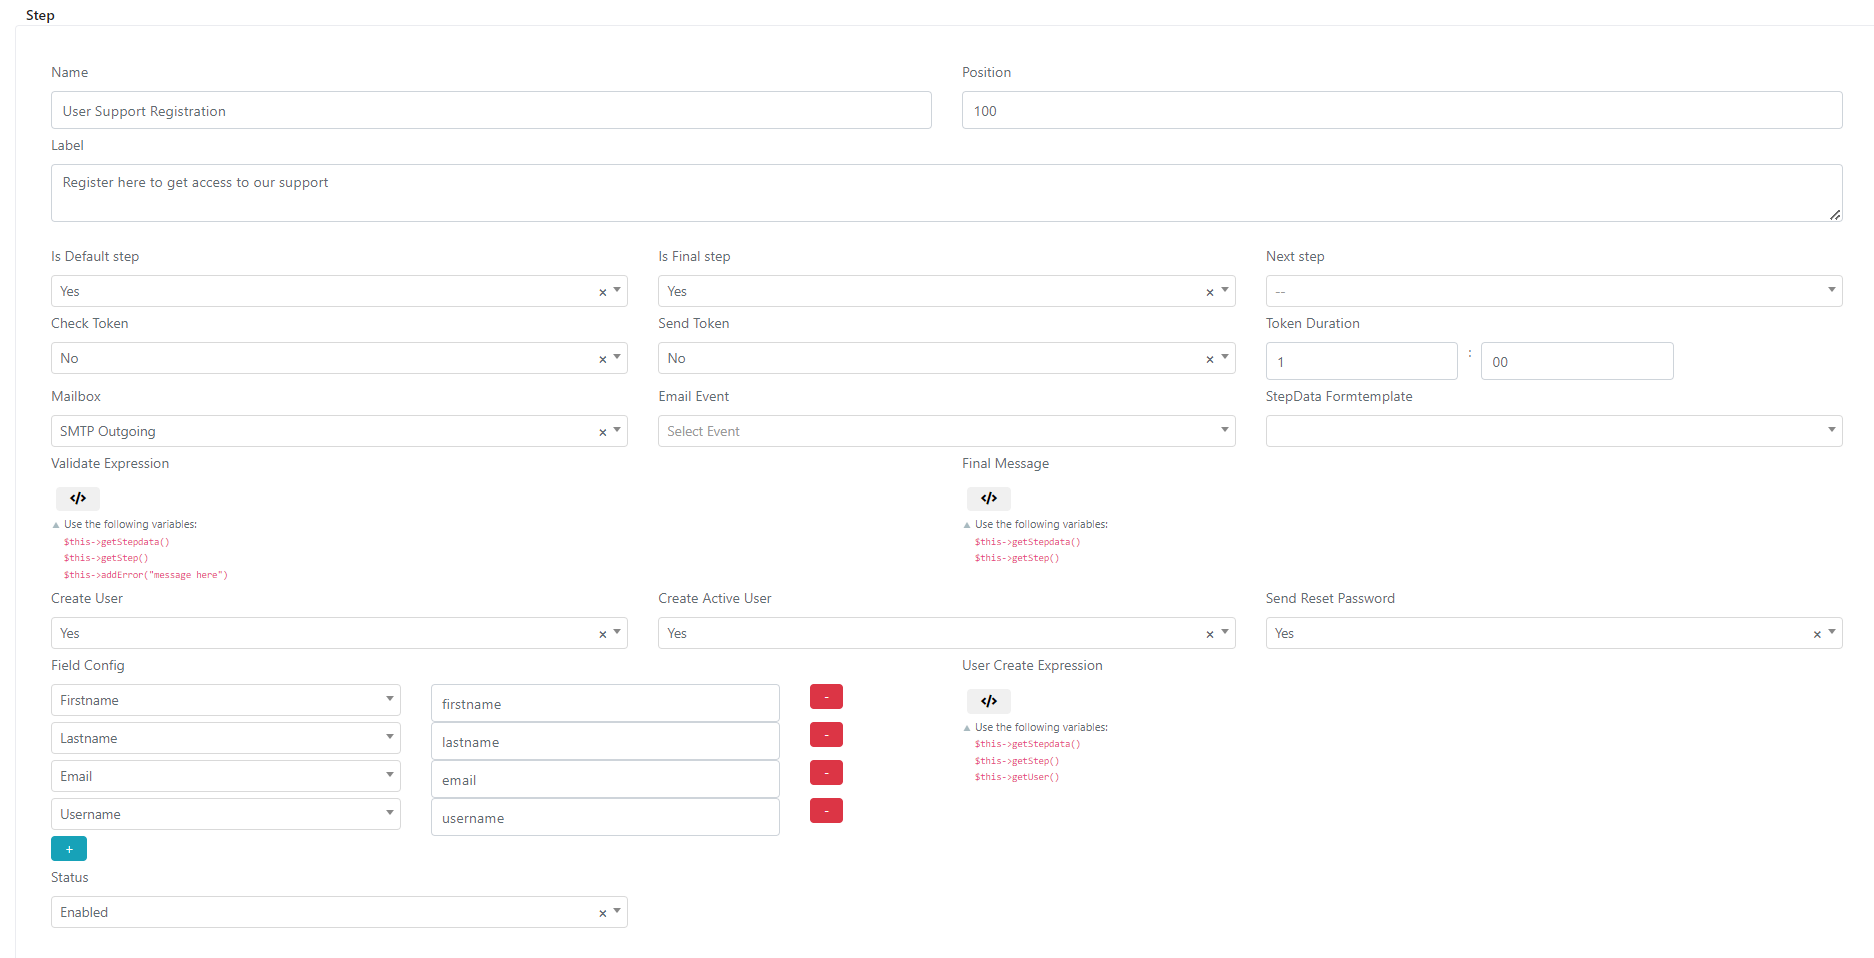
Once you click the button, you will be redirected to the creation screen of a new step.

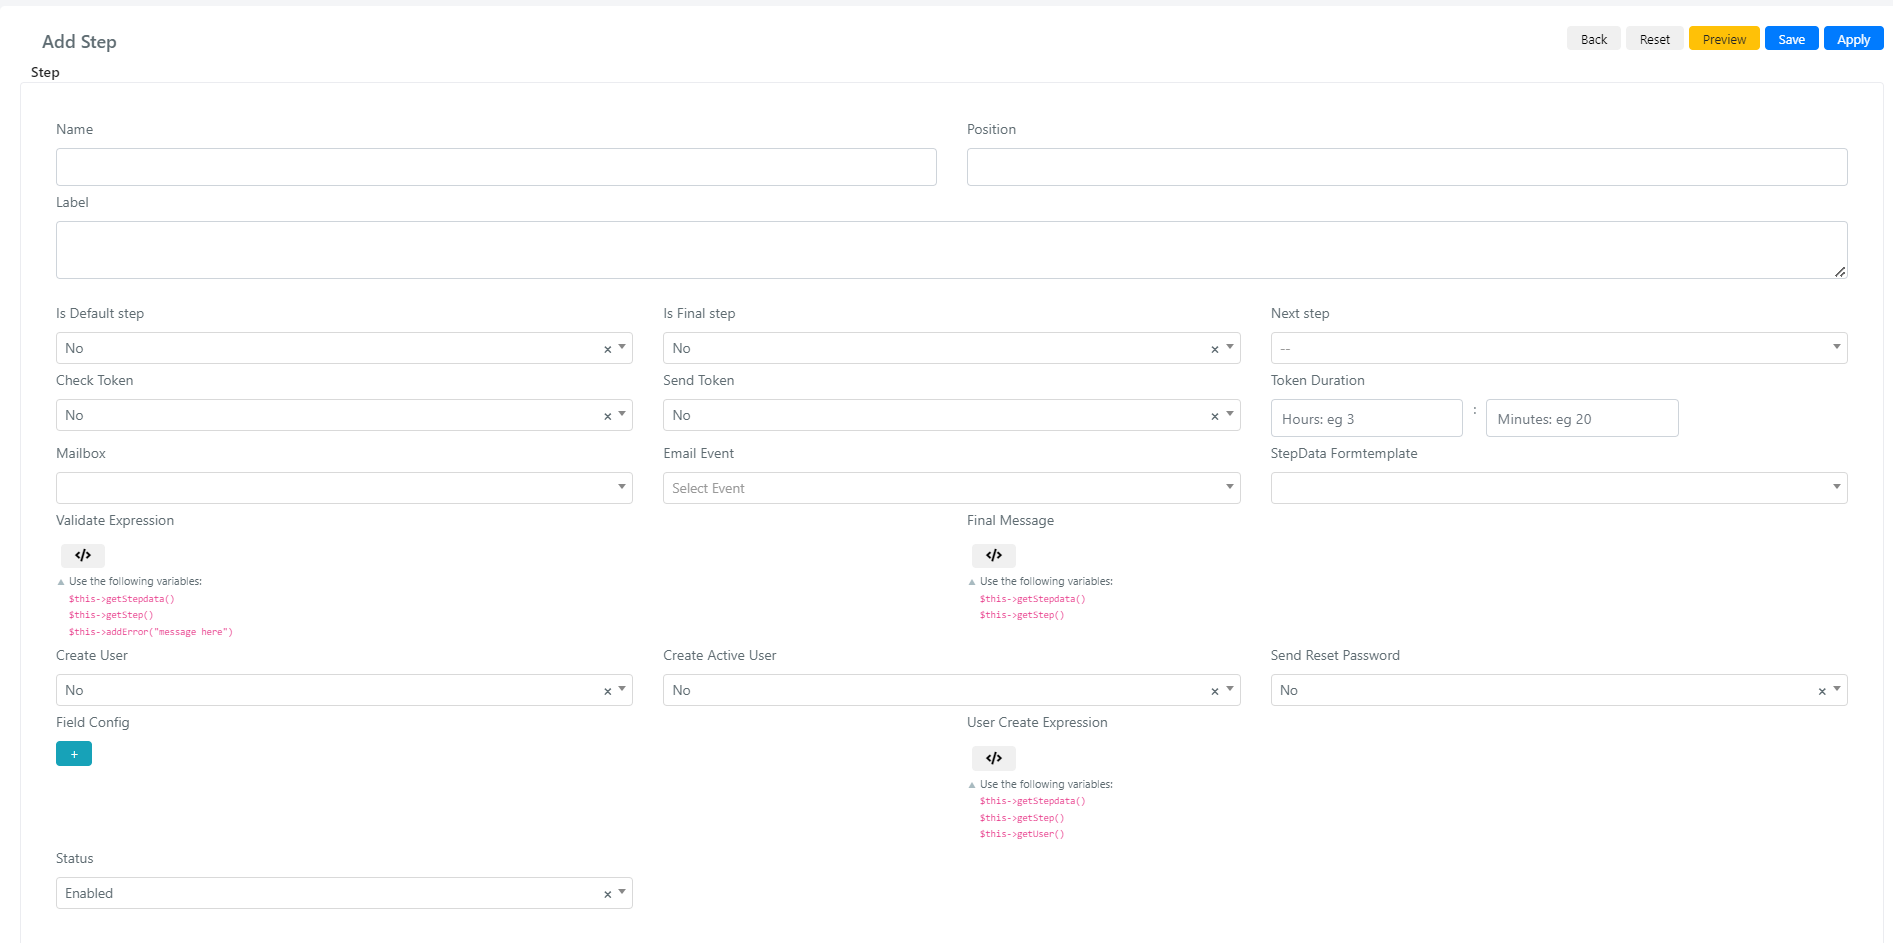
Below we briefly report the meaning of each field:
Field | Description |
Name | Step name |
Position | Position in the step grid. |
Label | Written that will appear to users when the step is uploaded. |
Is Default step | Indicate if this is the step from which the recording will begin |
Is Final step | Indicate if this is the step that will end the recording |
Next step | Next step in the registration, null if the current step is the step that will end the registration |
Check Token | Checks whether the verification token is present in the request. |
Send Token | Submit the verification token |
Token Duration | Token duration in hours and minutes |
Mailbox | Indicates the mailbox with which the messages will be sent to the user during registration |
Email Event | Email event associated with registration (if any) |
StepData Formtemplate | Form template associated with the current step |
Validate Expression | Custom code that allows you to validate the input data |
Final Message | Final message that will be displayed by the user if the current step is set as the final step |
Create User | Indicates whether a user will be created in this step |
Create Active User | Indicates whether an active user will be created in this step |
Send Reset Password | Indicates whether a password reset email will be sent to the user |
Field Config | Mapping user principal fields to form template fields |
User Create Expression | Custom code that will be used to create a user |
Status | Indicates whether this step is active or not. |
Registration Form Creation Example
In the successive lessons we will cover the creation of a registration form that allows a user to register himself and access the support, but only to users who belong to a company registered in Deepser, this to prevent external users from opening tickets without permission.
CREATING A CUSTOM FIELD TO RECEIVE USER INPUT
Before proceeding with the actual creation of the form, we must create a custom field that allows us to receive user input.
In the following example, we will see how to create a user only if the VAT number entered will correspond to one of the companies present in Deepser. For this example, we will assume that there is a custom field named “cust_vat_number” that will contain the VAT number of the company.
The Custom Fields will be addressed in another lesson, to go to the lesson related to the Custom Fields click here.
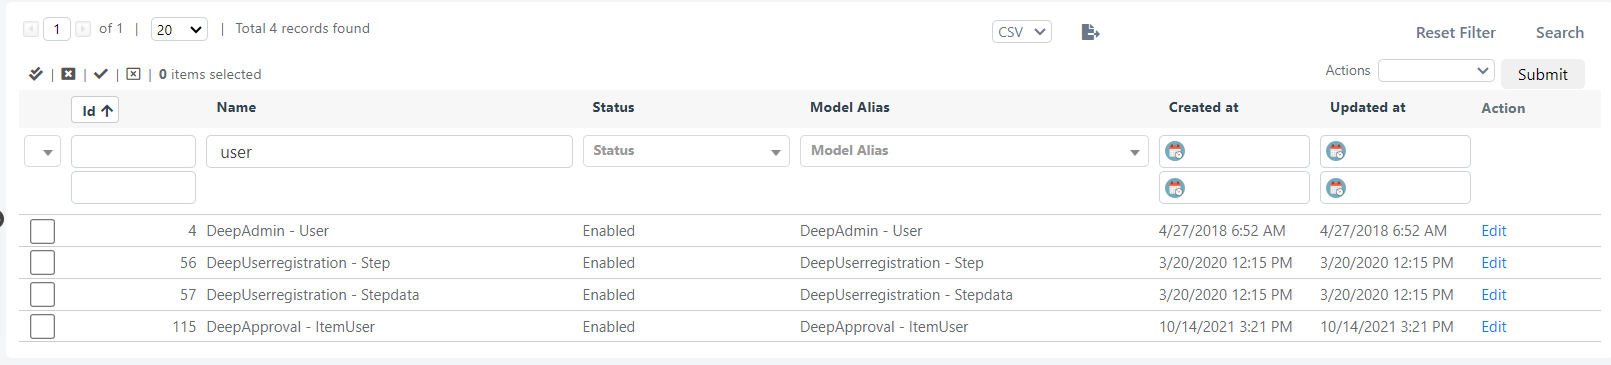
To create a custom field, we must go to: System -> Custom Fields.
Here we will have to click on the model “DeepRegistration – stepData”.

On the next screen, we will have to click on the “Add Field” button.
In the screen that will be displayed, will need to fill in the fields as follows:

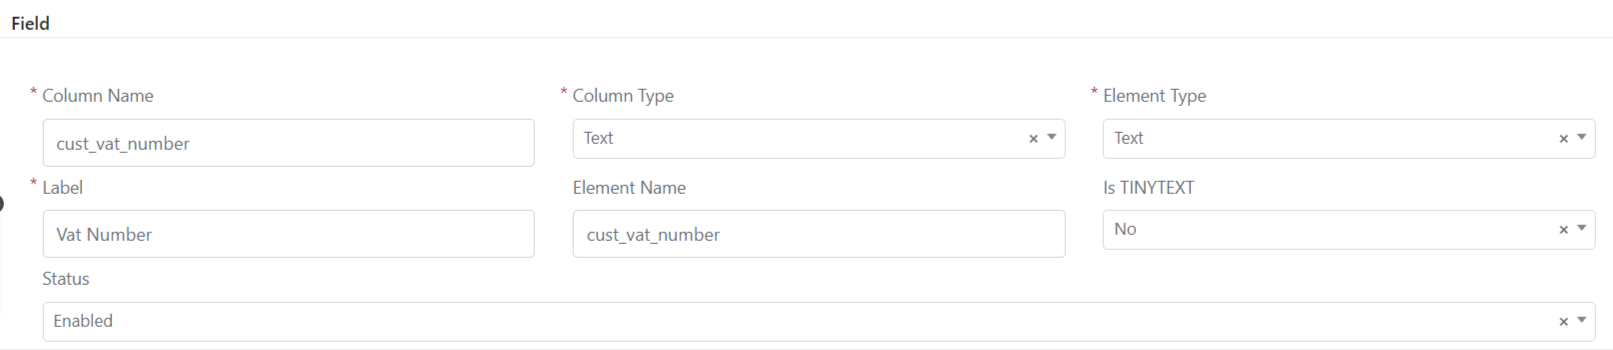
Important is to set the “Column Type” and “Element Type” fields to text.
At this point, you will need to click on the “Save” button
Once this is done, we can proceed to implement the registration form.
Form Creation
In order to create the Registration Form we must go to the step creation menu to create a new step.
The Step Section is located under the “System-> Permissions – > user Registration -> Step” menu.

At this point, we give a name to our registration form by entering the desired name in the “Name” field
We define the “Position” field as zero.
Now we set the label that will be displayed on the registration screen by entering the desired text in the “Label” field.
Note that this field can contain text or even html with its css styles.
We define “Is Default Step” field to yes, in this way we are defining what will be the step from which the registration will begin.
Since in our example we have only one registration step, we also define “Is Final Step” to “Yes”.
Since in our example we have only one registration step we define “Next Step” as none, in the case of a multistep registration it will be possible to set what will be the next step, through this field.
Another important thing to notice is that to populate the field, you will first need to create a new step.
We set what will be the email box that we will use to send any Password change emails through the “Mailbox” field
Now we set which form template we want to display during registration using the field “StepData Formtemplate”
In the “Validate Expression” field, we can go to define the custom code that we will need to carry out checks on the validity of the data passed in input.
Within this field we are going to enter the following code:
/**Defining Variables**/
//Assigning StepDatas to a variable.
$stepData = $this->getStepdata();
//Assigning the value og the cust_vat_number field to a variable.
$vatNumber = $stepData->getData('cust_vat_number');
//Assigning the value of the email field to a variable.
$email = $stepData->getData('email');
//if the email isn't in a valid format return an error to the user.
if (!filter_var($email, FILTER_VALIDATE_EMAIL)) {
$this->addError("Email is not in a valid format");
}
//Retriving form the user collection all the users the have the username equivalent to the ginven e-mail.
$usersCollection = Deep::getResourceModel("deep_admin/user_collection")->addFieldToFilter("username",["eq" => $email]);
//Retriving form the user collection all the StepData the have the username equivalent to the ginven e-mail.
$stepDataCollection = Deep::getResourceModel("deep_userregistration/stepdata_collection")->addFieldToFilter("email",["eq" => $email]);
//If uone or more user or StepDatas where found retun an error to the user.
if($usersCollection->count() || $stepDataCollection->count()){
$this->addError("Email Already Registered");
}
/**If the company is present in Deepser we allow the registration otherwise throw an error**/
//Loading a company ginven the cust_piva field, if there is non company with this field this method retrive a new object.
$company = Deep::getModel("deep_company/company")->load($vatNumber,'cust_piva');
//If the returned object doesen't have the id or is null,return a error to the user.
if(!($company && $company->getId())){
$this->addError("We are sorry, but only employee of our customer can register an account");
}
In the field “Final Message” we will define the message that we will give to the user once the registration has been successfully completed.
Here, we will insert the following code:
Success
Congratulations, your account has been created!.
Username:
getStepdata()->getData('email');?>
We have sent you an email with the link to reset your password.
At this point, we will have to define to create a user by defining the field “Create User” to”Yes”.
Now, we will define if the user will be an active user by defining the field “Create Active User” to “Yes”
Now we will define whether to send the user an email at the end of the procedure that will allow him to reset the password using the “Send Reset Password” field.
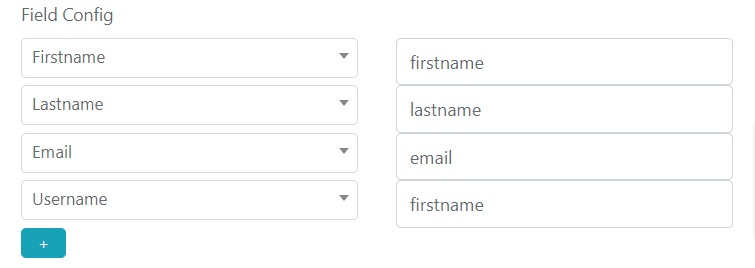
Now, in the “Field Config” field we will define the mapping of the user template fields with the form fields. To add a new field to map with the form data simply click the “+” button.
We have defined the users’ field as follows:
In the “User Create Expression” field, we can define custom code that will allow us to set the user’s attributes or in general to perform actions when creating a new user. In this field, we will enter the following code:
//getting the datas from the form
$stepData = $this->getStepdata();
// assigning the end user role to the created user by passing the role id
$this->getUser()->setData("role",73);
Finally, we set the “Status” field to Enabled (If it wasn’t already set to Active).
At this point, you will need to click on the button “Save” or “Apply”
Editing the form template
To modify the form template that will be displayed during registration, you will need to click the “Preview” button
At this point, you will need to click the pencil button:
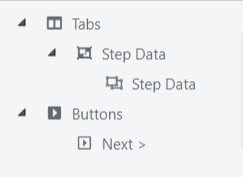
And then go to the StepData tab:

Here you can enter the fields by dragging them from the right column into the grid

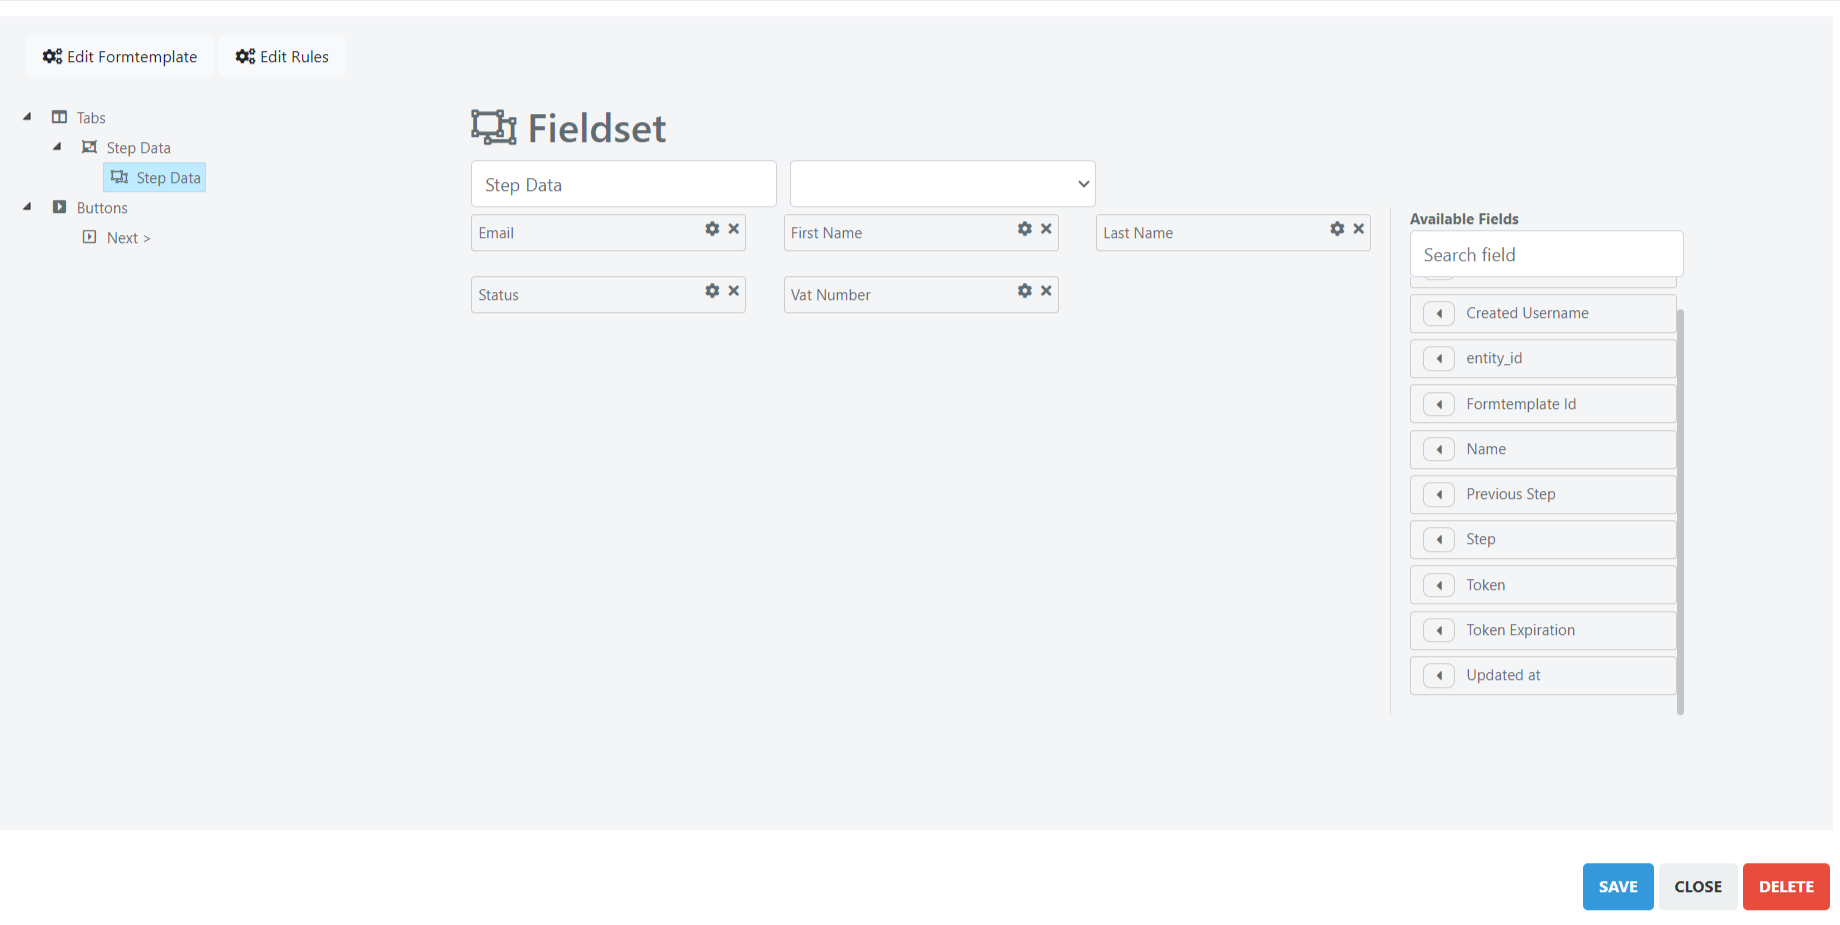
Finally, you will need to click on the Save Button.
Token usage
During the registration phase it may be necessary to validate the user’s email, to do this you can send a token that will allow you to verify the user’s email.
Taking as a basis the previous example, we create another step, this time ignoring the part related to the creation of the account, in addition we will configure the sending of the token.
EMAIL TEMPLATE CREATION
In order to send the verification token to the end user it will be necessary to create an email event with its associated template form that will be used by Deepser to send the email to the user who is registering.
To create a custom mail event you will need to go to the System -> Tools -> Email -> Templatemenu.
Then you will need to click on the “Add MailTemplate” button.
In the screen that will open you will need to define a name for the template, to do this, simply enter the desired name in the “Name” field.
Next, we will define a code for the template, filling in the “Code” field.
At this point, it will be possible to insert in the “Subject” section the php code that will compose the subject of the email.
You can use the following code as a reference to compose the subject of the email:
__('DEEPSER - Confirm your Registration')?>
Now it will be possible to insert in the section “Body”, that will represent the content of the message, the PHP / HTML code that will serve to generate the body of the mail.
You can use the following code as a reference when creating the body:
getModel()->getEmail();
$firstname = trim($this->getModel()->getFirstname());
$lastname = trim($this->getModel()->getLastname());
$tmpFullname = $firstname . $lastname;
$fullname = $fullanme != "" ? $tmpFullname : "user";
$url = $this->getModel()->getTokenStepUrl();
?>
includeTemplate("header") ?>
__('Dear %s',$fullname);?>,
__('Please confirm your registration by clicking the link below'); ;?>
__('Confirm the registration')?>
includeTemplate("footer") ?>
And click on the “Save” or “Apply” button:
EMAIL EVENT CREATION
To create a custom mail event, you will need to go to the “System -> Tools -> Email -> Event” menu.
At this point, you will need to click on the “Add Event” button.
The following page will be displayed:

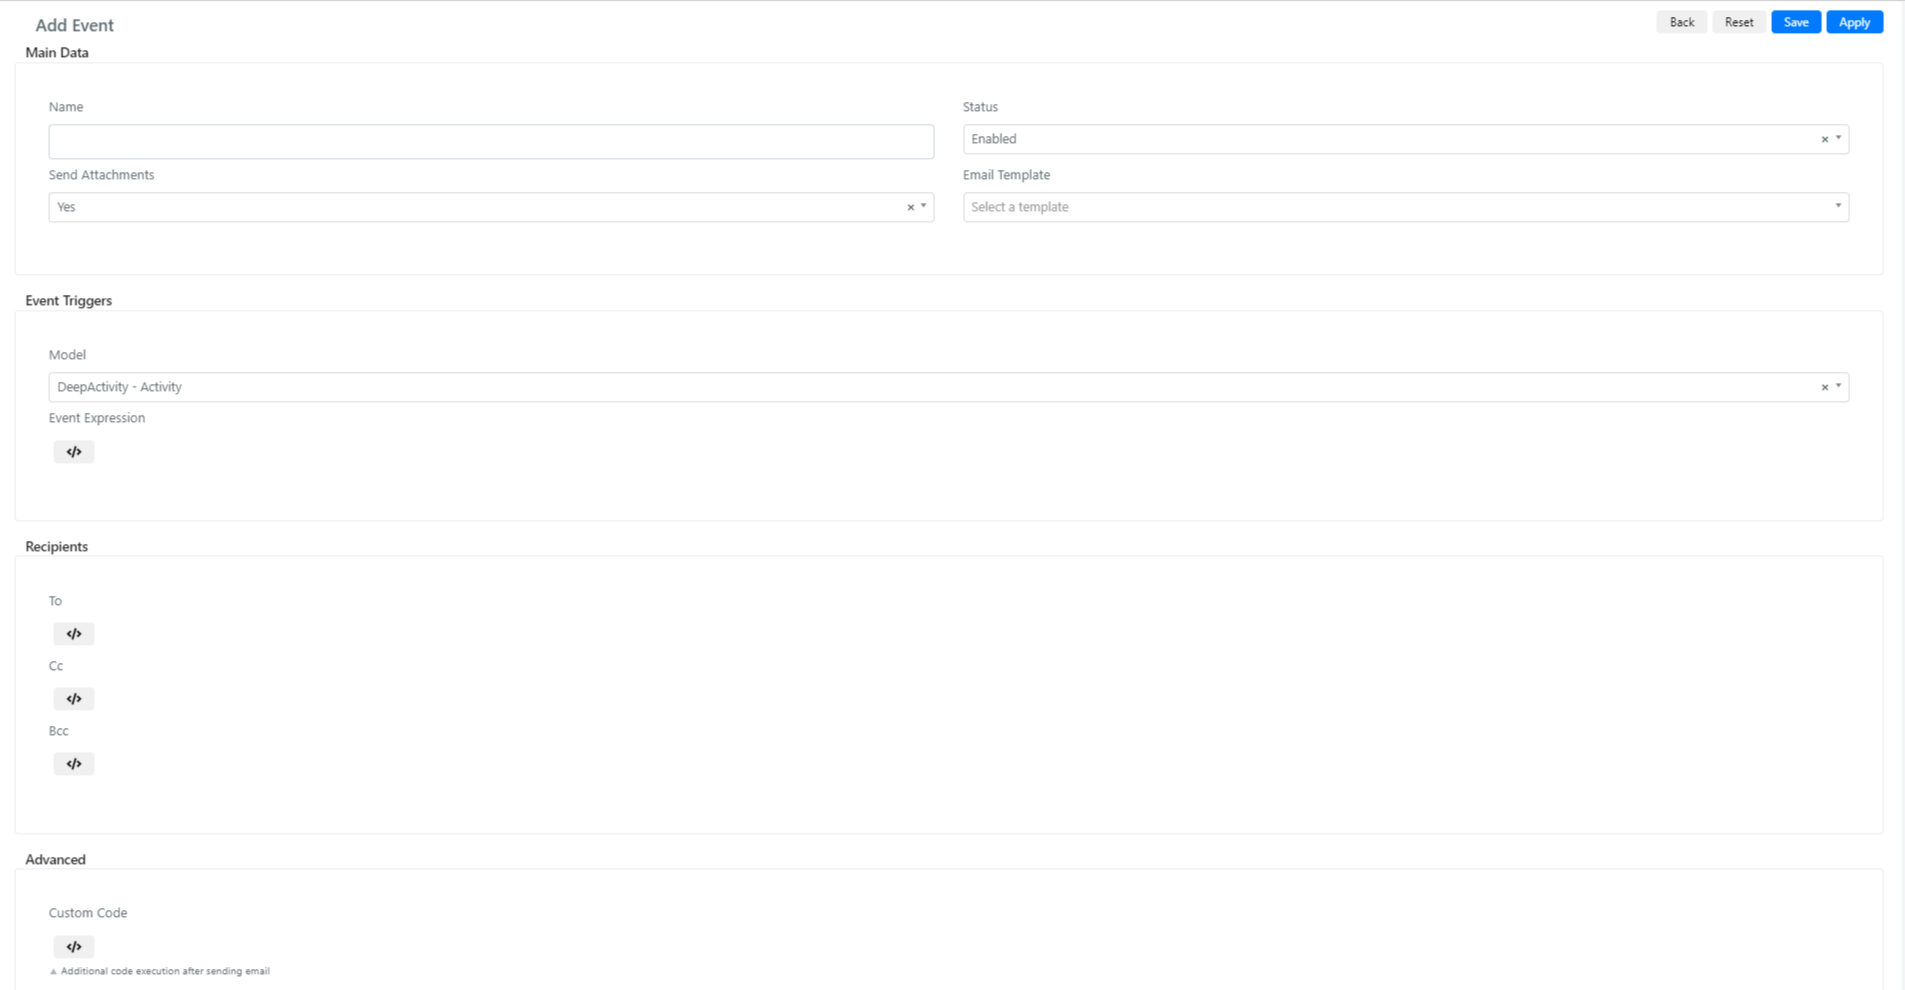
At this point, it will be necessary to give a name to the event by filling in the “Name” field.
We define Whether to send attachments, changing the value of the field “Send Attachments”, in our case we set it to “No”.
Now, in the “Email Template” field, we select the template created in the previous point of this guide.
In the “Event Trigger”section, select “DeepUserregistration-StepData” in the “Model” field
In the “Event Expression” entry.
We insert the following code :
return true;
In the “To” section
We insert the following code :
/**Configuring the language with local **/
$this->changeLanguage($this->getModel()->getCustLocale());
/**Getting the email from the current model**/
$this->addTo($this->getModel()->getEmail());
At this point, we can go to click the “Save” or “Apply” button
Now the event will have been saved.
ADD A NEW FORM TEMPLATE
To create a new form template, you will need to click on “Preview”.
Here, you will need to click on the button with the arrow icon.
Now you will need to click on “New Formtemplate”
In the screen that will open, you will need to enter in the field “Enter Template Name” the name of the new form template.
Next, you will need to click on “Save”.
At this point, the new form template will be created.
SET A FIELD AS REQUIRED
To create a new form template, you will need to click on “Preview”.
Here you will need to click on the button with the pencil icon.
Here you will need to go to the “Fieldset”: “Step data”.
At this point it will be necessary to locate the field that we want to make mandatory and click on the corresponding gear icon.
In the screen that will open you will need to change the field “Required” and set it to “Yes”.
Now you will need to click on the “OK” button on the field configuration screen.
Finally, you will need to click on the “Save” button in the form configuration window.
At this point the field will be mandatory.
EDIT FORM TEMPLATE PRIORITY
Deepser evaluates form templates from the highest priority to the lowest priority form templates.
The priority of the form templates is therefore important to define which form template the user will see.
To set the priority, you will need to go to the arrow key.
Now click on the template you want to edit.
At this point, click on the button with pencil icon.
Now you will need to click on the “Edit Rules” button and then subsequently set a value in the priority field.
Finally, click on the “Save” button.
STEP CREATION
For this example we will use as a basis the step created in the previous lessons, in addition we will create two form template the first named “First” with the email fields, Firstname and Lastname and the second named “Second” with only the Vat Number field (cust_vat_number) created in the previous points of lessons of this guide.
INITIAL STEP
Let’s go to the Step section and click on the “Add Step” button
In this new we are going to configure the field “Name”, in this field we will enter the name we want to give to the step.
We configure the field “Position” to 0
We configure the field The “Label”, this field will contain the inscription that the user will see when he arrives at this form.
We configure the field “Is Default Step” to “Yes”.
We configure the field “Is Final Step” to “Yes”.
We configure the “Next Step” field on the step created in the previous points (User Support Registration).
We configure the field “Check token” to “No”.
We configure the field “Send Token” to “Yes”.
We set the “Token Duration”field, to an hour or at least to the time that we believe to be sufficient to perform the registration.
We configure the”Mailbox”fieldwith the exit mailbox that we will use for registraction.
We configure the “Email Event”fieldwith the mail event created in the point above.
At this point we set the field”StepData Formtemplate” form template that we want to use in this first step, in the template form we set all the fields that must be filled in as mandatory, in this way the user will have to fill them in order to continue, you can refer to the previous topic for the configuration of the form field as mandatory click here to go to the guide.
To create a custom form template you can follow the guide found in the previous article, click here to go to the guide.
We can configure the fields “Create User” and “Create Active User” to “No”.
In the “Validate Expression” field, we insert the following code to verify the form template.
/**Variables Initialization**/
//Assigning the stepDatas to a variable.
$stepData = $this->getStepdata();
//Assigning the value of the email field to a variable.
$email = $stepData->getData('email');
/**Verifications**/
//if the emil isn't in a valid format return an error to the user.
if (!filter_var($email, FILTER_VALIDATE_EMAIL)) {
$this->addError("Email is not in a valid format");
}
//Retriving form the user collection all the users the have the username equiva-lent to the ginven e-mail.
$usersCollection = Deep::getResourceModel("deep_admin/user_collection")->addFieldToFilter("username",["eq" => $email]);
//Retriving form the user collection all the StepData the have the username equivalent to the ginven e-mail.
$stepDataCollection = Deep::getResourceModel("deep_userregistration/stepdata_collection")->addFieldToFilter("email",["eq" => $email]);
//If uone or more user or StepDatas where found retun an error to the user.
if($usersCollection->count() || $stepDataCollection->count()){
$this->addError("Email Already Registered");
}
In this case we can leave the field “Field Config” as we are going to manage the creation of users in the last step
We can leave the”User Create Expression”field blank because we will not create users in this step.
At this point, Click on the Apply or Save button.
In the end, the step will be saved.
FINAL REGISTRATION STEP
Let’s move now on to the final registration step.
In this step, we are going to change the”Check Token”field by setting it to “Yes”.
And we will configure the form template that will be associated with this template using the field “StepData Formtemplate”.
At this point, we modify the Form Validate Expression field to perform the only validation of the “Vat Number” (in the case of example).
**Defining Variables**/
//Assigning StepDatas to a variable.
$stepData = $this->getStepdata();
//Assigning the value og the cust_vat_number field to a variable.
$vatNumber = $stepData->getData('cust_vat_number');
/**If the company is present in Deepser we allow the registration otherwise throw an error**/
//Loading a company ginven the cust_piva field, if there is non company with this field this method retrive a new object.
$company = Deep::getModel("deep_company/company")->load($vatNumber,'cust_piva');
//If the returned object doesen't have the id or is null,return a error to the user.
if(!($company && $company->getId())){
$this->addError("We are sorry, but only employee of our customer can register an account");
}
Note: this form template must have a higher priority than all the others
At this point, you will need to click on the “Save” or “Apply” button.
Enabling Registration
To enable the possibility of registering through the registration form, it will be necessary to go to the System -> Configurations -> Admin -> Security menu.
Here you will need to change the field “Enable User Registration” and set it to “Yes”.
Now, to save the changes, you will need to click on the “Save Config”button.
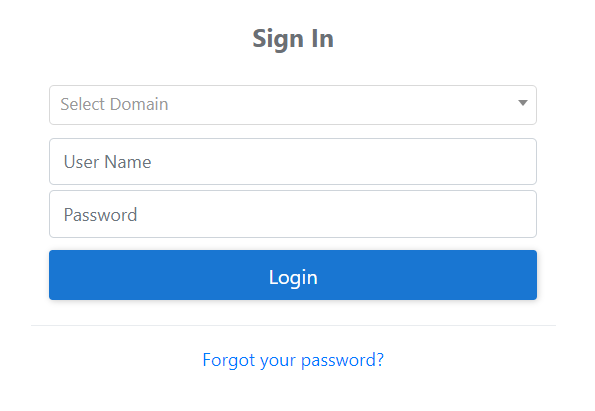
At this point, the registration link will have appeared on the main Login page:
