Deepser Deepser
  • Documentation
  • Start Free Trial
Start Free Trial
Deepser Deepser
Start Free Trial
Deepser
  • Documentation
  • Start Free Trial
loading
  1. Home
  2. Documentation
  3. Workflow
  4. Multi Stage Flow
Updated on December 5, 2025

Documentation

  • Access and Visibility
    • Resources
    • Roles
    • Creating and Managing Roles in Deepser
    • Creating a new user
    • Password Reset and Modification
    • New User Registration
    • LDAP Configuration
    • SSO Deepser Configuration
    • SSO Login/Provisioning Configuration – Azure
    • Multi Factor
    • Groups
    • Groups Creation
    • Manage Users in Groups
    • Company
    • Companies in Deepser
    • Company Creation
    • Parent Companies
    • Email Domains
    • Visibility management in Deepser
    • Permission and Visibility Handling
    • Groups and Rules Definition
    • End Users Visibility Overview
    • Entities Portal Visibility
    • Empowered End User (EEU)
    • Company Supervisors
    • Additional Companies
    • Access Groups
    • Access Users
  • Activity, Worklogs & Comments
    • DeepActivity Comments
    • Placing a comment
    • Comments System Configuration
    • DeepActivity Worklog
    • Entering a Worklog
    • Enabling Worklogs in the User Portal
    • Worklog Global Grid
    • Worklog Global Grid Configuration
    • Activity Global Grid Advanced Configuration
  • Board
    • Enable groups to create boards
    • Creating a FreeForm Board
    • Creating and customizing a Lane
    • Entry Creation
    • Board Live
    • Live Board Creation
    • Advanced Live Board Configuration
    • Creating and customizing a Lane
    • Creation and Advanced Configuration of a Lane and Drop Code
  • Categories
    • Category Overview
    • Category Configuration
    • Category Usage
  • Chat
    • Using the Chat
    • Enabling the Chat on Portals
    • Chat Rooms and Moderators
    • Public Chat
    • Configure a Public Chat Widget
    • Chatbot
    • Chatbot Flow – Example
  • CMDB
    • Deepser CMDB
    • Enable CMDB in the User Portal
    • User Portal CMDB Grid Configuration
    • Advanced Configuration of CMDB Grids
    • Class, Type and Subtype
    • Configuring a CI
  • CRM
    • Deep CRM
    • Creating an account in the CRM
    • Creating a contact in the CRM
    • Creating an opportunity in the CRM
    • Contact Types in CRM
    • Opportunity Types in CRM
    • CRM Lists
    • CRM Entities Synchronization: Contacts and Accounts
    • Sync configuration
    • Advanced Sync
    • Address Functioning
    • Sales
    • Mailchimp Integration
  • Deepser API
    • API Notions
    • API Endpoint and URL
    • API Verbs and Format
    • API Authentication
    • API Main Methods
    • Retrieve
    • Multiple Retrieve
    • Create
    • Update
    • Delete
    • API Entities
    • API Company
    • User API
    • Group API
    • Service Operation API
    • Service Type API
    • Activity API
    • CMDB CI API
    • API Attachment
  • Deepser Fundamentals
    • Deepser Backend
    • Deepser User Menu
    • Deepser Navigation Menu
    • Global Search Usage
    • Deepser Home Page
    • Grids
    • Filters and Order
    • Export Data
    • Mass Action
    • Mass Action Configuration
    • Merge Action
    • Grid Creation and Cloning
    • Configuring Grids
    • Advanced Collection Configuration
    • Grids Render and Options Configuration
    • Grids Custom Options Configurations
    • Grids Renderer Tooltip Example
    • Grids Renderer Link Example
    • Grids System Configuration
    • Form Template Theory
    • FormTemplates
    • FormTemplates Structure and Buttons
    • Form Template Selection and Creation
    • Form Template Configuration
    • Form Template Structure Configuration
    • Formtemplates Fieldset Configuration
    • Formtemplates Buttons Configuration
    • Formtemplates Field Configuration
    • Custom Button Configuration
    • Advanced Form Template Rules
    • Buttons Conditional Hiding
    • User Portal
    • Browsing the user portal
    • Managing Tickets in The User Portal
    • User Portal Additional Features
    • Configuring Portal Groups
    • Configuring Portal Requests
    • Configuring Service Operations in the User Portal
    • Enabling Other Modules in the User Portal
    • Enabling Other Modules in the User Portal Grid
    • Guest Portal
    • Enabling the Guest Portal
    • Guest Portal Visibility Configuration Overview
    • Enabling Service Types on the Guest Portal
    • Adding a Portal Group in the Guest Portal
    • Adding a Portal Request in the Guest Portal
    • Editing Form Templates in the Guest Portal
    • Enabling Categories in the Guest Portal
    • Enabling Notifications for Guest Users
    • Knowledge Base in the Guest Portal
    • CMS in the Guest Portal
    • Cache Management
    • Quick Reply
    • Mentions
    • Module Creator – Creating a custom module
    • Inline Translation
  • Email Integration
    • Email Integration in Service Management
    • Enable Embedded Images on Message Body
    • Mailbox
    • Configuring an Outgoing Mailbox
    • Configuring an Incoming Mailbox
    • OAuth Client for Email Integration
    • Email Loop Management Tool
    • Office 365 Mailbox Configuration
    • Azure Oauth Client (Legacy Protocol)
    • Google Oauth Configuration
    • Email Rules
    • Email Rule Configuration
    • Advanced Email Rule Configuration
    • Email Attachment Conversion
    • Avoid Duplicate Tickets By Email
    • Managing additional Email recipients
    • Email Events
    • Enabling / Disabling an Email Event
    • Custom Email Events Creation
    • Custom Email Events Configuration
    • Attach Report to Email Notification
    • Email Templates
    • Email Template Configuration
    • New operation notification template for Requester User
    • New or Updated comment notification template for Requester
    • Email Webclient
  • Escalation
    • Escalation rule levels
    • Configuring Escalation Rules
    • Configure an escalation rule that modifies entity.
    • Escalation rule that sends an email notification
    • Create an escalation rule that is based on a metric
    • Configure an escalation rule that generates other entities
  • Importing Data
    • Import Foundamentals
    • Import Creation
    • Import Basic Data Binding
    • Import Before Run
    • Import Before Run Tutorial
    • Import Before Row
    • Import Before Row Tutorial
    • Import After Row
    • Import Binding The Unique Field “Code”
    • Import Binding the Type Value
    • Import Binding the Dates Values
    • Import Binding a Company, creating the record if it doesn’t exist
    • Global Import
  • IT Asset Management
    • IT Asset Models
    • ITAM Automatic Scan Configuration and Usage
    • ITAM Configuration
    • AnyDesk
    • Supremo
    • ISL Online
  • Knowledge Base
    • Reading the Knowledge Base
    • Knowledge Base in Service Operations
    • Article Configuration in Knowledge Base
    • Knowledge Base Configuration
    • Knowledge Base Standard Filters
    • Knowledge Base Advanced Filters
  • List
    • Introduction to lists
    • Creating a new list
    • List Values and Model Visibility
    • Use a list as the basis of a custom field
  • Password Management
    • Configuring a Password
    • Using a Password
    • Private Password
    • Password System Configuration
    • Enabling Password Manager Portal
    • Custom Deeppassword fields
    • Password Audit
  • Relations
    • Using a Relation Grid field
    • Configuring a Relation
    • Modifying relation using a custom event.
    • Opposite relation
    • Column Configuration
    • Relation Graph View
    • Fetching data from relational entities
  • Service Management
    • Introduction to Services in Deepser
    • Service Operations
    • Creating a Service Operation
    • Adding Comments, Activities, Attachments and Tasks to Operations
    • Service Operation Main Fields
    • Service Operation Additional Fields
    • Service Operation Activities, Relations, Email and SLAs
    • Service Types
    • Routing rules
    • Configuring Routing Rules
    • Advanced Routing Configuration
  • SLA
    • Calendar
    • Metrics
    • Goal
  • Task
    • Creation of task type
    • Form configuration of task types
    • Task Global Grid
    • Task Global Grid Configuration
    • Task Global Grid Advanced Configuration
  • Workflow
    • Workflow Overview
    • Flow Designer
    • Flow Trigger
    • Workflow – Stage Set
    • Workflow – Executions
    • Approval workflows
    • Portal Approval Structure
    • Backend Approval Structure
    • Workflow Actions
    • Workflow Logic
    • Workflow Samples
    • Multi Stage Flow
    • SubFlow
  • Inventory
    • Inventory Overview
    • Inventory Configuration
    • Warehouse
    • Item
    • Movement
  • Custom Fields
    • Custom Field Overview
    • Custom Field – Creation
    • Custom Field – Element Type Simple
    • Custom Field – Element Type Advanced
  • Custom Event
    • Custom Event Overview
    • Custom Event – Creation
    • Custom Event – Type
  • Dashboard
    • Dashboard Overview
    • Panel Configuration
    • Chart Configuration
  • Project
    • Project Module
    • Gantt
    • Project Task
    • Resource Grid
  • Calendar
    • Calendar Configurations
    • Internal Calendar Configuration
    • Calendar Configuration Example
    • External Calendar Configuration
    • External Calendar – Google Calendar Configuration Example
    • External Calendar – Outlook Calendar Configuration Example
    • Calendar Usage
  • Survey
    • Survey Overview
    • Designer
    • Survey
    • Dashboard
  • Contract and Contract Line
    • Contracts and Contract Lines – General Overview
    • Contracts
    • Contract Lines
    • Contract Creation
    • Line Creation
    • Associate a Contract / Line with other entities
    • Contract Type
    • Line Type
    • Contracts and Escalation Rules
  • Report Documentation
    • Report Configuration
    • Report Usage
  • Sales
    • Catalog and Price List Overview
    • Catalog Configurations
    • Product
    • Price List
    • Billing Overview
    • Order Billing
    • Lines Billing
    • Worklogs Billing
    • Movements Billing
    • Operation Billing
  • Integrations
    • Teams Integration
    • NinjaOne RMM Integration
    • Datto RMM Integration
    • Microsoft Intune Integration

Multi Stage Flow

Estimated reading: 7 minutes

In this article we are going to see the flow configuration that will take care of creating a resource access approval in the event that an “Access Management” type ticket is opened.

For this tutorial, suppose that the environment has a type of “Access Management” service, already configured.

Suppose that this flow requires 2 stages of approval: in the first phase it will be up to the assignee group of the ticket to authorize access to the resource, in the second phase it will be a Deepser administrator user to authorize access to the resource.

STAGE CONFIGURATION

The stage that we are going to create will be the following:

  • Approval Of assignee Group
  • User Administrator Approval
  • Approved
  • NotApproved

To configure a Stage Set it will be necessary to go to the Flow à Stage Set menu.

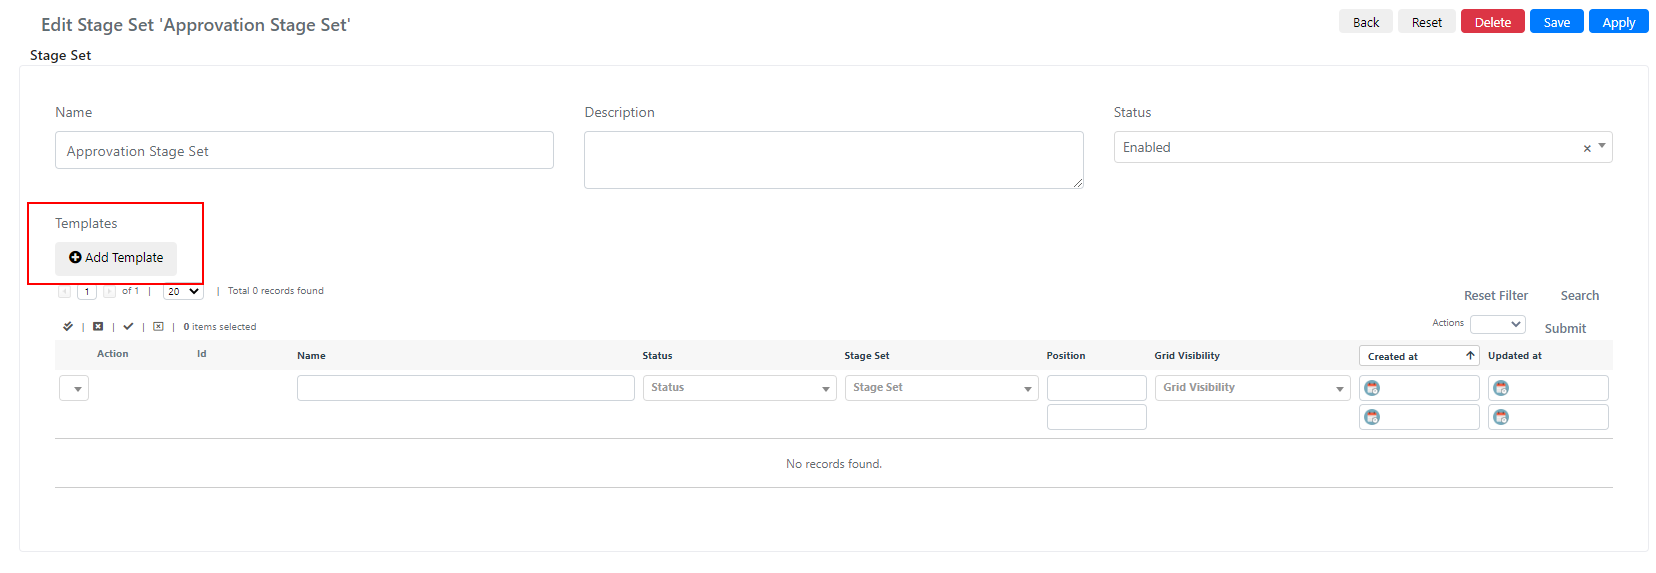
At this point we must click on the “Add Stage Set” button, then we will have to set in the Name field “Approvation Stage Set” and then click on “Save” or “Apply“.

At this point it will be possible to include in this stage set just created the various stages necessary, to do so you will need to click on Add Template:

Now in the screen that will open it will be possible to configure the new stage, for the purposes of this guide we can only configure the “Name” field and click on the “Save And New” button.

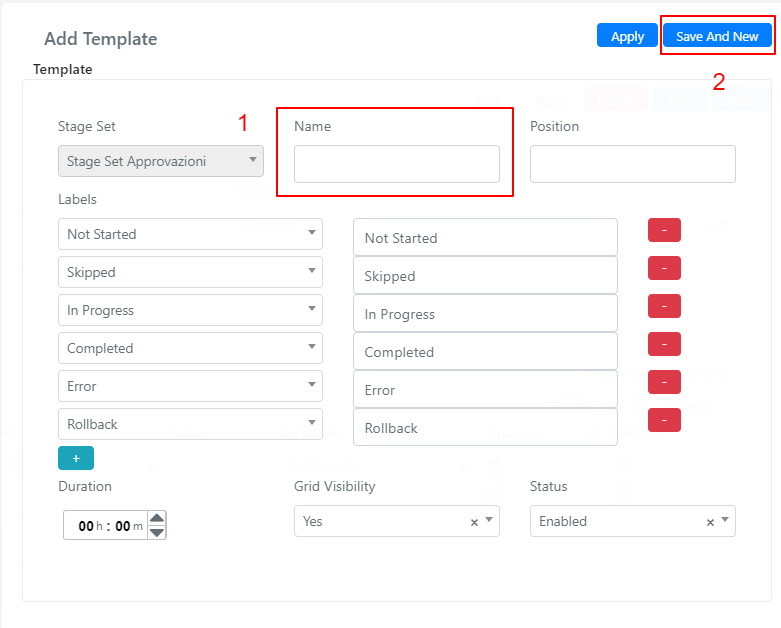
We will have to repeat this step for each stage we want to add.

For more information about stage sets and internships, please consult the page dedicated to Stage Sets by clicking on this link.

Once you have finished adding the stages we can go and click on the “X” button located in the upper right corner of the screen.

CONFIGURING A FLOW WITH MULTIPLE STAGES

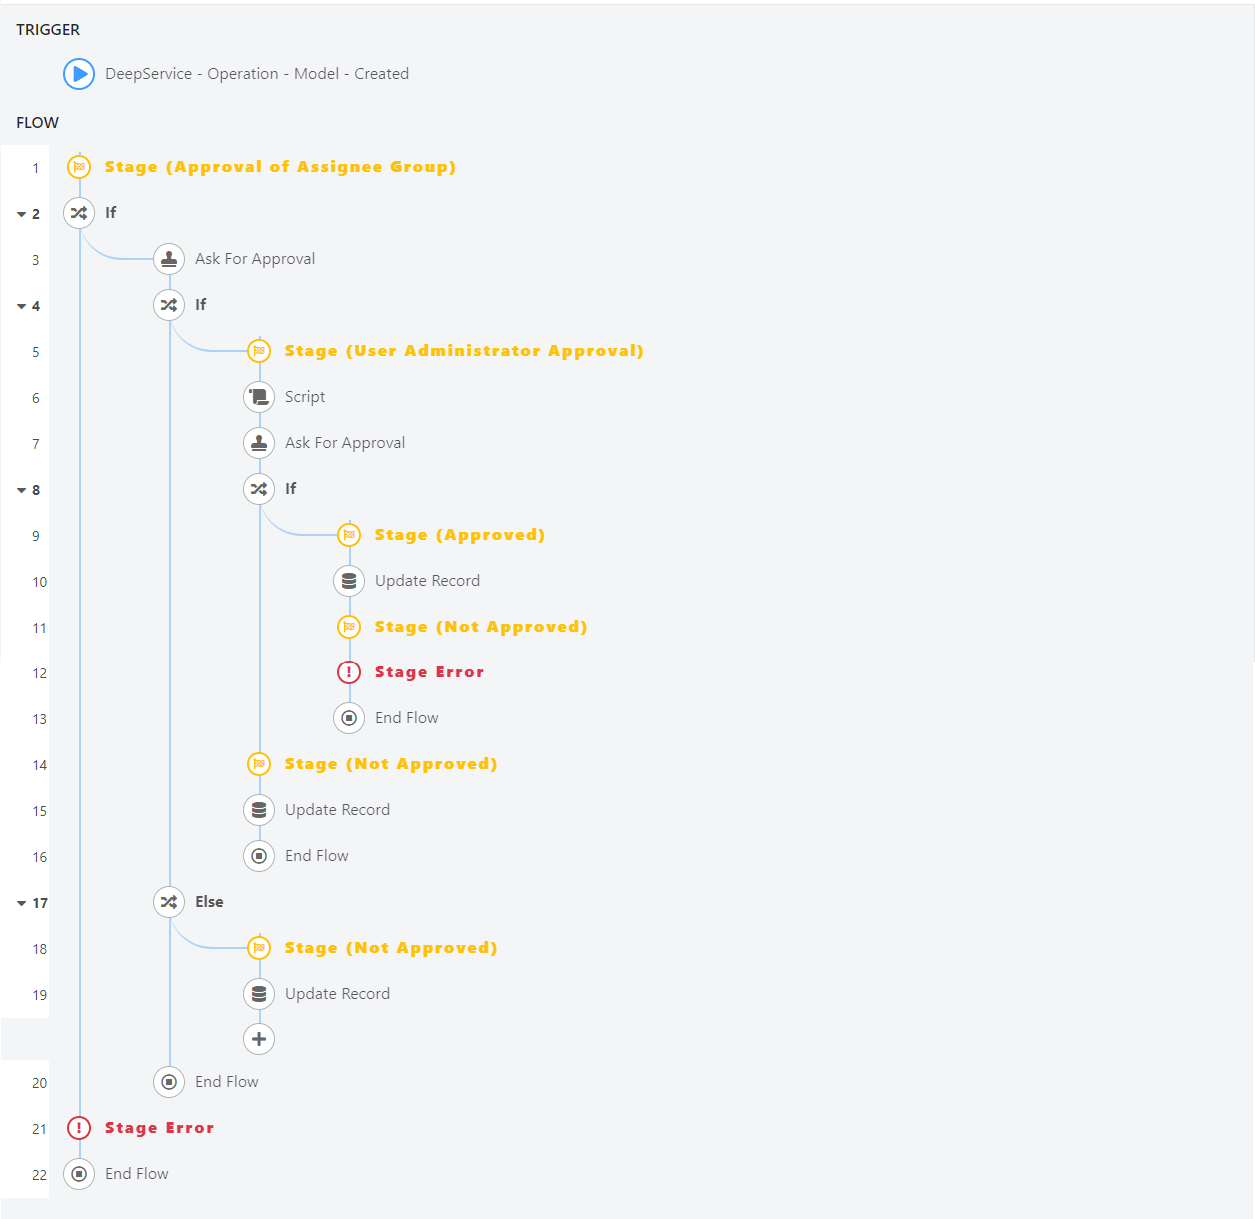
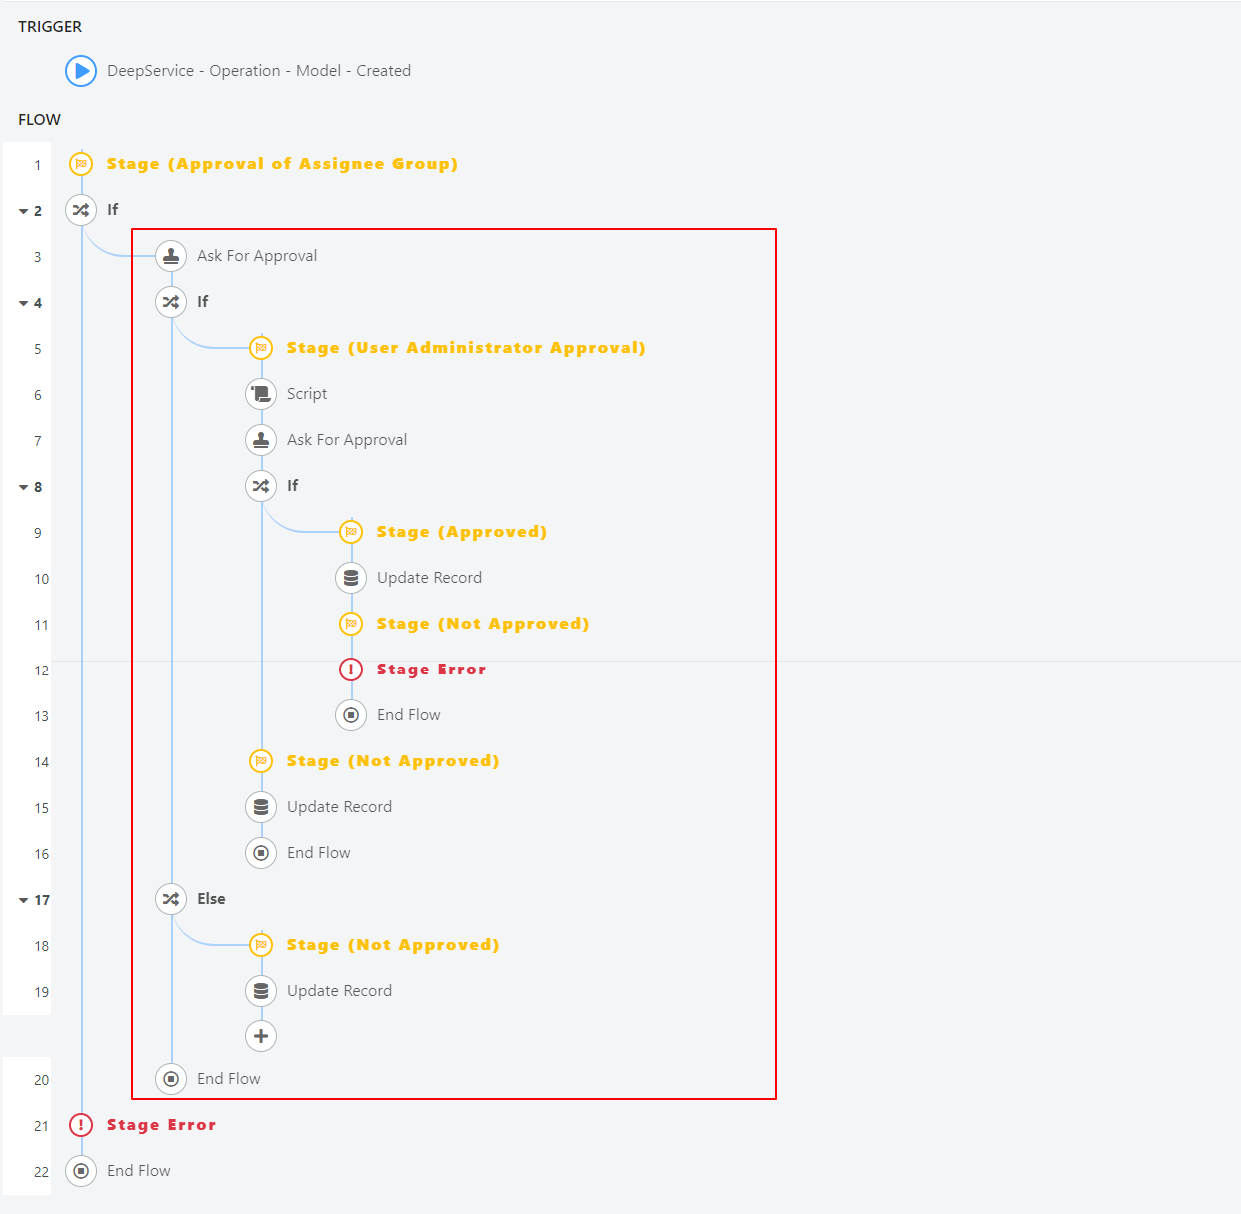
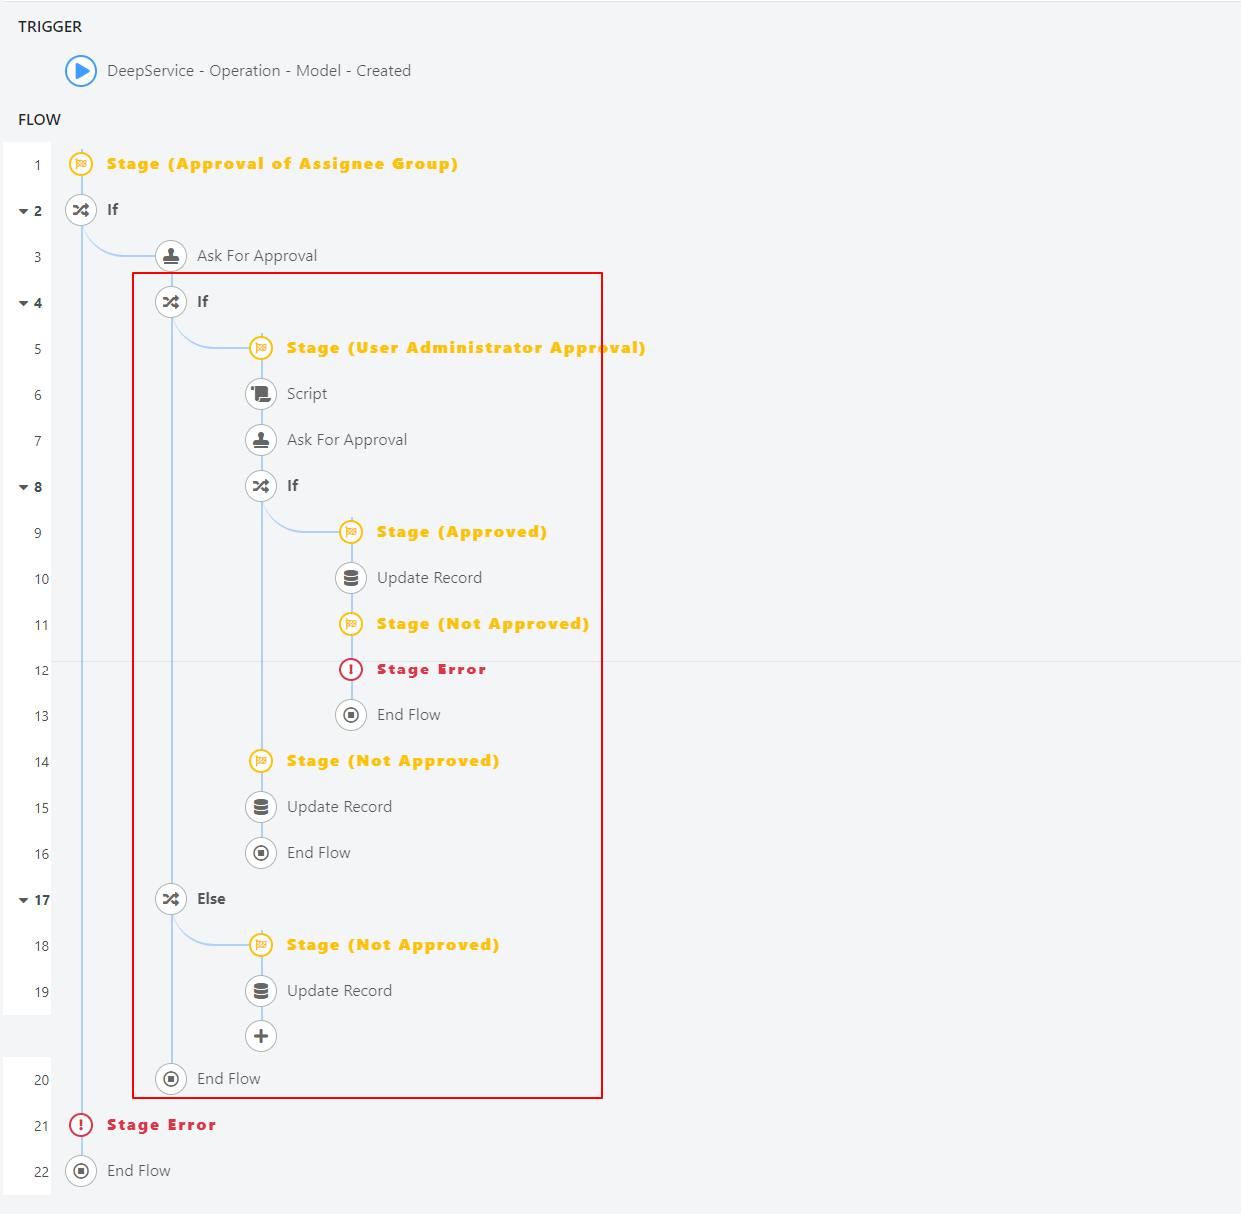
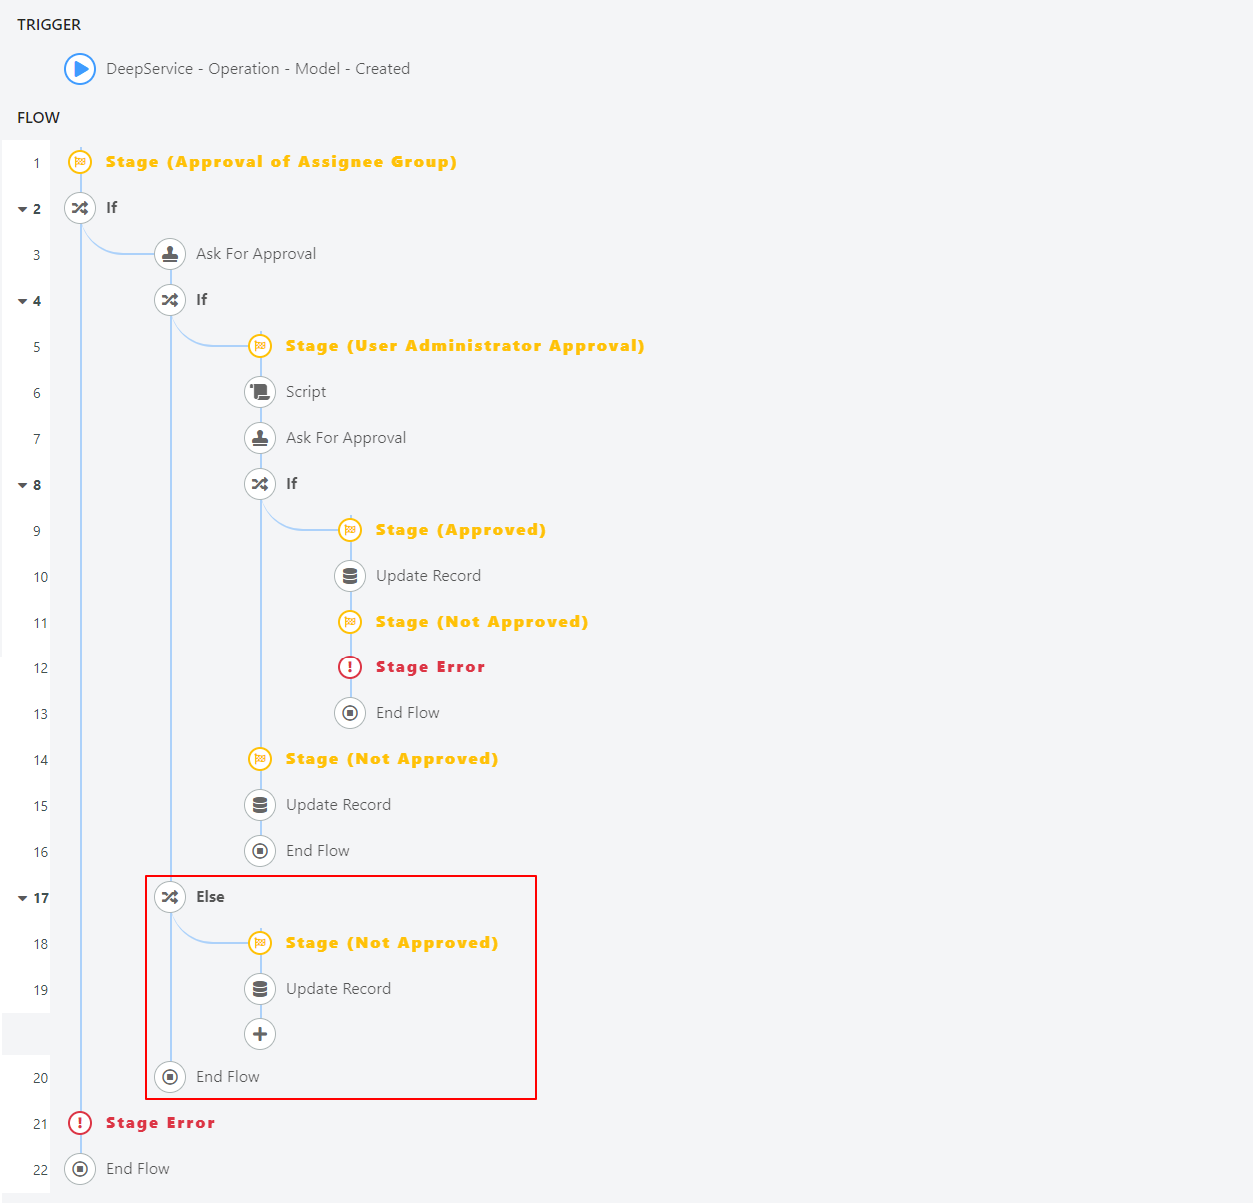
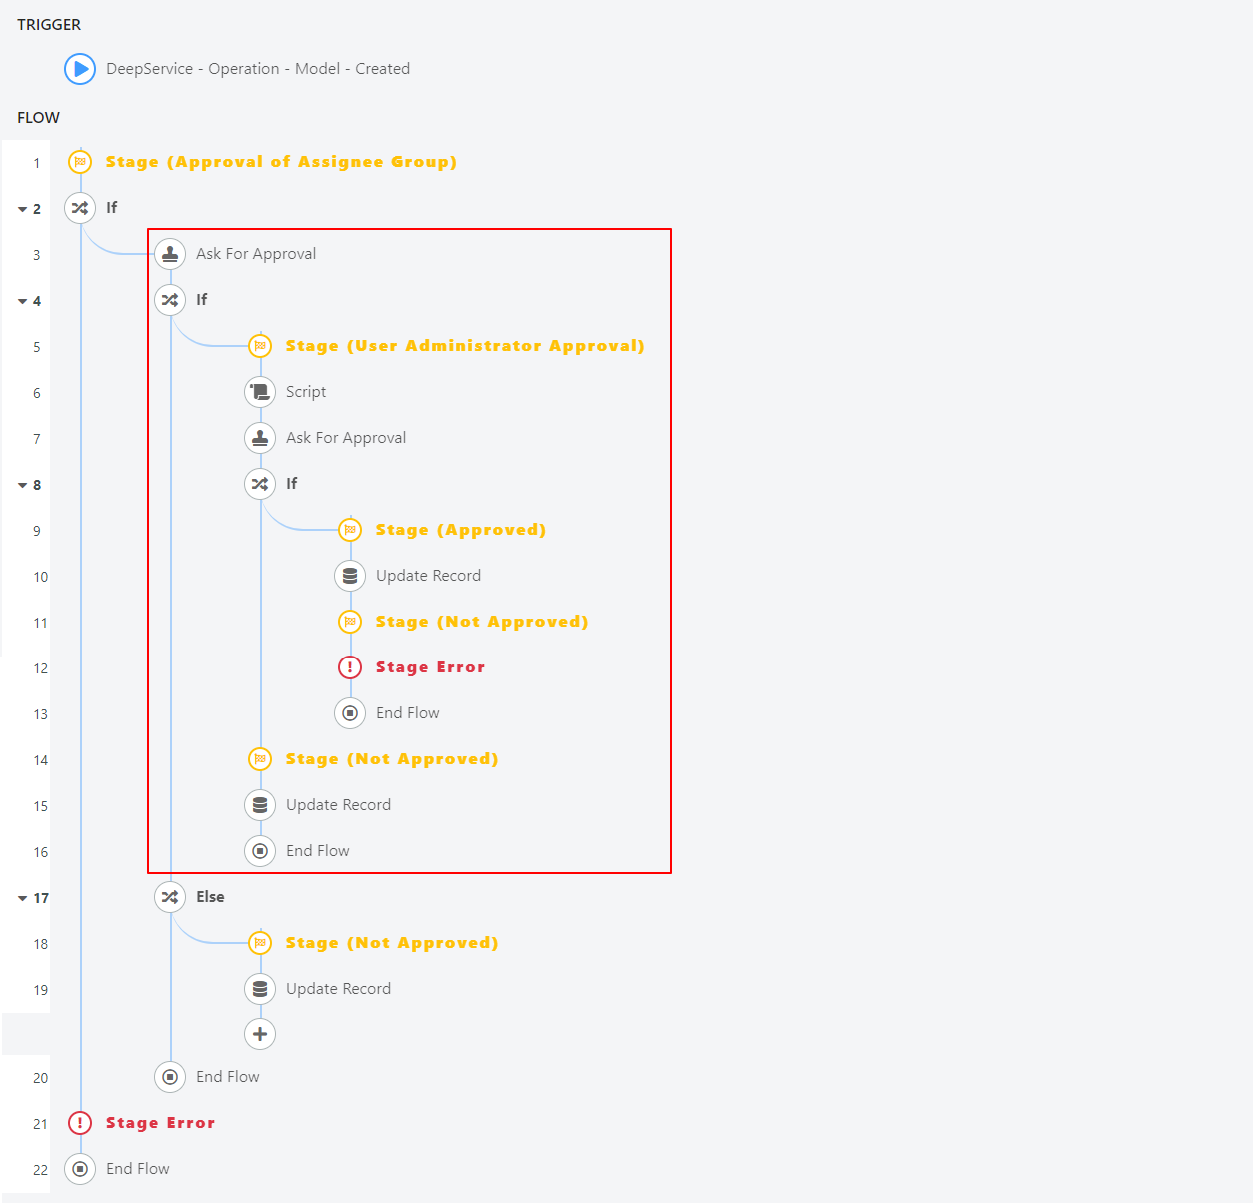
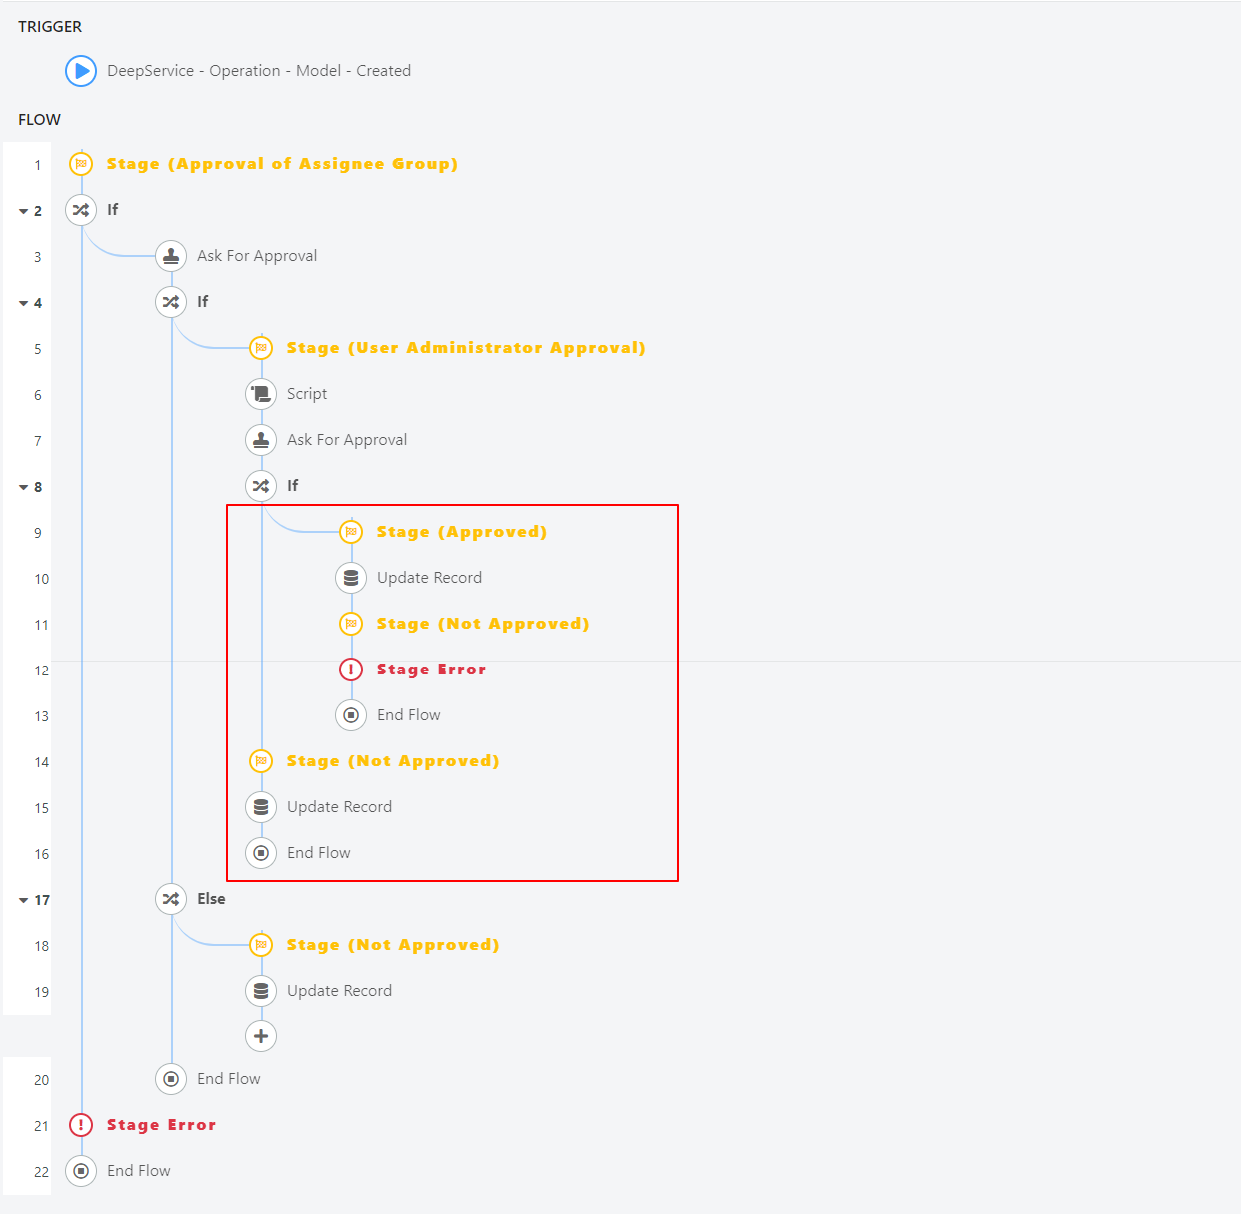
Below we will report the final result of the flow:

To do this you will need to go to the Flow à Designer menu.

Now you will need to click the NEW button in the upper left corner of the page:

And then on the word “Flow” that will appear below the button.

At this point the following page will open:

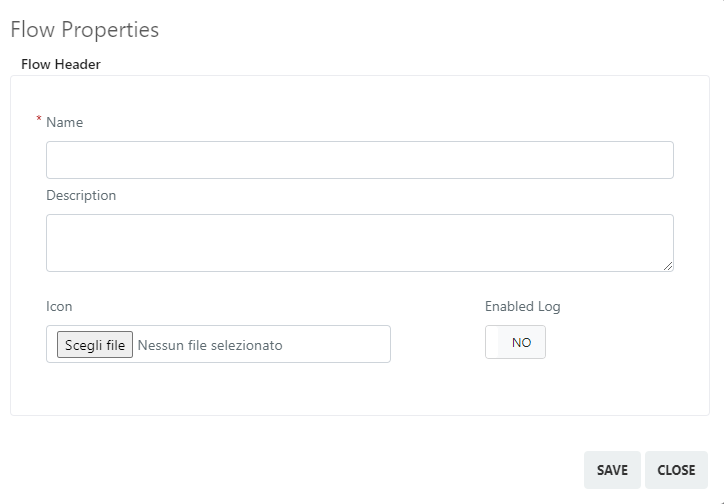
Below are the fields with their meaning:

  • Name, in this field we are going to define the name that this flow will have.
  • Description, in this field we are going to define the description that will have the flow
  • Icon, in this field we are going to define the icon that will have the flow
  • Enable Log, this toggle if set to you will enable the log in the flow.

Once you have configured the fields mentioned above you will need to click on the “Save” button.

Now the following screen will appear:

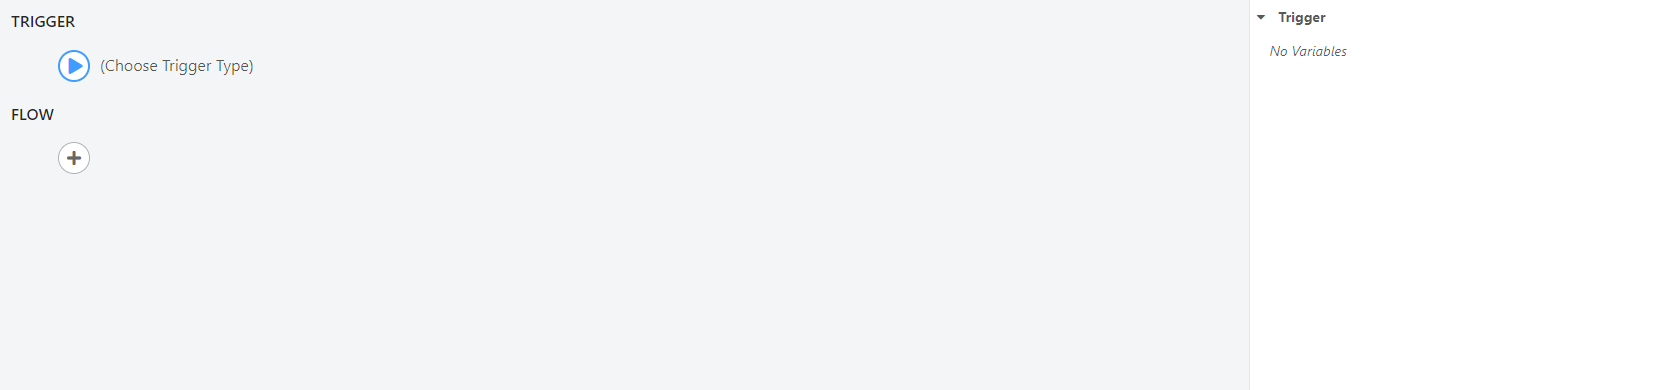
At this point we are going to configure the “Trigger” field as follows:

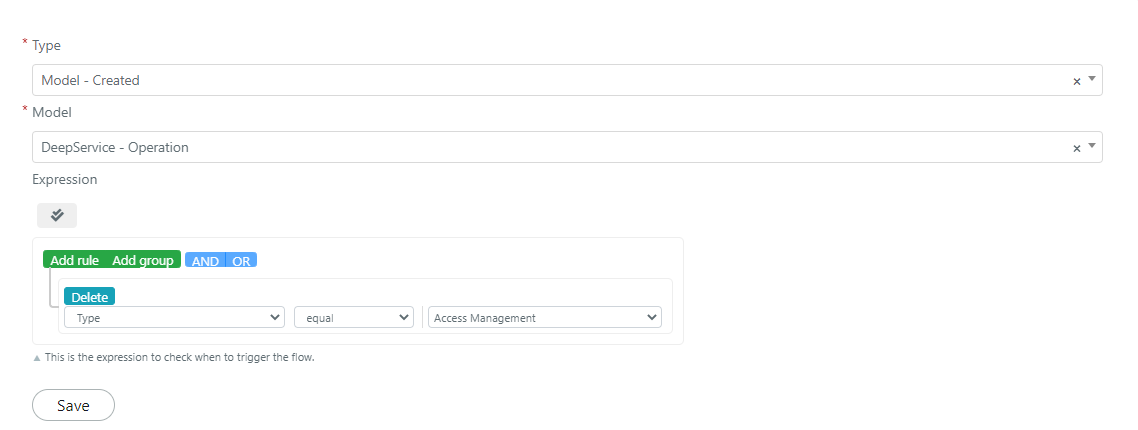
Now you will need to click on “Save” to save the block.

Before continuing the configuration of the flow, it will be necessary to import the stages created in the previous point of this guide, to do so we will have to click on the three dots placed in the upper right part of the page.

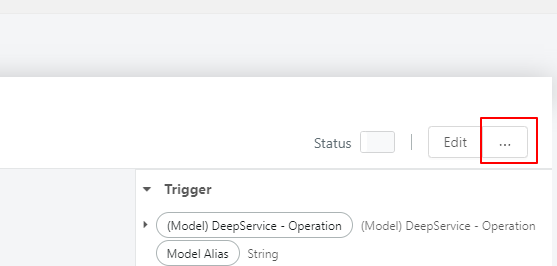
In the screen that will open you will need to select from the drop-down menu the Stage Set to import and click on “Import“.

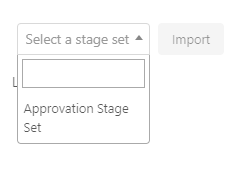
At this point, the stages set in the previous step of this guide will appear.

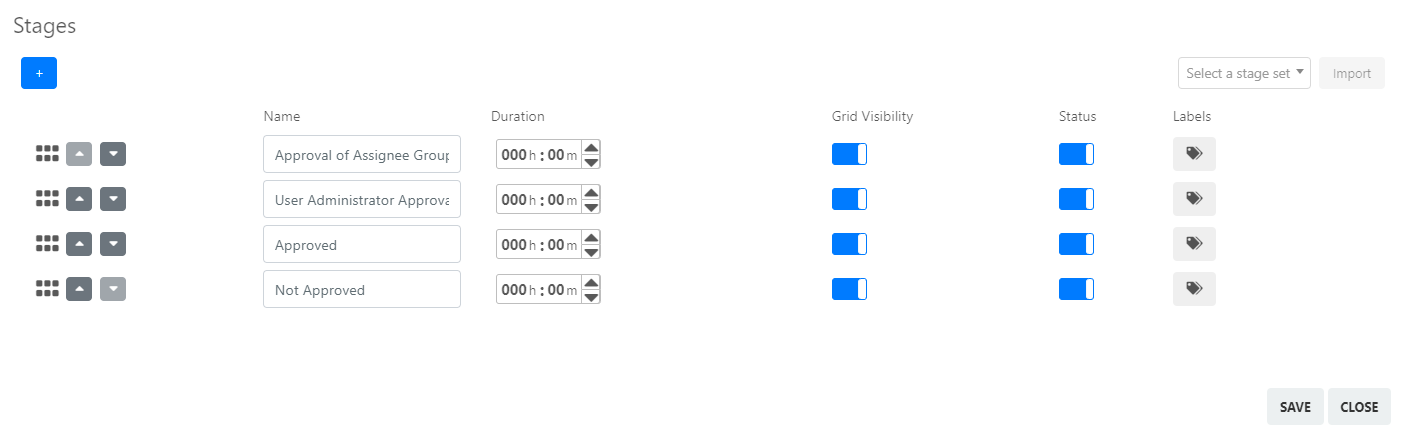
After clicking on the “Save” button, the stages will have been imported correctly.

At this point we will have to go and click on the button:

From the “Actions” section we are going to select a stage block that we will configure as follows:

ASSIGNEE GROUP APPROVAL

At this point in the article, we are going to make a first big distinction that is, we will differentiate the case in which there is an assignee group in the ticket and the case in which there is not.

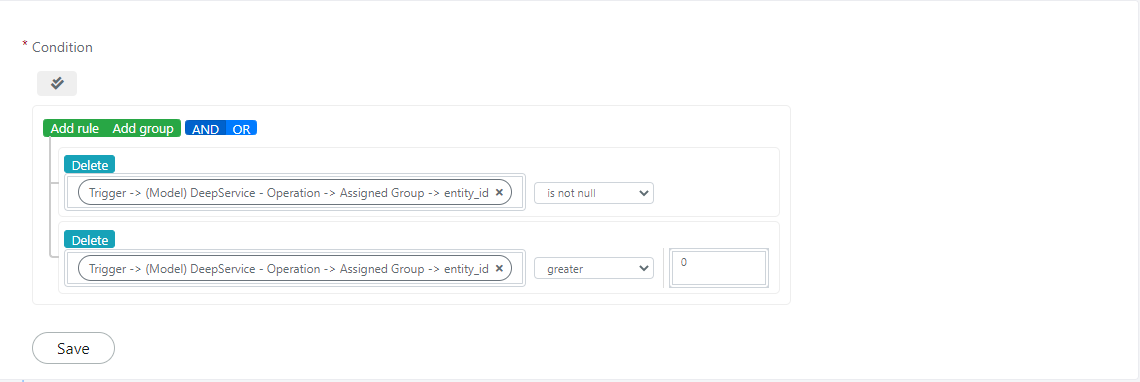
Next, we will have to insert an “If” block from the “Logic” section below the previous block, the if block will be configured in the following way to verify that the assignee group is set in the ticket.

CHECK IF THE ASSIGNEE GROUP IS NOT PRESENT

In the left branch of the “IF” block we are going to configure an “Else” block, which will be present in the “Logic” section.

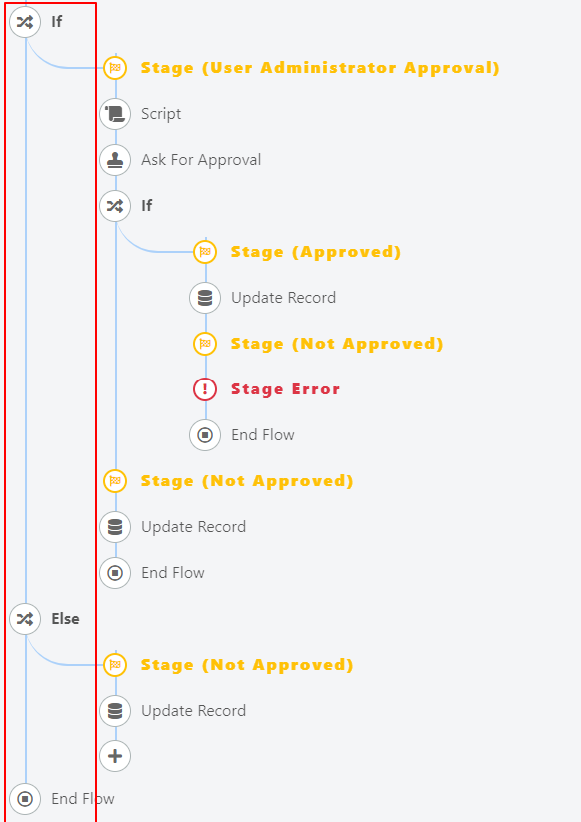
In the left branch we are going to insert an “End Flow” block.

CHECK IF THE ASSIGNEE GROUP IS PRESENT

In the left branch we will insert a “Stage Error” block and an “End Flow” block, in the right one we will have to insert an “Ask for Approval” block, from the “Actions” section.

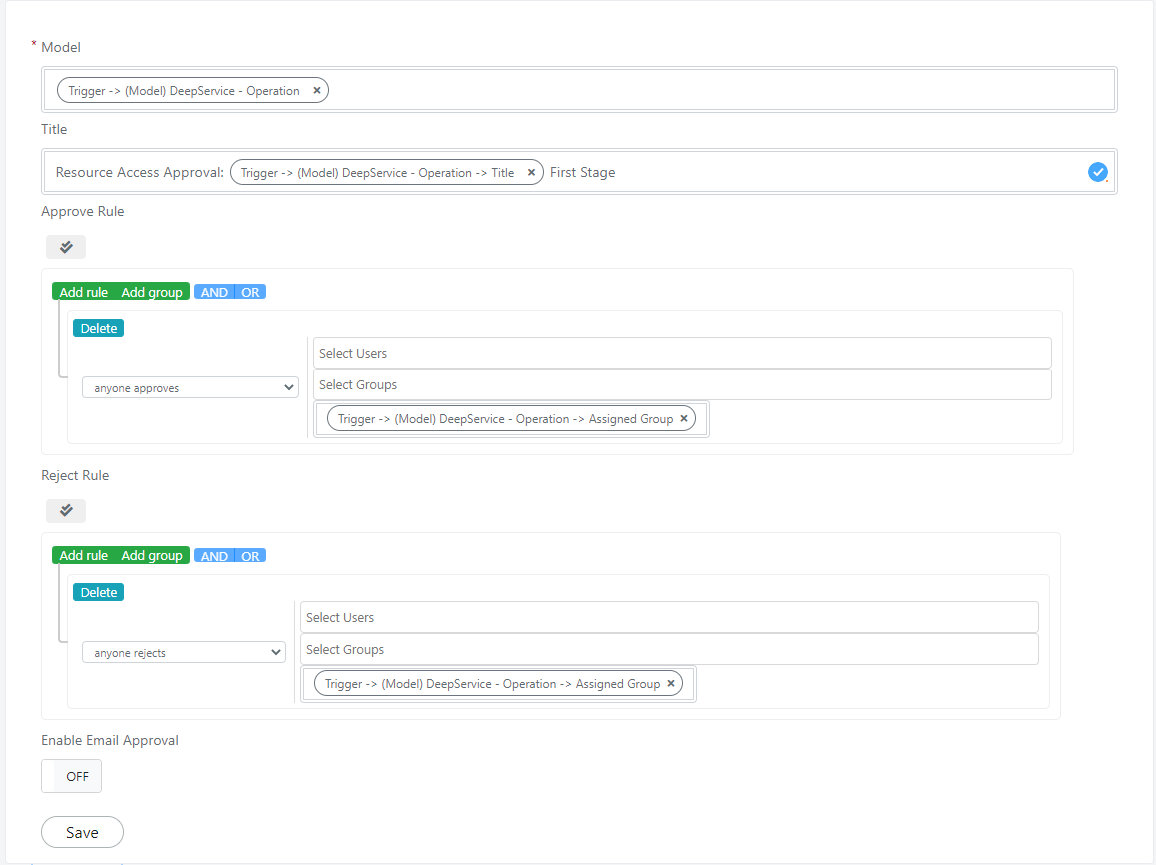
At this point we are going to configure the “Ask for Approval” block like this:

CHECK FIRST APPROVAL

At this point of the flow, we will insert an if block that will check if the approval has been accepted or if it has been rejected.

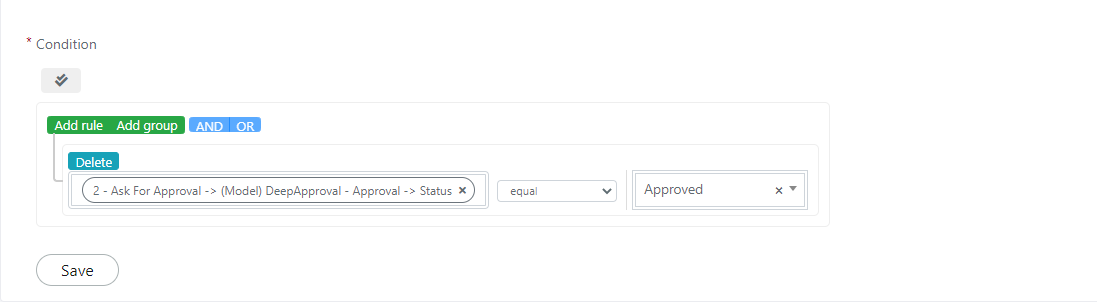
The if block will be configured as follows:

Below this IF we will have to go to configure in the left branch an Else block and in the right one instead, we will configure the procedure to continue the approval, as discussed in the following points of this article.

ELSE BRANCH CONFIGURATION:

In the left branch of the “if” block we will instead add an “Else” block, we will then insert a Stage block that will be configured in the following way:

Below the previous block we are going to insert an update record:

After this block, remember to insert an End Flow block.

IF BRANCH CONFIGURATION:

In the right branch of the “IF” block we will instead add a “Stage” block, which will be configured as follows:

Below the block a previous we are going to insert Script block that we will configure as follows:

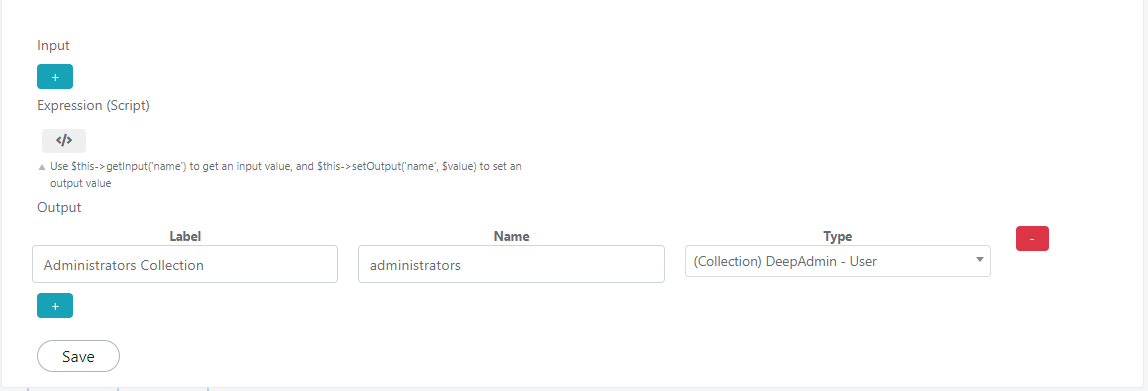
In the “Expression (Script)” section we will insert the following code:

				
					$usersCollection = Deep::getResourceModel('deep_admin/user_collection');
$usersCollection->getSelect()->join('admin_role', 'main_table.user_id = admin_role.user_id', [])
                             ->join(['ar2' => 'admin_role'], 'ar2.role_id = admin_role.parent_id', array('user_type'));
 
$usersCollection->addFilterToMap('user_id', 'main_table.user_id');
$usersCollection->addFieldToFilter('ar2.user_type', ['eq'=> 'ADMIN']);
$this->setOutput('administrators', $usersCollection);


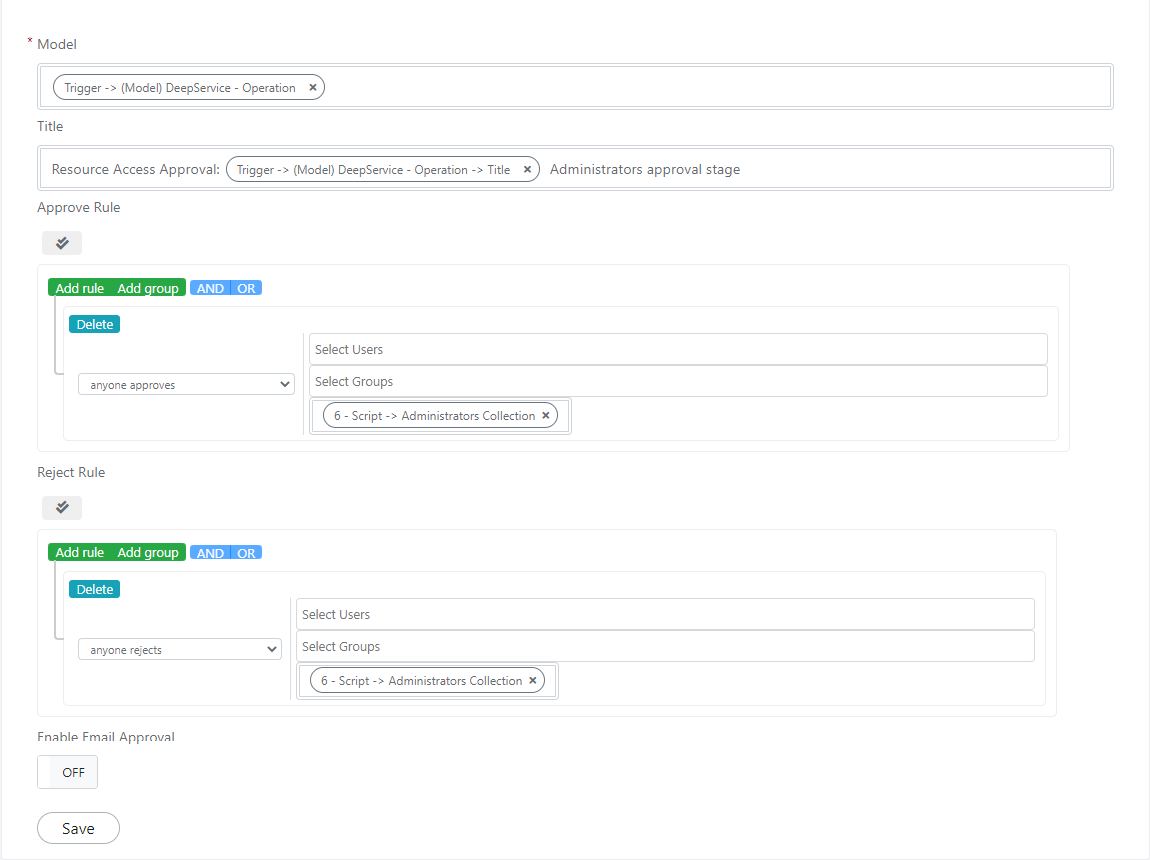
After the scripting block we must go to insert a new approval, through a “Ask for Approval” block, which will be configured as follows:

CHECK SECOND APPROVAL STATUS

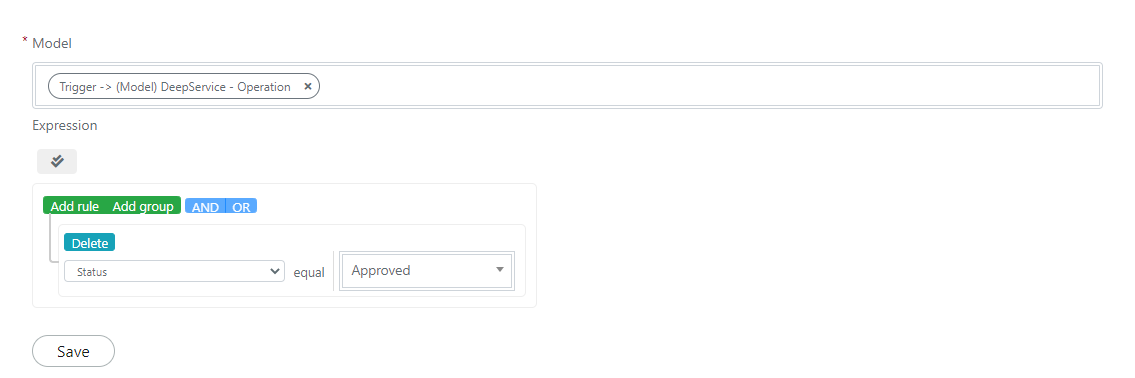
At this point we will have to go to configure an if block that will allow us to check in which state the approval is.

To do this we will have to add under the previous block “Ask for Approval” a block “if” configured in the following way:

Below this if we will have to include in the right branch the case in which the approval was successful and in the left branch the case in which it was rejected.

APPROVED ACCEPTED BRANCH CONFIGURATION

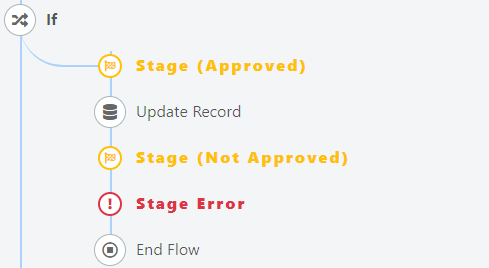
In the right branch we are going to figure a block “Stage” configured as follows:

Then we will insert a block “Update Record” which will take care of changing the status of the ticket that gave rise to the flow, to do this we will insert the following configuration in the update record block:

As a graphic precaution for users in this flow it was decided to set the “Error” status on the “Not approved” stage in case of approval.

To do this you will need to Add a Stage block configured as follows:

And then insert a “Stage Error” block, which does not require configurations.

CONFIGURATION BRANCH APPROVAL REJECTED

In the left branch of the if block that controls the second approval, we are going to insert a Stage block configured as follows:

And finally, an “Update record” block to change the status of the ticket on which the flow is being executed:

Before you can see the effects of the flow you will need to enable the flow by setting the toggle “Status”.

At this point, the flow will be up and running.

Was this guide helpful? Yes No

Share this Doc

Multi Stage Flow

Or copy link

Clipboard Icon
CONTENTS
Leaf Illustration

Deepser srl
Via Luigi Dalla Via 3/B,Torre A, piano 7, int. 12
36015 Schio (VI), Italy

© Deepser. All right reserved.

Privacy Policy
Terms of Service