Flow Designer
By definition, a workflow is the sequence of steps involved in moving from the beginning to the end of a working process.
The module that allows you to create a workflow is the “Flow Designer” module.
After opening your Deepser Backend portal, by clicking at “Flow” module and “Designer”

And the following screen will open:

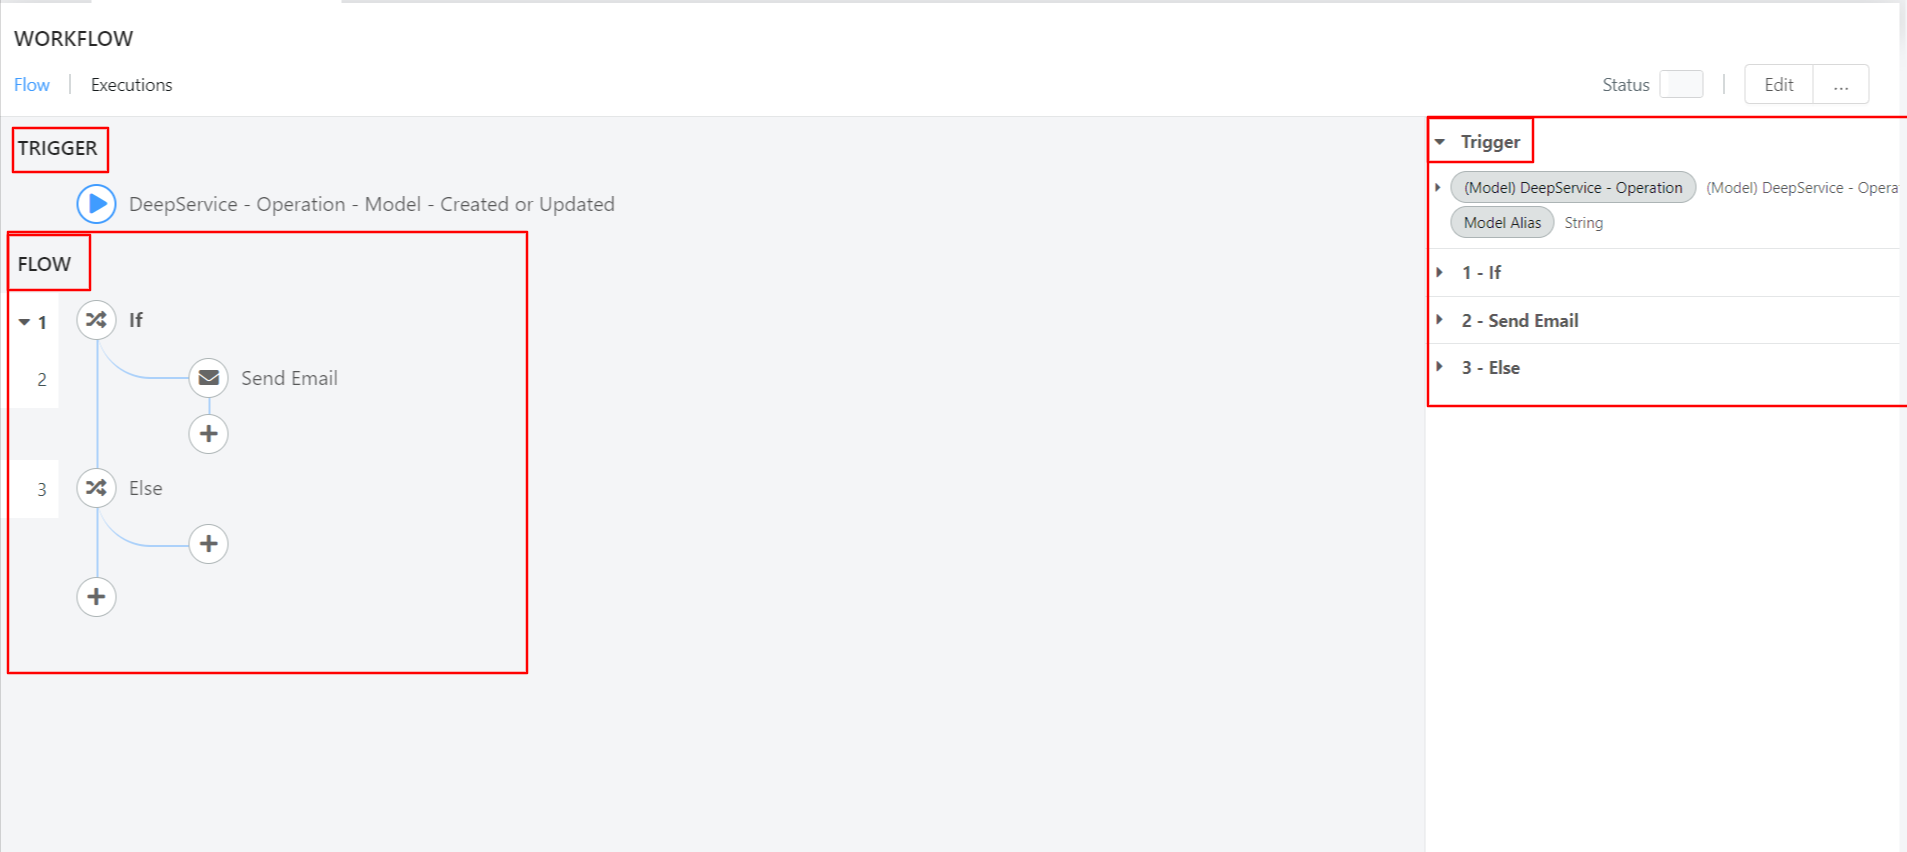
The Flow Designer is where you can create a workflow.
In the upper section we can find the TRIGGER section which represents the starting point from which the approval process stars running.

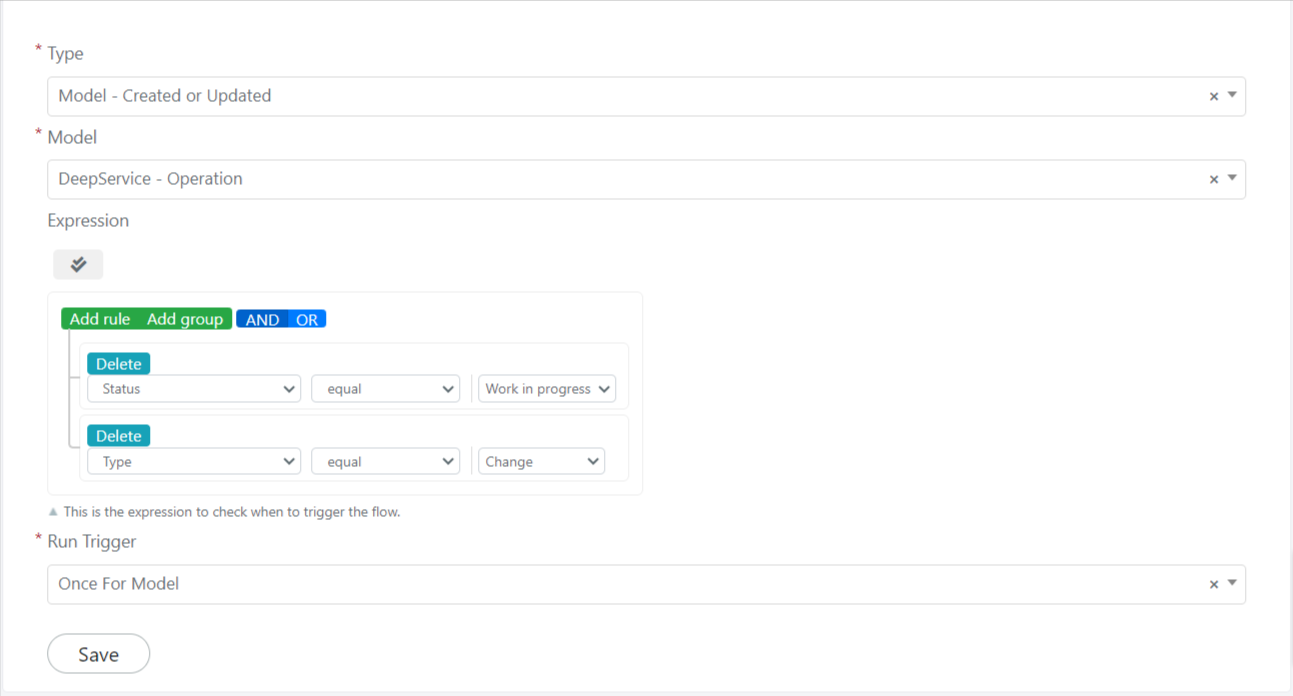
In our example, your supervisor wants that an approval process starts when a ticket (or Operation) changes its status into “In Approval”. In this case, the trigger will be the change of the status.
In the below section, inside a red square, we can find the FLOW section which represents the approval process itself.
To build the FLOW section, located at the right, there are variables that can be dragged and dropped from right to left inside the trigger section and inside the flow section.

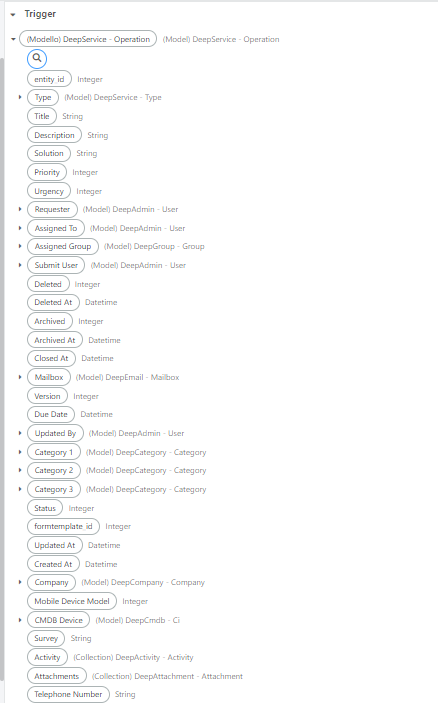
Therefore, it’s simple to choose visually which set of variables you need in order to create your process flow.
Located at the top right, there are
- button “Status”: enables or disables the flow process.
- button “Edit” : shows you the flow properties.

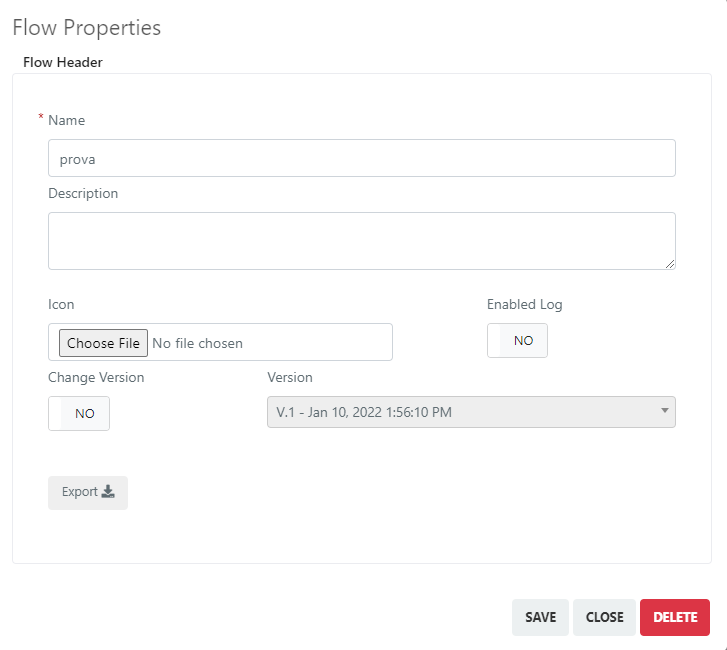
By clicking the button “Export”, the following screen will open:

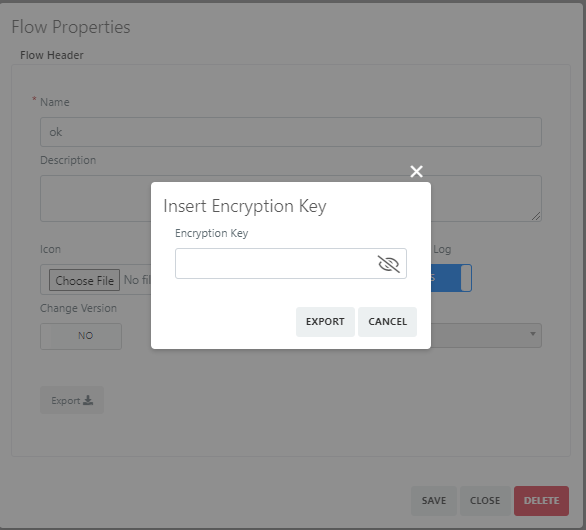
By inserting an encryption key, you can export in a .txt file.
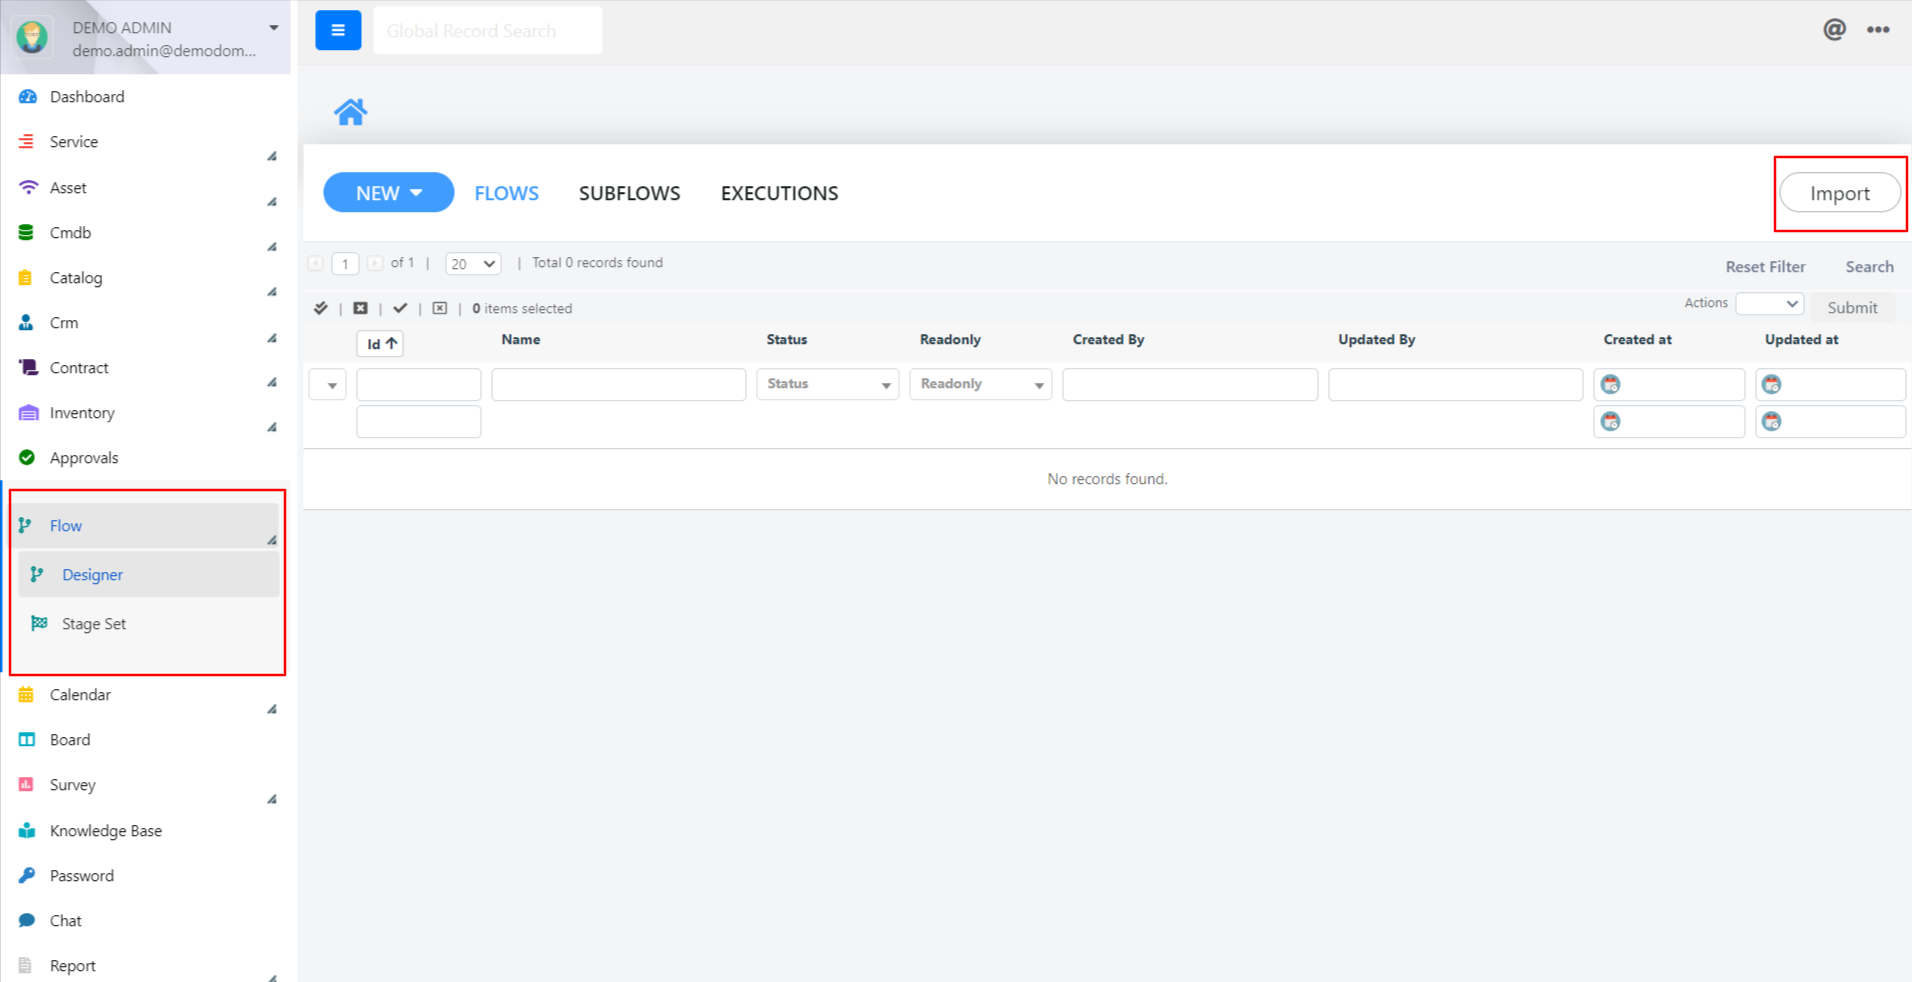
If you want to use the property “Import”, the button “Import” is shown in the main page of the Flow Designer Module (see the first image).
In the next article we are going to explain how to configure the TRIGGER section.
Flow duplication
The Deepser application provides all users with the capability to duplicate an existing flow. This functionality is particularly useful when there is a need to replicate a pre-configured process or workflow, saving time and ensuring consistency across different operations. The duplication process can be carried out manually through the Flow module within the application interface. By following a series of straightforward steps, users can create a new flow based on an existing one, preserving its structure, configurations, and logic. In the following sections, each step required to duplicate a flow will be explained in detail, guiding users through the entire process to ensure a smooth and accurate replication.
- Begin by accessing the existing flow that you wish to duplicate.
- Once inside the flow, locate the Edit button in the top-right corner of the screen (next to the Status button).
3. Click the Edit button to open a new window. At the bottom of this window, you will find the Duplicate button.
4. Click the Duplicate button to open duplication options:
a. New Name
b. Duplicate as Subflow
c. Duplicate also Subflows
d. Version
5. Flow Duplication:
a) To duplicate the flow as a standard flow, leave the Duplicate as Subflow option set to its default value of No, then click the blue DUPLICATE button to proceed.
b) To duplicate the flow as a Subflow, change the Duplicate as Subflow option to Yes, and then click the blue DUPLICATE button to complete the process.
Log Action
If you want to display a message inside your workflow, all you need is the action “Log Action” inside your workflow. After opening your workflow process inside the “Flow” module, to add the action “Log Action” inside the FLOW section:
Then the following screen will open:
For example, inside our workflow we want to display the message:
“If you are reading this message it means that the new ticket is Created.”
This message will be visible after the execution of the workflow inside the “Execution” tab across the log section. The log file can be also downloaded.
Note: Logs will be visibile only if the flag “Enable Log” inside the Flow Properties is enabled (see article)
Another method for creating a log involves using a custom file. Under the log node, there is a File command where you need to enter a value—this value will serve as the name of the log that appears under System > Tools > Log > System Log. To illustrate this method, we’ve provided an example using the file name “test_to_create_log”.
After creating the ticket, navigate to System > Tools > Log > System Log, where the new log will appear with the same name as the file shown in the example.
When accessing the log, the message entered in the Log section from the first image will be displayed.
Create Variable
A new node has recently been added to the flow, designed specifically for variable assignment. This logic node, named “Create Variable,” enables users to create a new variable and assign a value to it. The value can either be a fixed, predefined input or the result of a previous operation or process within the flow. This functionality provides greater flexibility and control when managing data throughout the workflow.
Before creating this node, you must complete the following four mandatory fields:
Field | Note |
Label | Specifies the display name of the variable, which will appear in the right section under trigger variables. |
Name | Defines the internal name of the variable. |
Type | Determines the variable’s data type based on your use case. There are 9 available types, including integer, string, boolean, datetime, and others. |
Value | Assigns a value to the new variable, selected from the options in the right section under the trigger. |
Delete Record
If you want to delete a record in your workflow process, all you need is the action “Delete Record” inside your workflow.
After opening your workflow process inside the “Flow” module, to add the action “Delete Record” inside the FLOW section:
In our example, we choose the model Operation in which we want to delete the record (dragged and dropped from the right section inside the trigger variables).