

ITAM Agent Installation
To install the Agent go to the Deepser back-end, from the menu access the Asset>Device section, click on the “Download Agent” button at the top right (as shown in figure).

The installer will be downloaded.
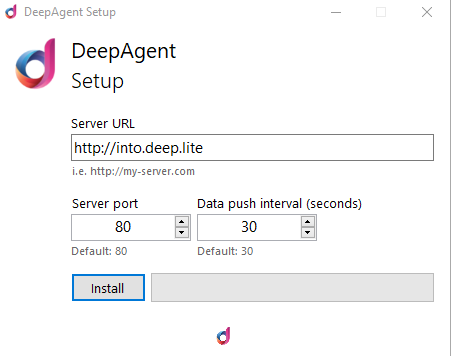
All the information necessary to configure communication with the Server (URL, port) is contained in the name of the executable.
Run the installer (requires Administrator privileges) and, if necessary, modify the pre-filled connection parameters; finally click on the install button to start the installation.
Once the installation is complete, on the device desktop, an icon named ‘Portal’ and a new start menu entry named ‘DeepAgent’ menu will appear.
By clicking on the ‘Portal’ icon you will be redirected to the opening page of a new Ticket where the device in use will be automatically set in it. The proposed type of Ticket created through the Agent can be changed in the Portal configuration section.
To ensure installation has taken place correctly and there are no communication problems, go to the Device section of the Asset module from the Deepser back-end menu (Asset>Device).
In this section, the record representing the device on which the Agent has been installed will be displayed.
To access the Agent user interface, click on the ‘DeepAgent’ entry added to the Start Menu.
In the first tile, the one with an icon representing an “eye”, you can check the status of the ‘DeepAgent’ service.
In the second tile, the one with an icon that represents a “wifi” network connection, there is the interface for converting an Agent into a Remote Collector (the conversion process will be discussed in the dedicated section).
